iOS Collaboration Mobile App - User Guide - English
Starting from iOS app version 7.6.35419, the access to Mobile Collaboration is allowed only for users with Essential License and higher. PBX admin needs to assign a corresponding license in WMS -> Users (consult the Guide for instructions).
Wildix Collaboration Mobile application provides access to Wildix Unified Communications from your iPhone, iPod touch and iPad.
iOS App Version: 8.13.55942
To check the current version, go to iOS changelog: https://www.wildix.com/new-releases-and-updates/collaboration-ios-app-changelog/
Updated: September 2023
Permalink: https://wildix.atlassian.net/wiki/x/9yDOAQ
Before using the app
Requirements
To use this application, you must be a user of a Wildix system and have fast internet connection that doesn’t block VoIP traffic.
Ports to open: Ports used by Wildix services
Use of App outside the office network: the first time you make a login from the local network, the PBX sends the settings of the public network to the application (the same for connection from the public IP). The app tries to connect using the first IP and if it fails, it moves to the second one, thus ensuring the connection both when you are in or outside the office network.
Requirements iOS:
WMS version 5.01 or higher
iOS version 9 or higher
minimum supported device - iPhone 5 (5, 5S, 5C)
Push notifications
Thanks to push notification, the app no longer needs to run all the time. Once you receive a call / a text, the app “wakes up” in the background, even in case the app was closed.
To deactivate access to Presence and SIP server and to stop receiving notifications, you can set the status to Offline or log out from the app. Read the chapters Status and Log out for more info.
NOTE: The latest Apple requirements for iOS 13 SDK change the behavior of push notifications compatibility. After upgrading the app at least to v. 8.0.45765, a user needs to open it to update a new push subscription. Otherwise, all non-call push notifications (chat message / missed call message) are sent to the app as a call containing own user caller name.
The sync between read chat messages in Collaboration and the app is currently disabled. In order to remove push notifications that were received for group chat messages, open the app (this behavior will be improved in the next releases)
After re-login to another PBX without correct logout from the previous PBX, a user can still receive push notifications (chat / call / missed call) from the previous PBX as a call containing own caller name, non-call push notifications (chat / call / missed call) are sent to the app as “Unknown” call
to disable these notifications, log in to a previous PBX and perform logout again. A warning notification with extension and PBX domain is displayed if this situation occurs
to remove push subscriptions from PBX: access PBX via SSH as root and run the command push_remove EXT where EXT is user extension, for example, 123
Read about push notification: https://blog.wildix.com/what-is-push-notification-for-mobile-apps/.
Sync of enterprise phonebooks
Sync of enterprise phonebooks is not necessary: live search in PBX phonebooks is supported directly from Dialpad.
- Go to iPhone Settings -> Passwords & Accounts
- Select Add Account
Select Other
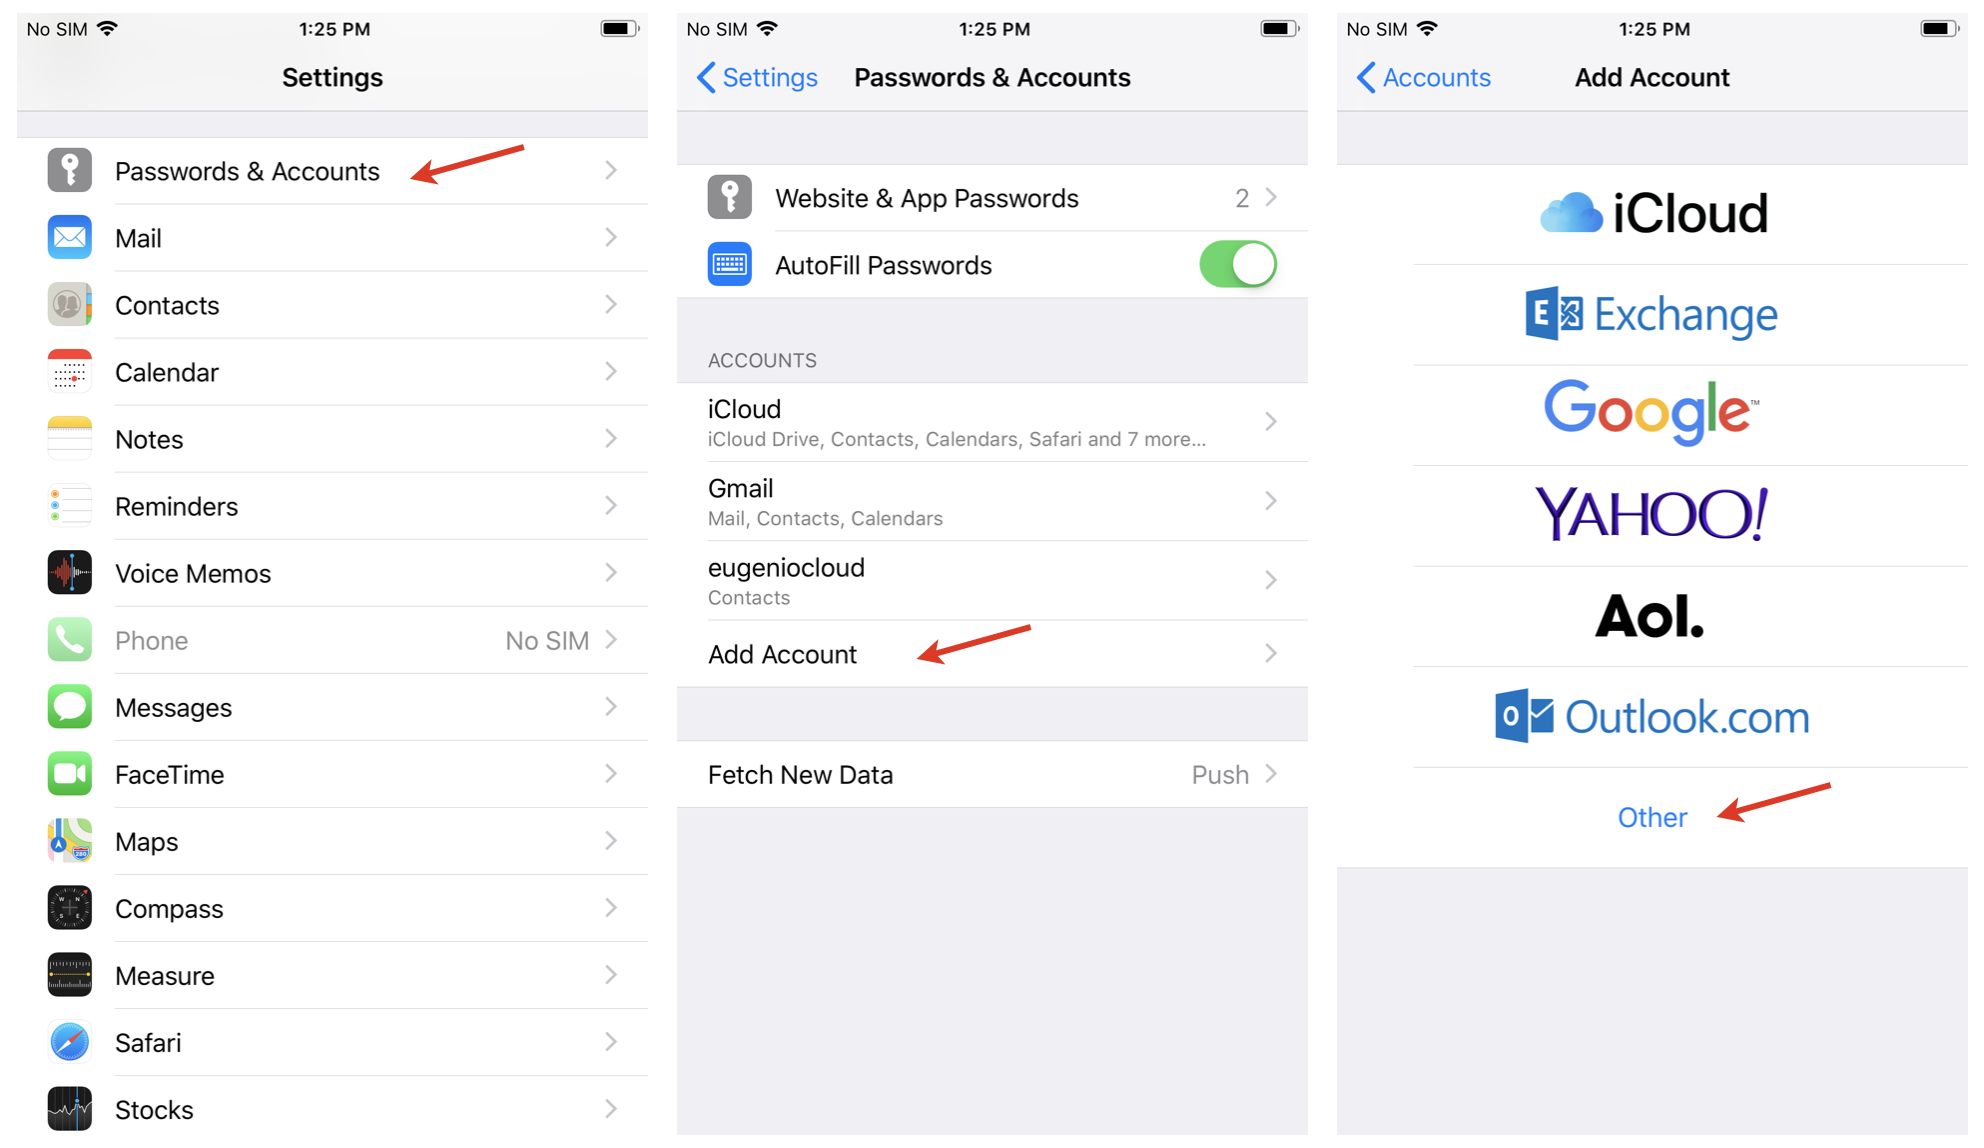
- Select Add CardDAV Account
Enter the Server name (PBX domain name or IP), User name, Password and Description
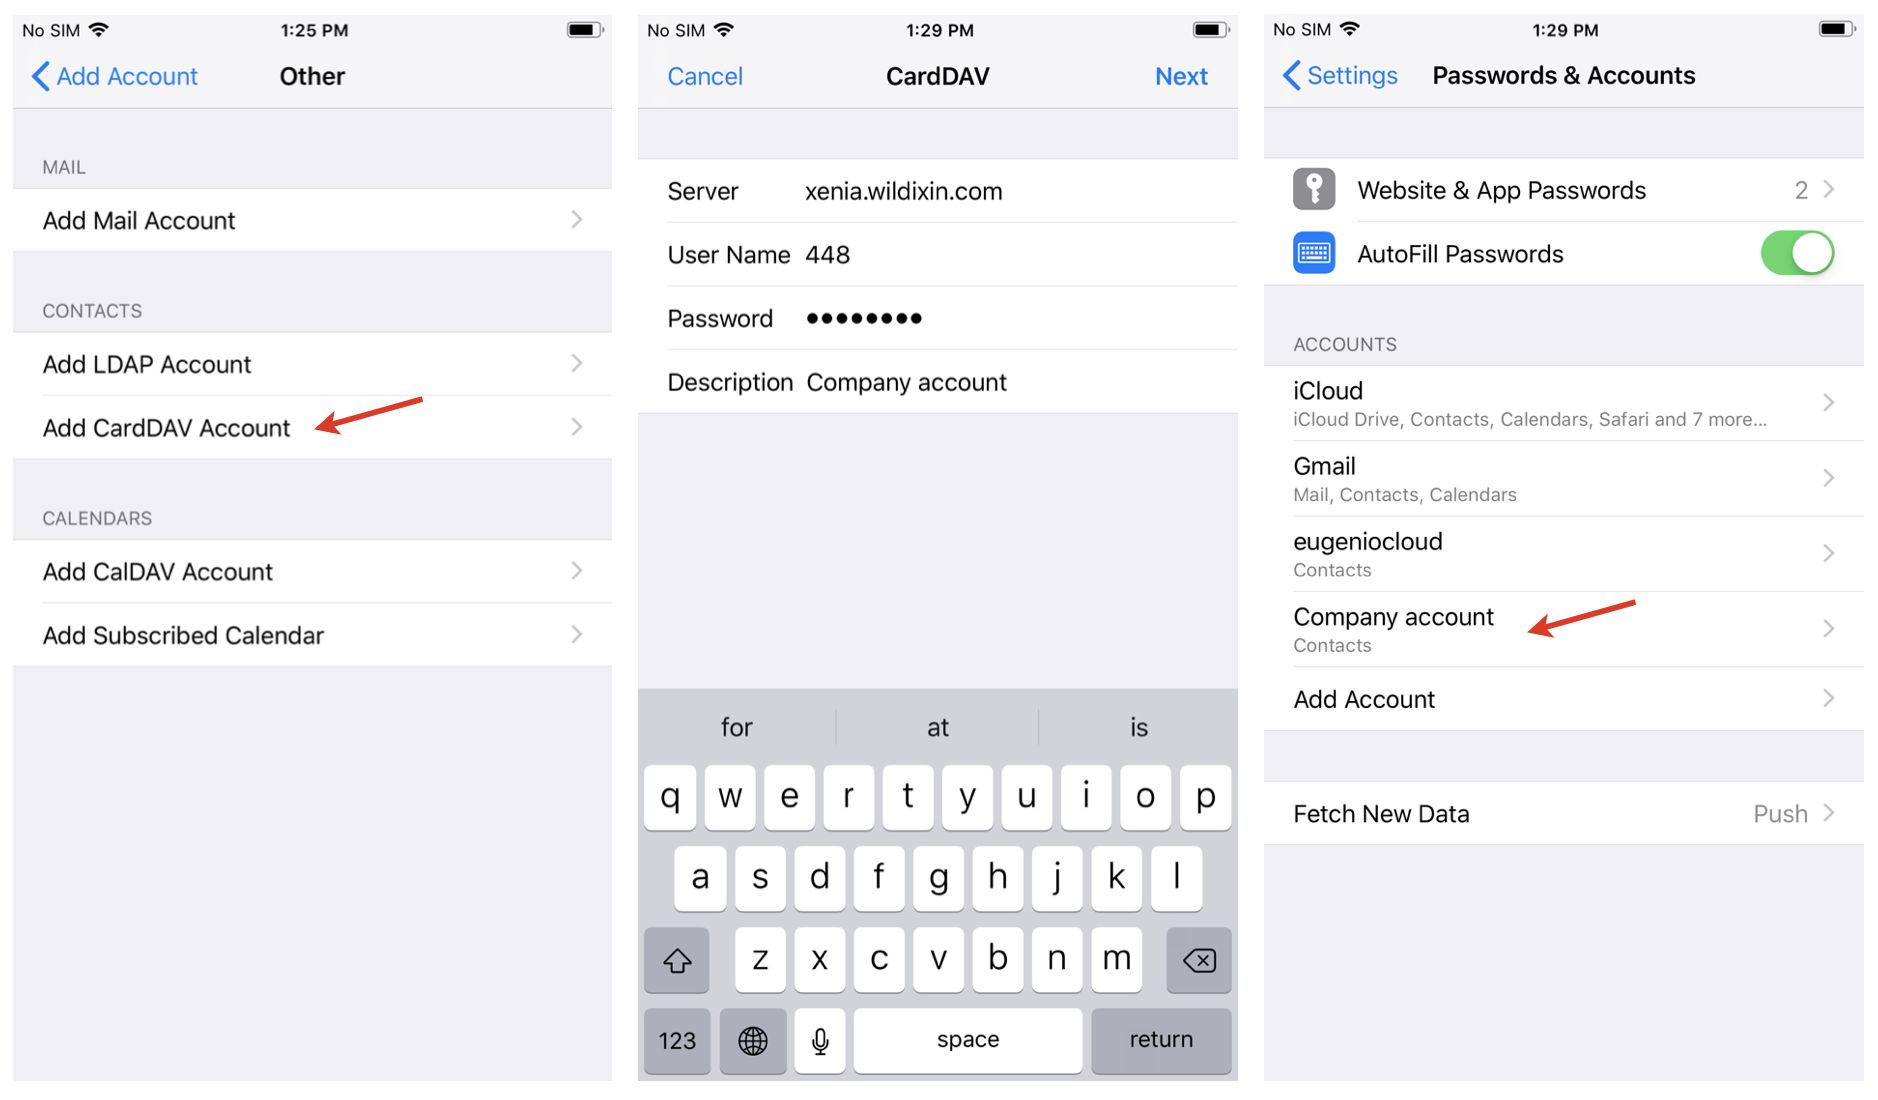
Now all your PBX contacts appear in your iPhone phonebook. Go to iPhone Phone -> Contacts and select the groups that you wish to be displayed in the phonebook of your iPhone.
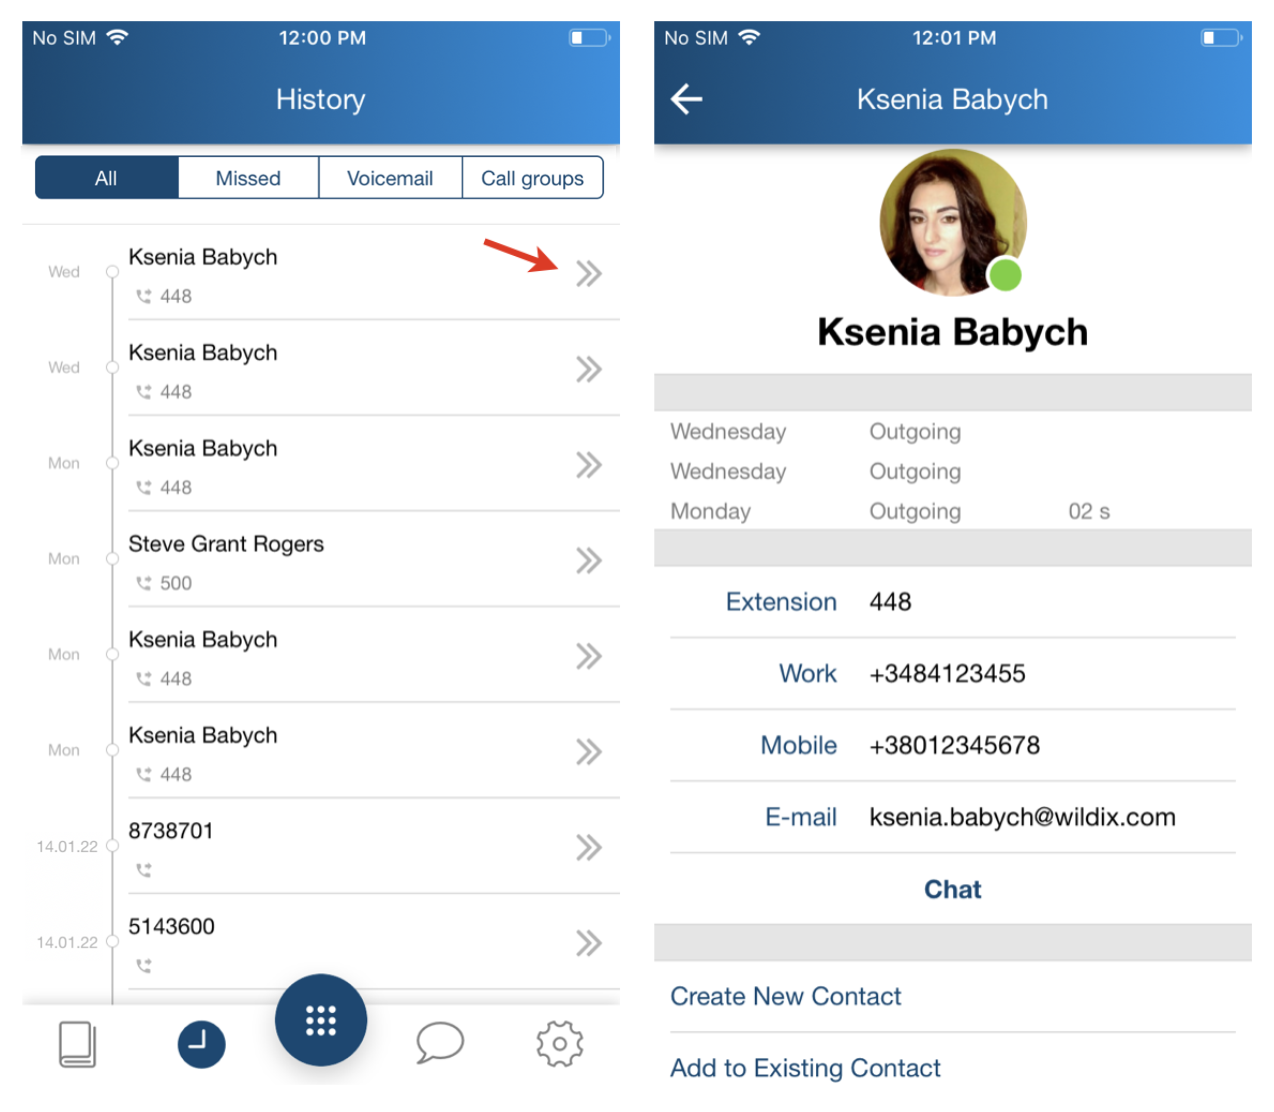
Note: It is possible to save contacts directly from History:
- Go to History
- Tap the double Arrowhead icon to view user contact details
- Select one of the options: Create New Contact / Add to Existing Contact
Login
Launch the app:
- Domain: PBX IP or domain name
Note: you can enter the PBX name, wildixin.com domain is added automatically.
User name: Extension / User name / Email address
- Password: WEB password of a user for access to Collaboration
Or
You can use Google/ Office 365 credentials for single sign-on.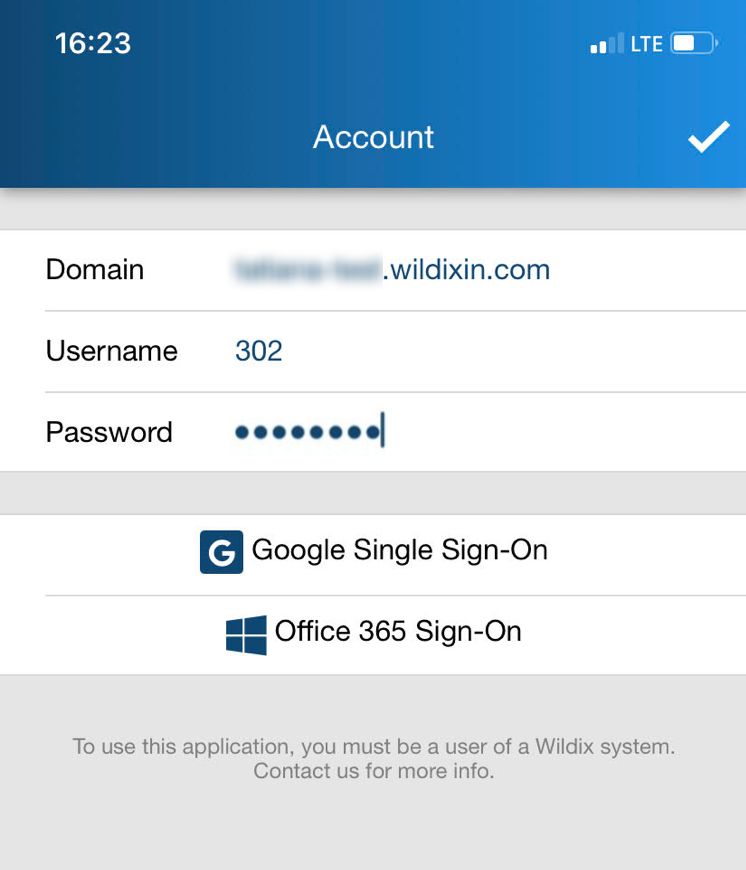
Two-factor authentication (2FA)
It is possible to use 2FA authentication for login. The option can be enabled in Collaboration -> Settings -> Personal.
Detailed information can be found in Collaboration User Guide.
Menu description
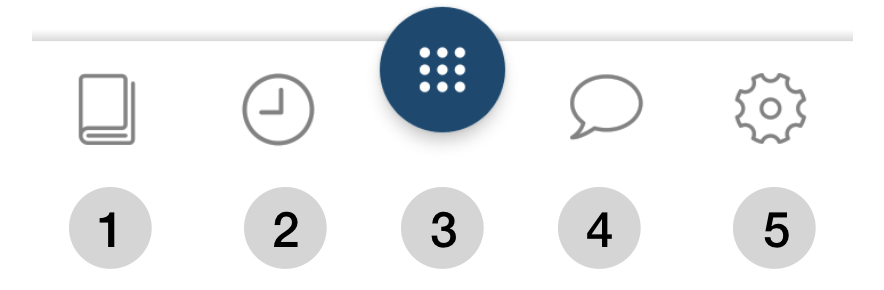
1 - Contacts
2 - Call history
3 - Dialpad/ Function Keys/ Active call
4 - Chat
5 - Settings
User status
- Tap Dialpad
- Tap status icon / user picture
- Tap on the current status and select the new one: DND / Away / Offline / Online
- Enter your status message (optional)
- Tap the Tick icon to apply changes
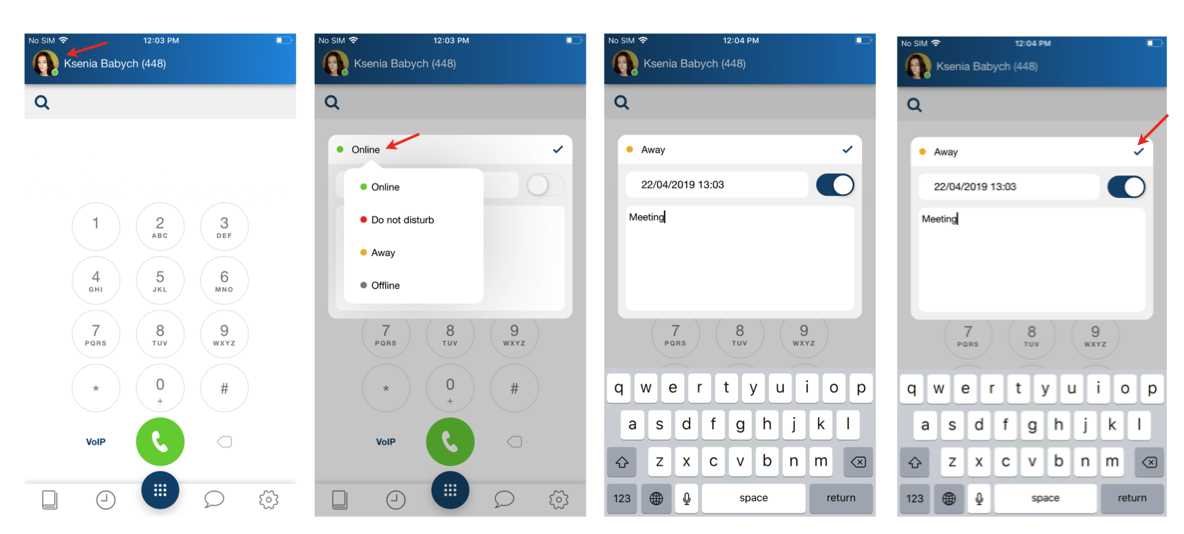
Note: for DND / Away it is possible to set up expiry time via Until option (optional), after which your status passes to online.
Note: offline status is available only for mobile apps and it allows you to disconnect from Presence and VoIP servers; you will not receive push notifications at all.
Call
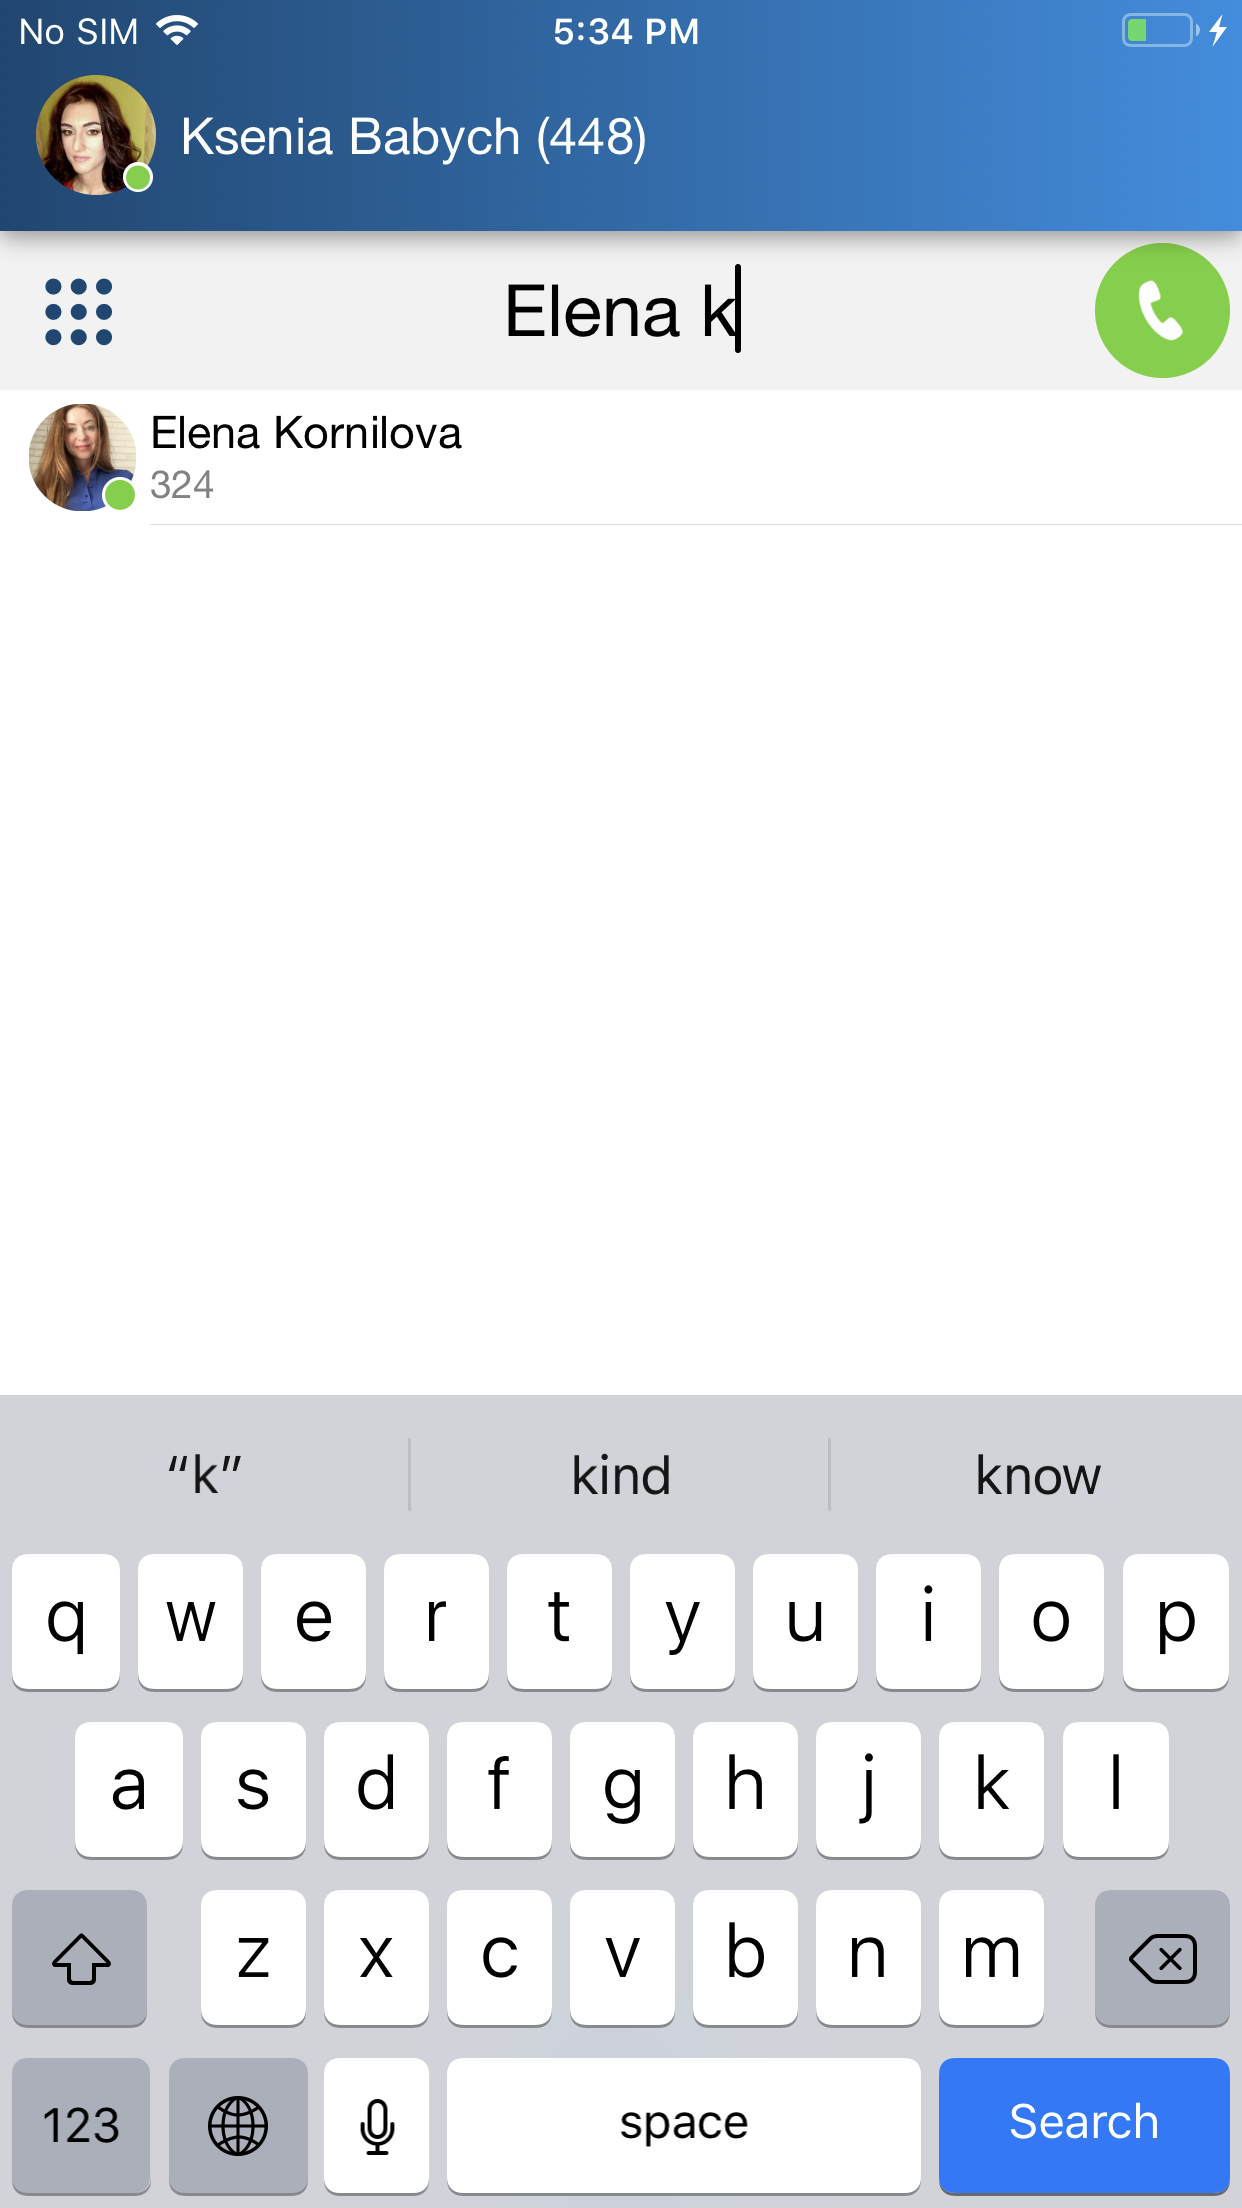
Live search
You can use real-time search in PBX phonebooks to place calls.
Note: You can also sync your enterprise phonebooks if you want them to appear in Contacts menu of Wildix Mobile Collaboration App. Refer to this Chapter for detailed information.
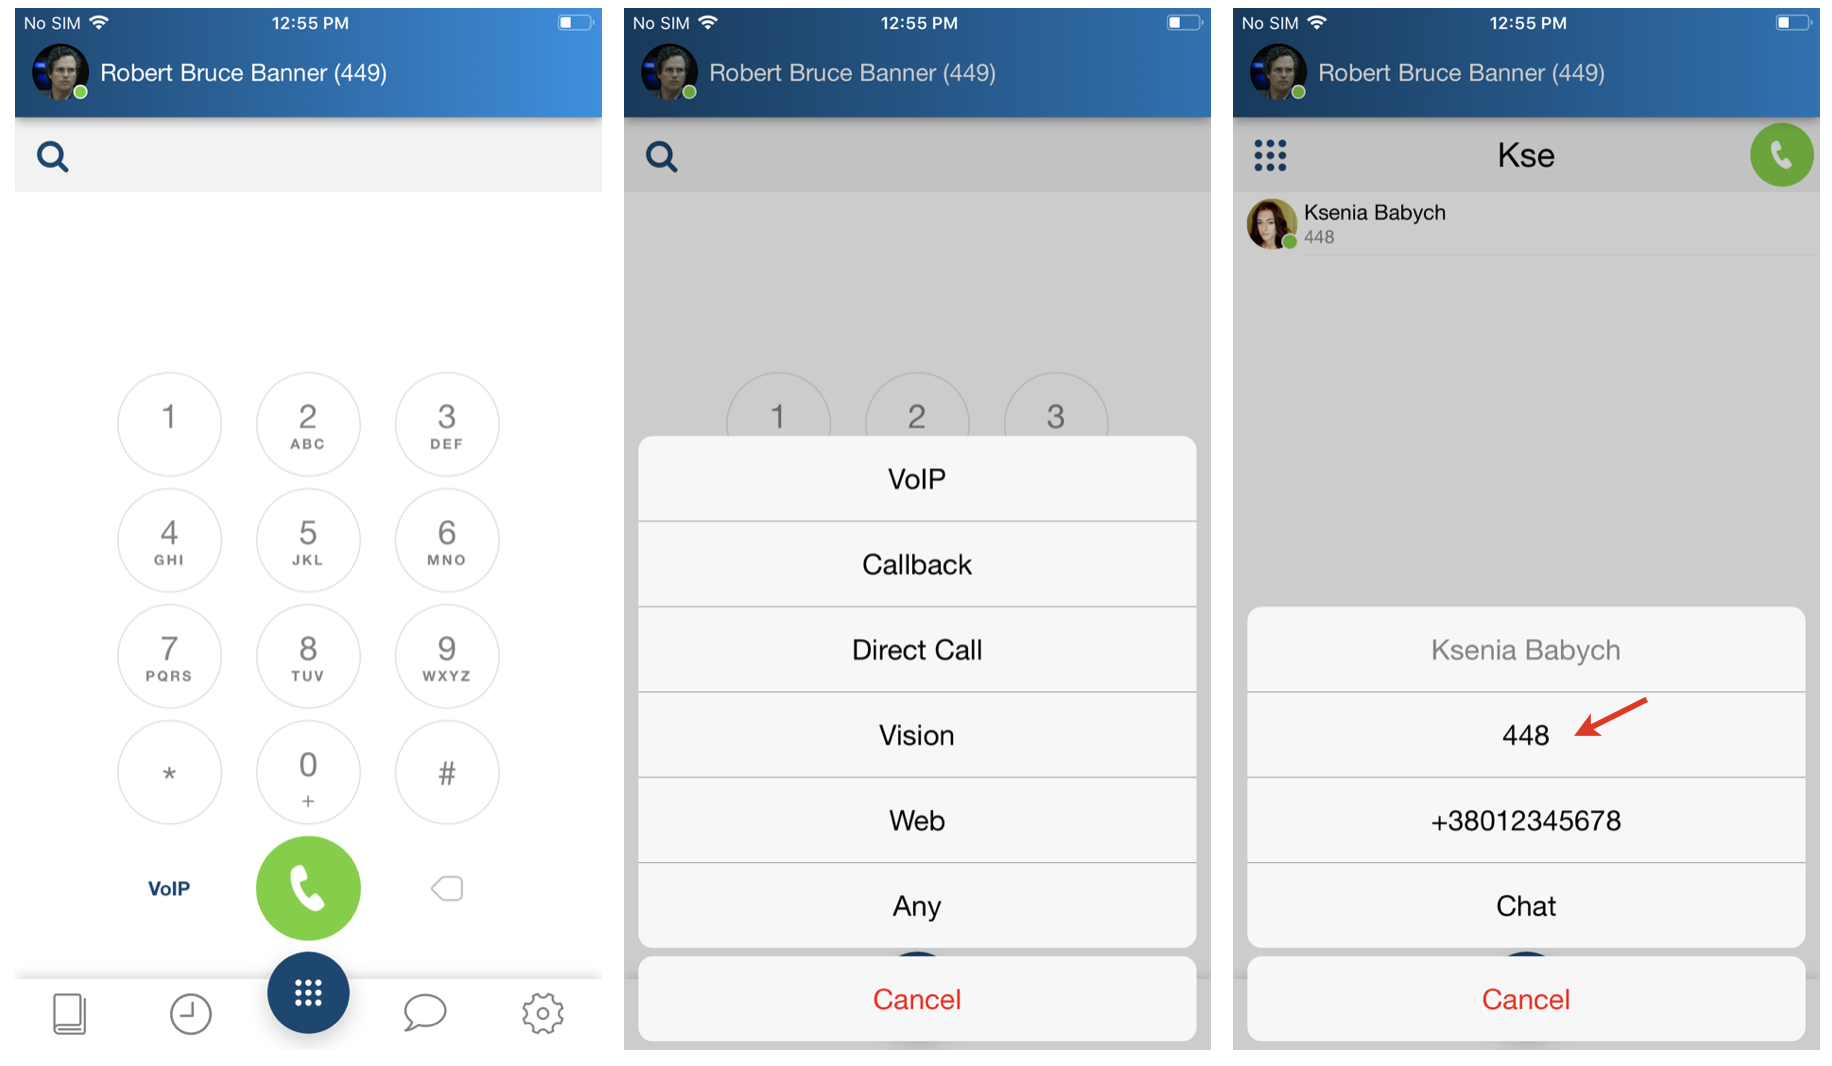
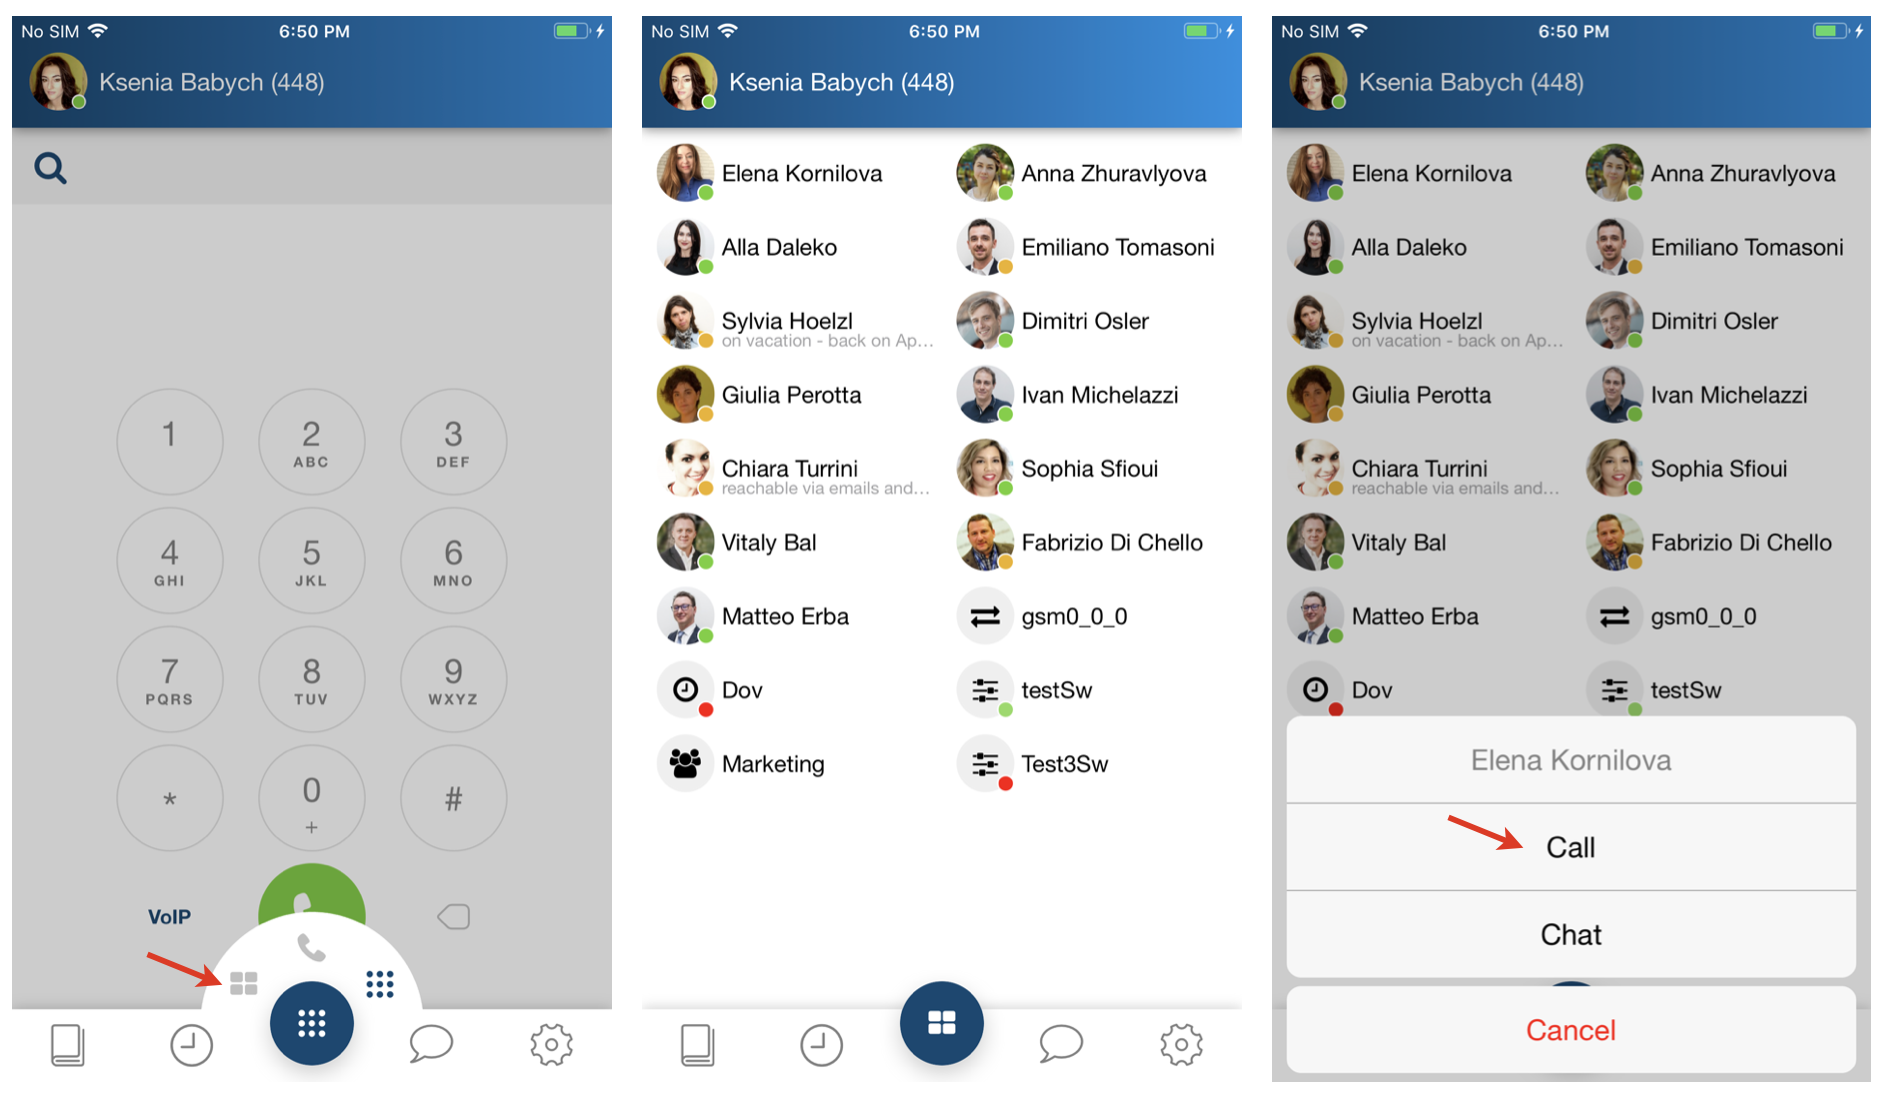
Place a call from Dialpad
- Tap Dialpad
Select the mode to place a call:
Note: It is possible to generate a call via another device registered to your account (WP phone, Vision/ SuperVision, W-AIR handset/ headset etc)
- VoIP: place a call via the PBX (recommended in case you have fast and reliable Internet connection)
- Callback: you receive a callback from the PBX via Mobile network (make sure your mobile number is indicated in Settings -> Personal)
Direct Call: place a call via Mobile network
Note: Starting from app v. 8.11.55938 and WMS v. 6.02.20230306.1, there is possibility to configure an automatic Direct Call for certain numbers (e.g. 112 emergency number) for all PBX users.
The feature should be configured on the PBX side. Check out documentation for instructions: Custom config parameters List (see the section "Configure which numbers on mobile should be directed to native dialler").
- Call-Through PBX: provides possibility to make calls via GSM network of the PBX from Collaboration app (available if enabled, see Call-Through PBX setup section for more details)
Wildix devices registered to your account: select a device from the list - a call will be generated using the selected device
Start entering user’s name or number / extension in the Search field to find a user / a contact
Note: Starting from app version 8.6.55887 contact lookup is performed in the local iOS contacts, too.
Tap on a user / a contact you wish to call. Select number/ extension to place a call
Or
- Enter the number using Dialpad
- Tap the green Handset button
Call-Through PBX setup
Note: The feature is available starting from Beta version 8.7.55914
To enable the functionality, follow the steps below:
- Go to app Settings -> Advanced
Enable Call-Through PBX option (1) and enter PBX phone number (2):
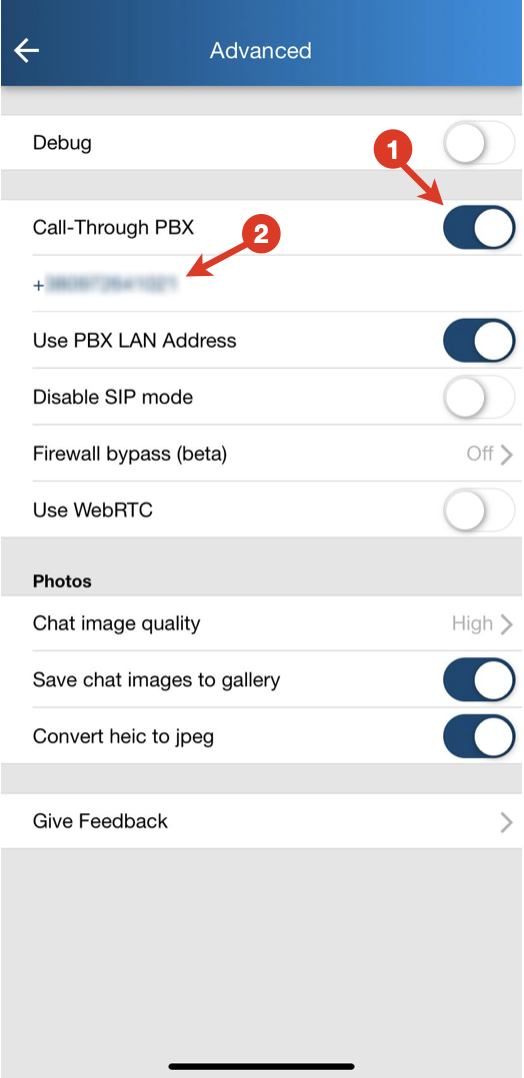
Notes:
- Mobility extension lookup should be configured for the PBX phone number in the main Dialplan in WMS:

Make sure to choose Set option -> Skip audio prompts:
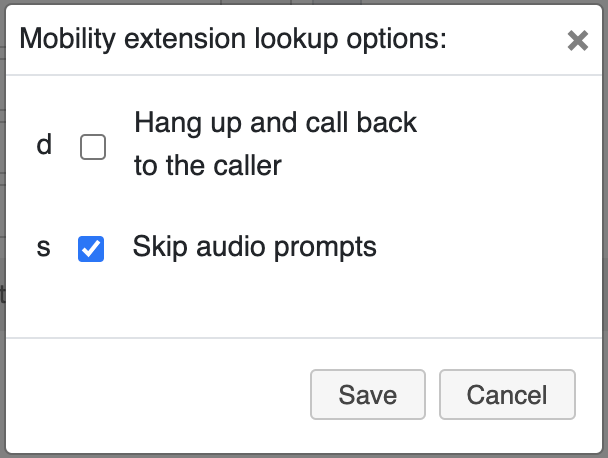
Documentation: Dialplan applications - Admin Guide: Mobility extension lookup - User, performing a call via Call-Through PBX, should have their mobile number indicated in WMS -> Users -> Mobile field.
- Mobility extension lookup should be configured for the PBX phone number in the main Dialplan in WMS:
- Once enabled, Call-Through PBX appears in the list of options on the Dialpad:
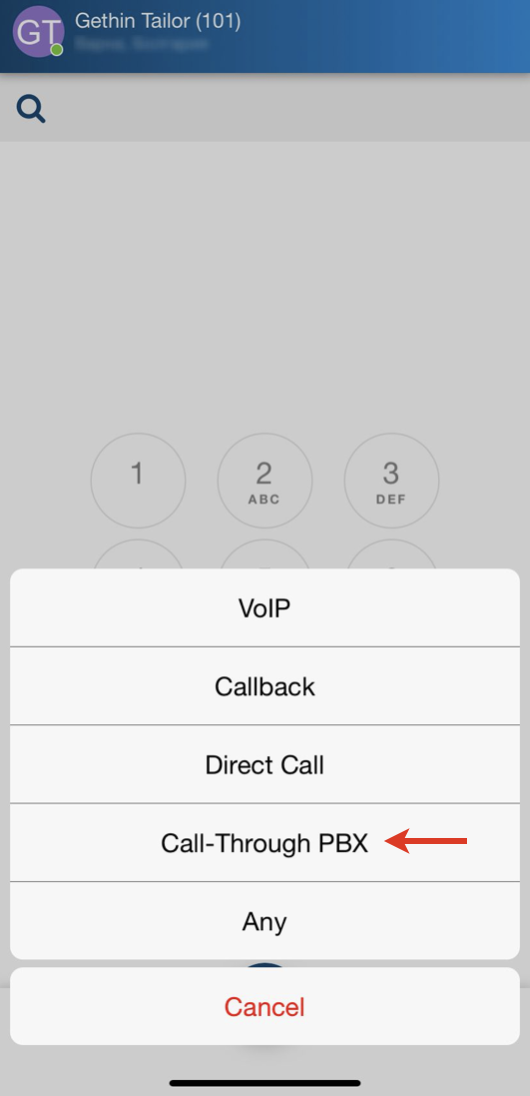
When making a call via Call-Through PBX, the dialed number includes PBX phone number and destination number separated by comma. Press Call and the call is started via native Phone app.
During this call, go to Collaboration app where the same call is active. Via Collaboration, you can put the call on hold or transfer it (both attended and semi-attended transfer supported).
Video: generate a call from iOS via W-AIR Headset
From Function keys
Note: Before using the feature, configure function keys (FK) in Collaboration -> Settings -> Function keys. Starting from v. 8.10.55932, it is possible to configure up to 40 FK. For more information, read Collaboration Guide, Function key section.
- Tap Dialpad and select Function keys to switch to Function keys menu
- Tap on a function key you wish to call
- Select Call from the drop-down list
From Enterprise Contacts
Note: by default the local contacts from your device’s phonebook appear in this menu; to access the enterprise phonebooks, set up the sync of contacts, as described in the chapter Sync of enterprise phonebooks.
- Tap the contact you wish to call
- Tap the number you wish to call
Note: a call is made using the mode selected in Dialpad menu (VoIP / Callback / Direct Call).
.PNG?version=1&modificationDate=1556016989000&cacheVersion=1&api=v2&width=220&height=391)
From History
- Go to History
- Tap on a user
- A call is placed automatically
From Voicemail
- Go to Voicemail
- Tap on a voicemail message from a user you'd like to call
- Select Call from the drop-down list
From Chat
- Open a chat session with a user
- Tap Handset button
- The call is placed automatically
Note: In case you received a Call me back request from another user, it is displayed in chat and you can place a callback to this user by tapping Call me back.

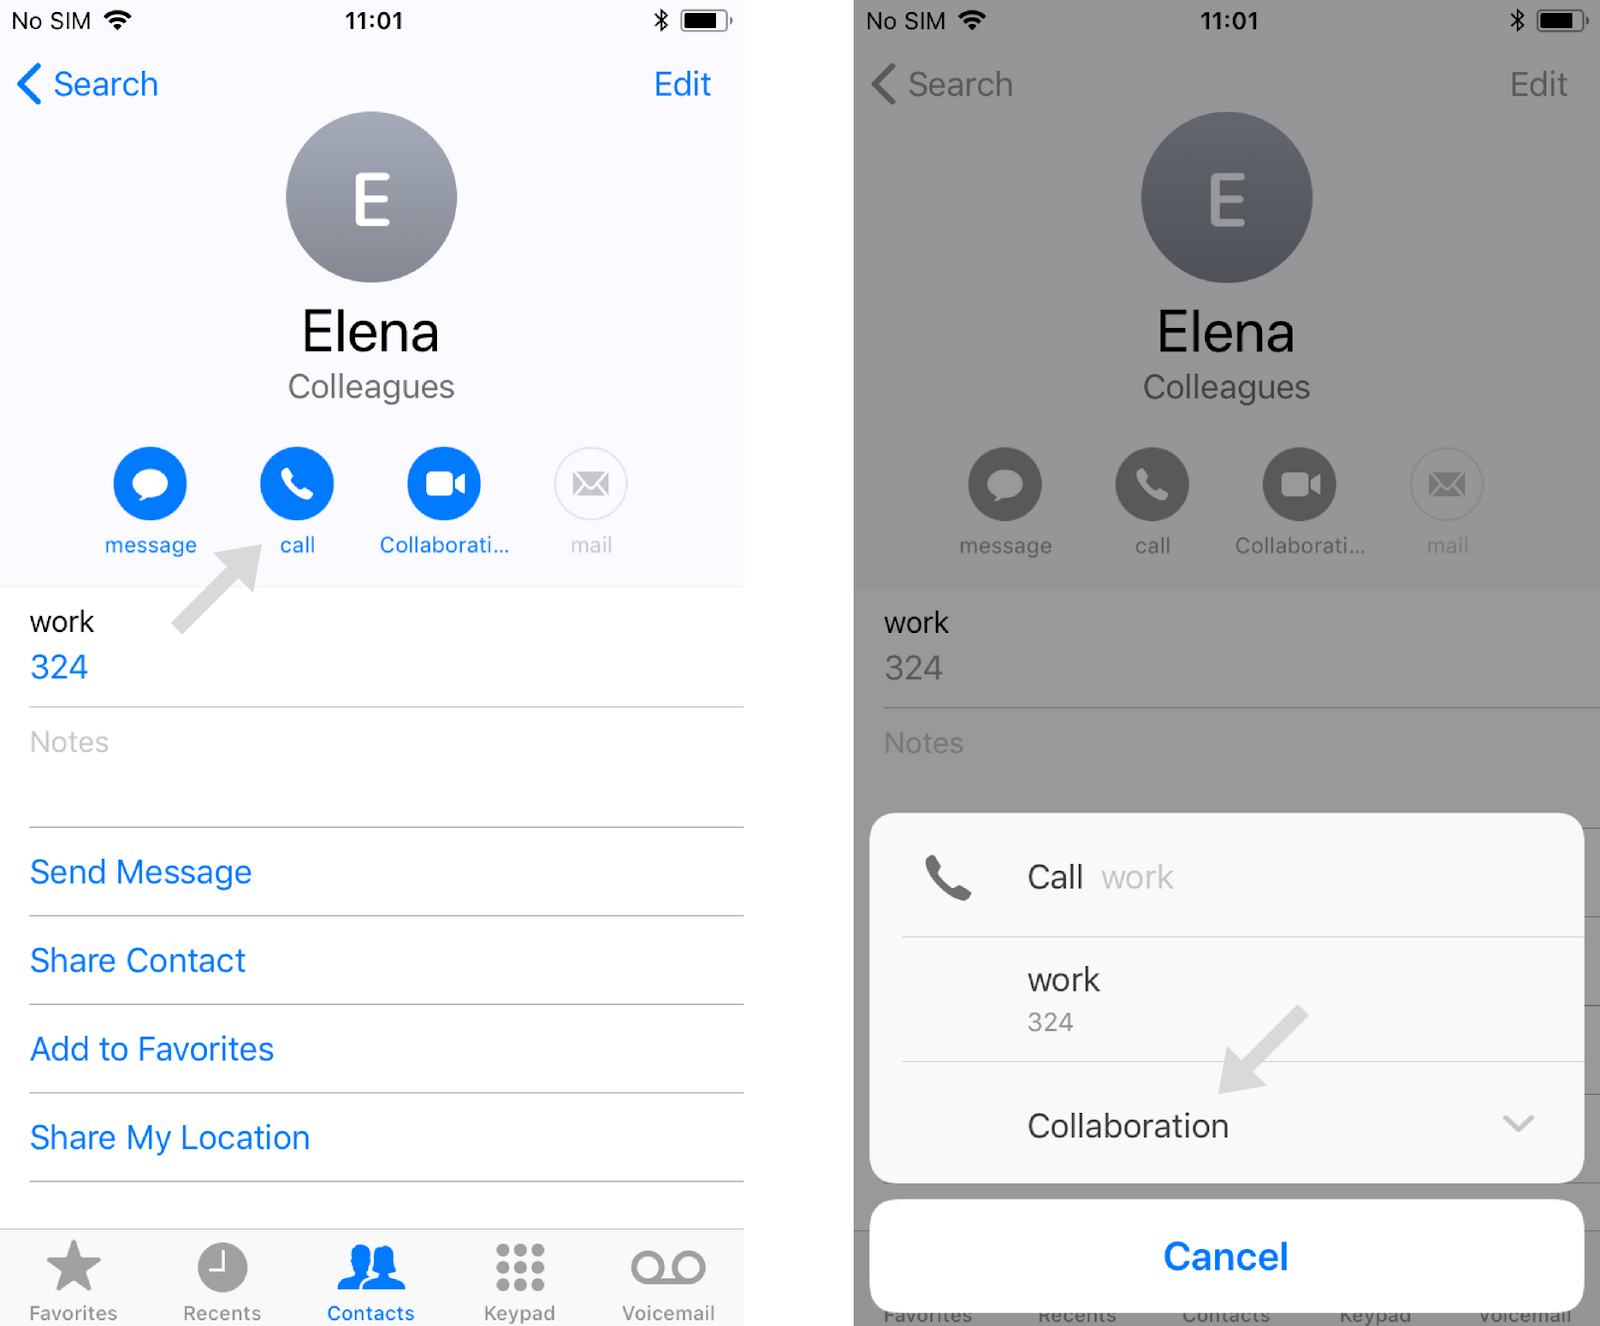
From your device’s contacts
- Tap a contact in your iOS contacts
- Tap and hold the Call button
- Select Collaboration
From Browser (Support of URI for call generation)
Thanks to URI support, it is possible to generate a call from the browser by clicking on a link containing a phone number. It allows you to start calls from various web pages.
Supported link:
<a href=”sip:[phone_number]”>
<a href=”wildix:[phone_number]”>
where [phone_number] parameter can also start with “+”
To generate a call from the browser:
- Tap on a telephone number containing the supported link
- Select Collaboration from the drop-down list
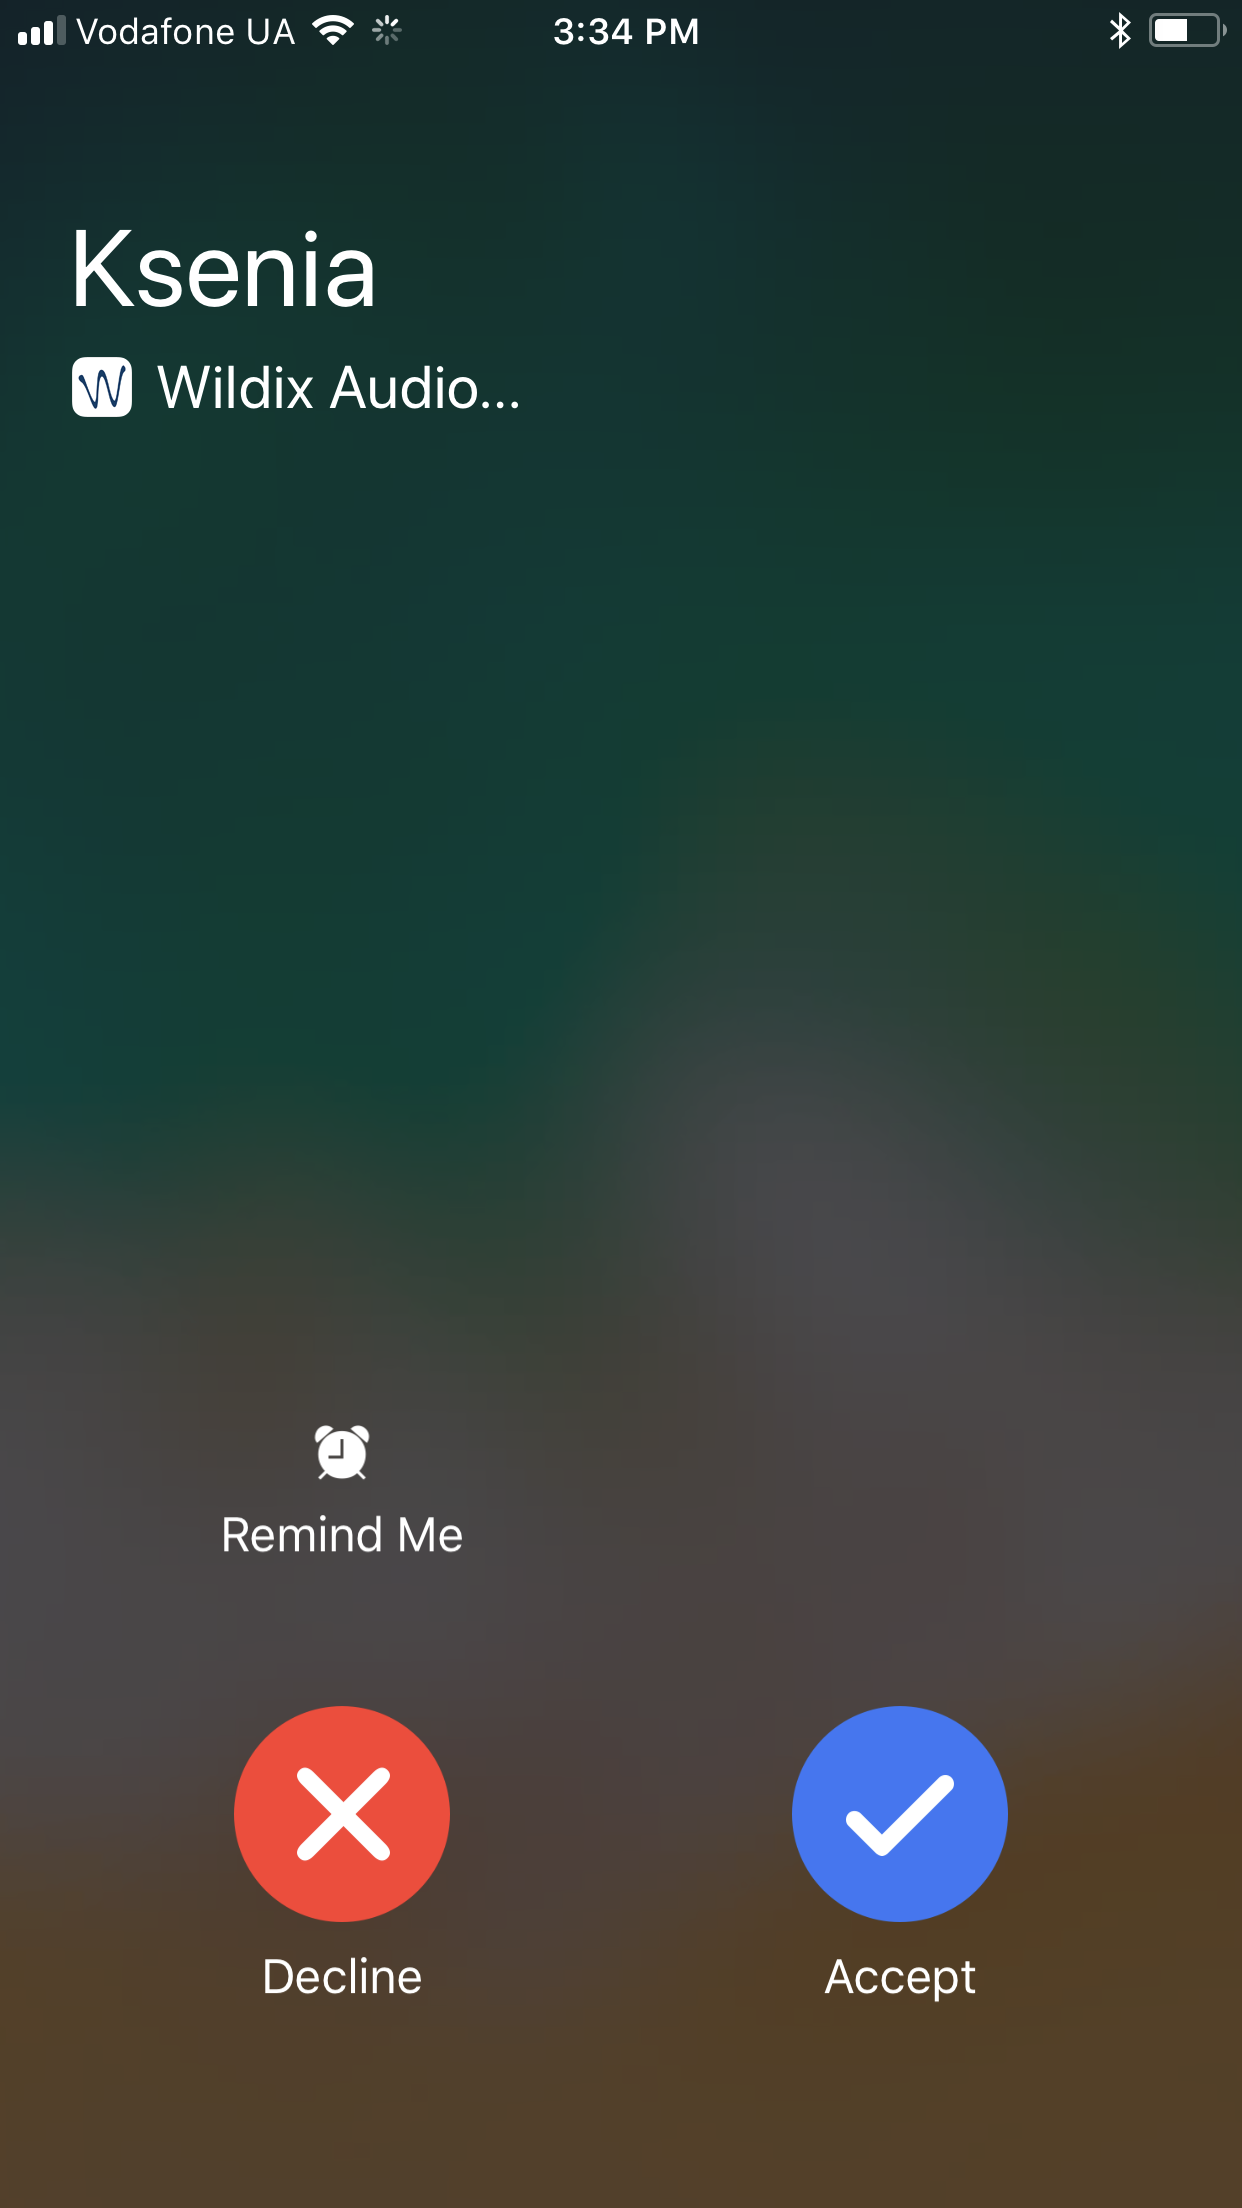
Answer a call
Note: on iOS mobile calls and VoIP calls have the same priority, you VoIP call is not interrupted in case you receive an incoming mobile call.
- Tap the blue Tick button to answer
- Tap the red Crossmark button to decline
Call management
During a call you can navigate your device, open the App and tap Dialpad to come back to the active call.
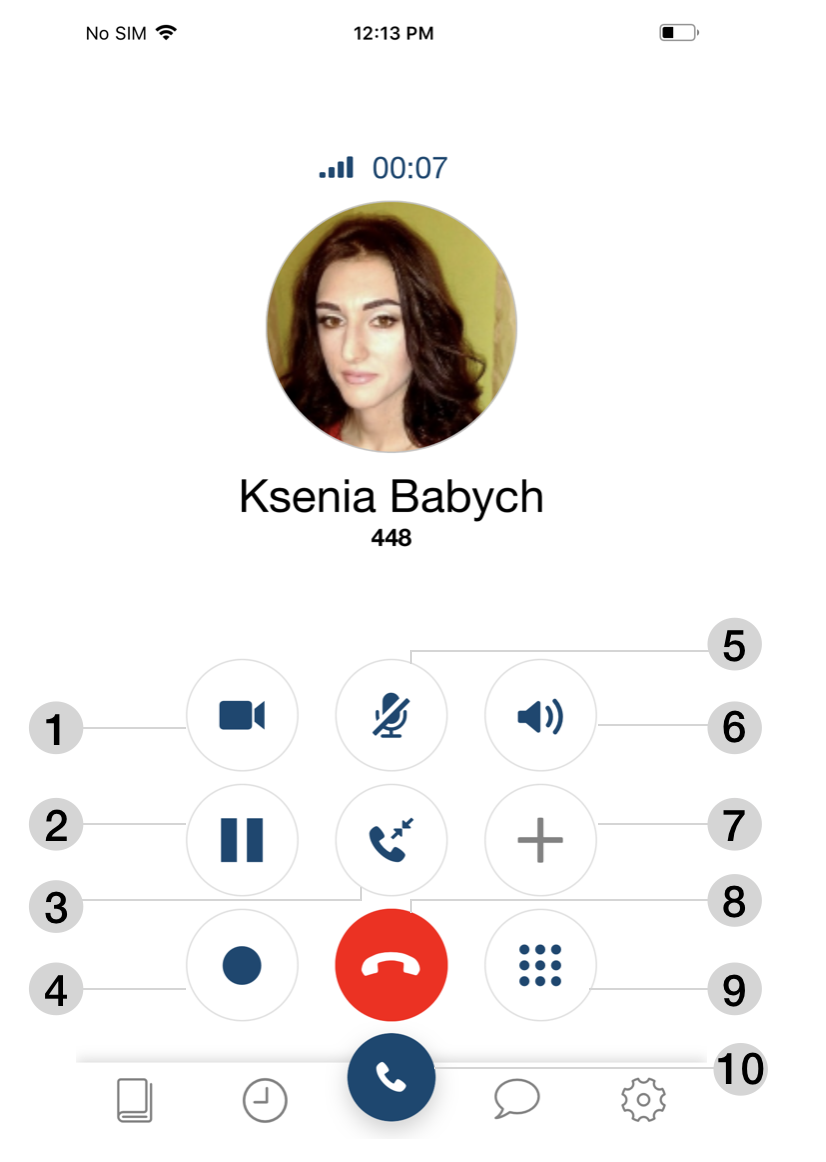
1 - Video
2 - Hold
3 - Transfer. Select the needed option for the list: Contact (choose a contact from Contacts)/ Number (dial a number you wish to call from Dialpad)/ Device (select a device where you wish to pass the call)/ Function key (select FK to transfer the call)
4 - Record a call
5 - Mute
6 - Speakerphone. Tap to switch between audio sources: Speaker/ Handset (iPhone)/ Headphones
7 - Conference (in case there is more than one active call)
8 - Hang up
9 - DTMF
10 - Switch back to Dialpad/ Function keys tabs to make a new call
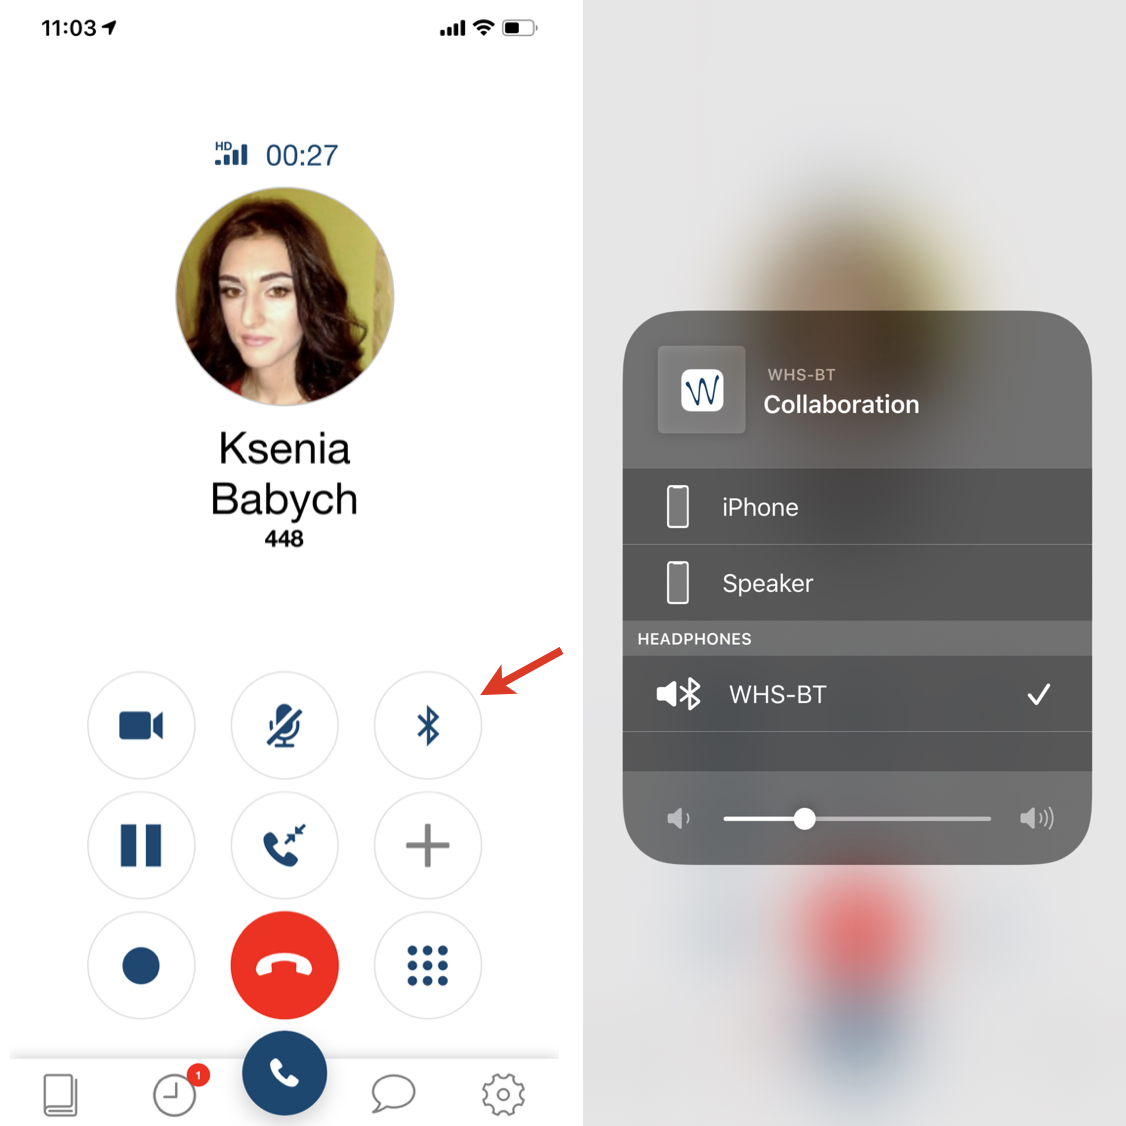
Switch between audio sources
Note: If you have paired Bluetooth headphones to your iPhone, they are automatically selected as an audio source during incoming/ outgoing calls.
If you have any headphones connected to your iPhone, you can switch to them during an active call:
- Hold Speakerphone button for 2 seconds to display the list of available audio modes
- Select the needed mode from the list:
- iPhone (Handset)
- Speaker
- Headphones
Transfer
Blind transfer:
(transfer without notification)
- Tap Transfer button during a call
- Tap Contact to select a number from the phonebook or Number to manually enter the number
- Select a contact and tap the number / enter the number and tap the green Handset button
Attended transfer:
(transfer with notification)
- Tap New call button during a call
- Make a new call (select a contact from Contacts or dial the number manually)
- Wait till the other party answers (the previous call is now on hold)
- Tap Transfer button and select the call on hold to complete the transfer
Video tutorial:
Transfer via Function keys
Transfer option via Function keys "Colleague", "Park Orbit" and "Speed dial" is available:
- Tap Dialpad and select Function keys to switch to Function keys menu
- Select the function key to transfer a call
- Tap Transfer for blind transfer, otherwise tap Call to start a call first (attended transfer)
![]()
Control of active calls on other devices and Call continuity
Control of active calls on other devices
The feature allows you to view and control own active calls on other devices registered to your account. You can hold/ resume, record, hang up a call as well as send DTMF.
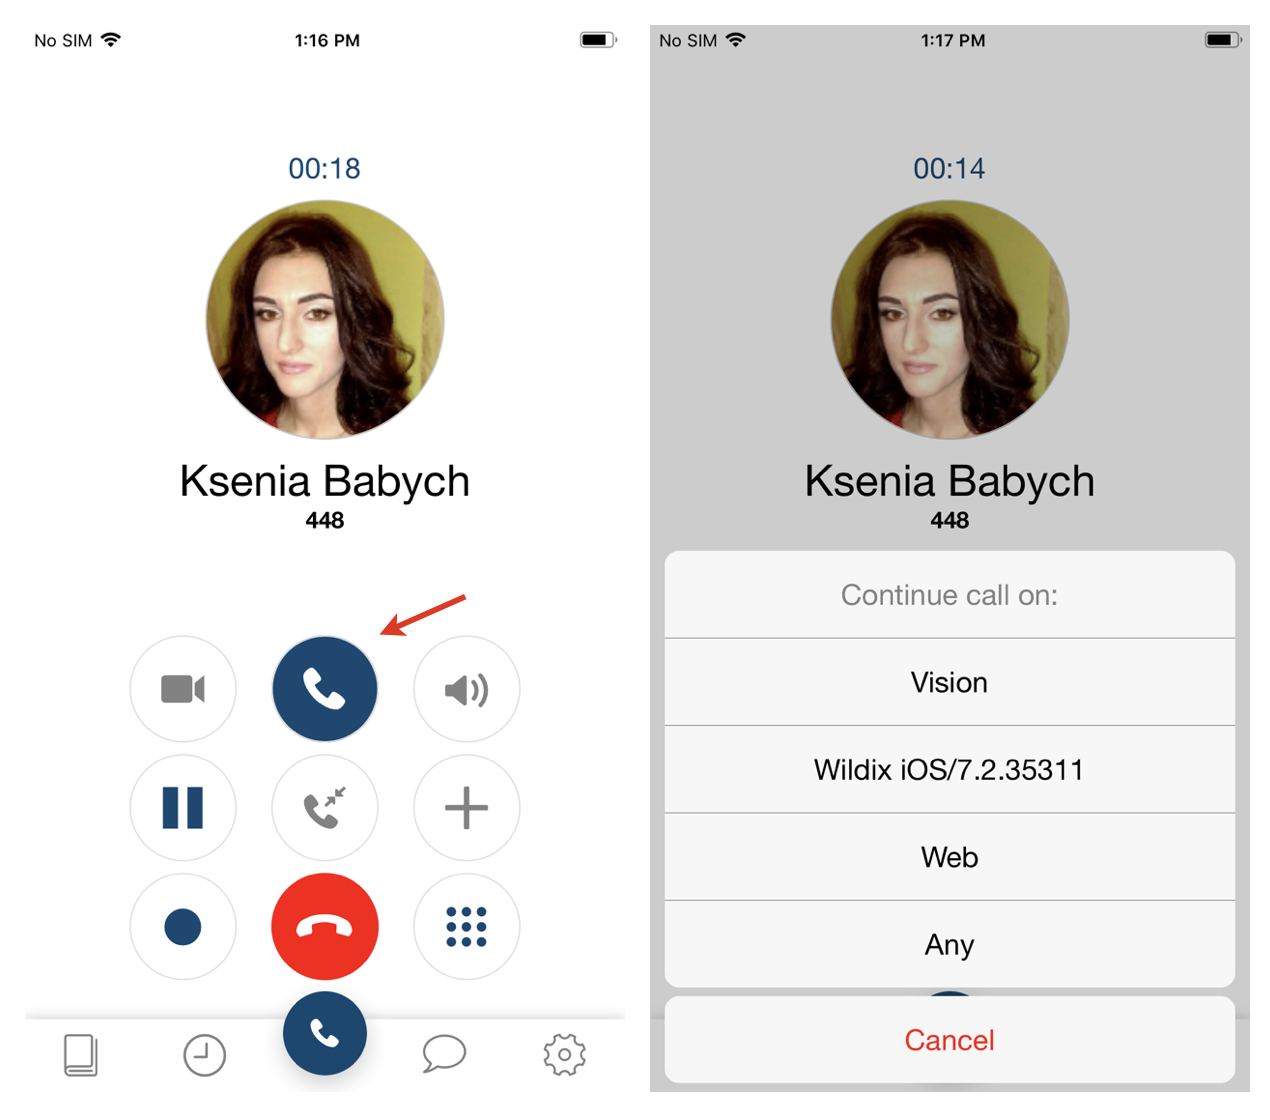
Call continuity
With the help of the feature it is possible to pass your active calls from other devices to iOS or another specific device.
To pass an active call to iOS Collaboration app:
- Tap Call continuity button
- A call is automatically picked up on iOS
To pass an active call to a specific device:
- Tap and hold Call continuity button
- Select a device from the list
- A call is automatically picked up on the selected device
|
Note: To use mobile continuity, make sure that Dialplan rule "pbxfeatures (Features codes dialplan)" is added to "Included procedures" of the Dialplan used for managing calls.
Note: In case there is no need to monitor active calls or use Call continuity, you can switch back to Dialpad/ Function keys tabs.
Chat
All the colleagues added to your roster appear in Chat menu.
- Tap Chat
- Use the Search field to find a user
- Tap a user and enter your message
- Tap Paper plane icon to send the message
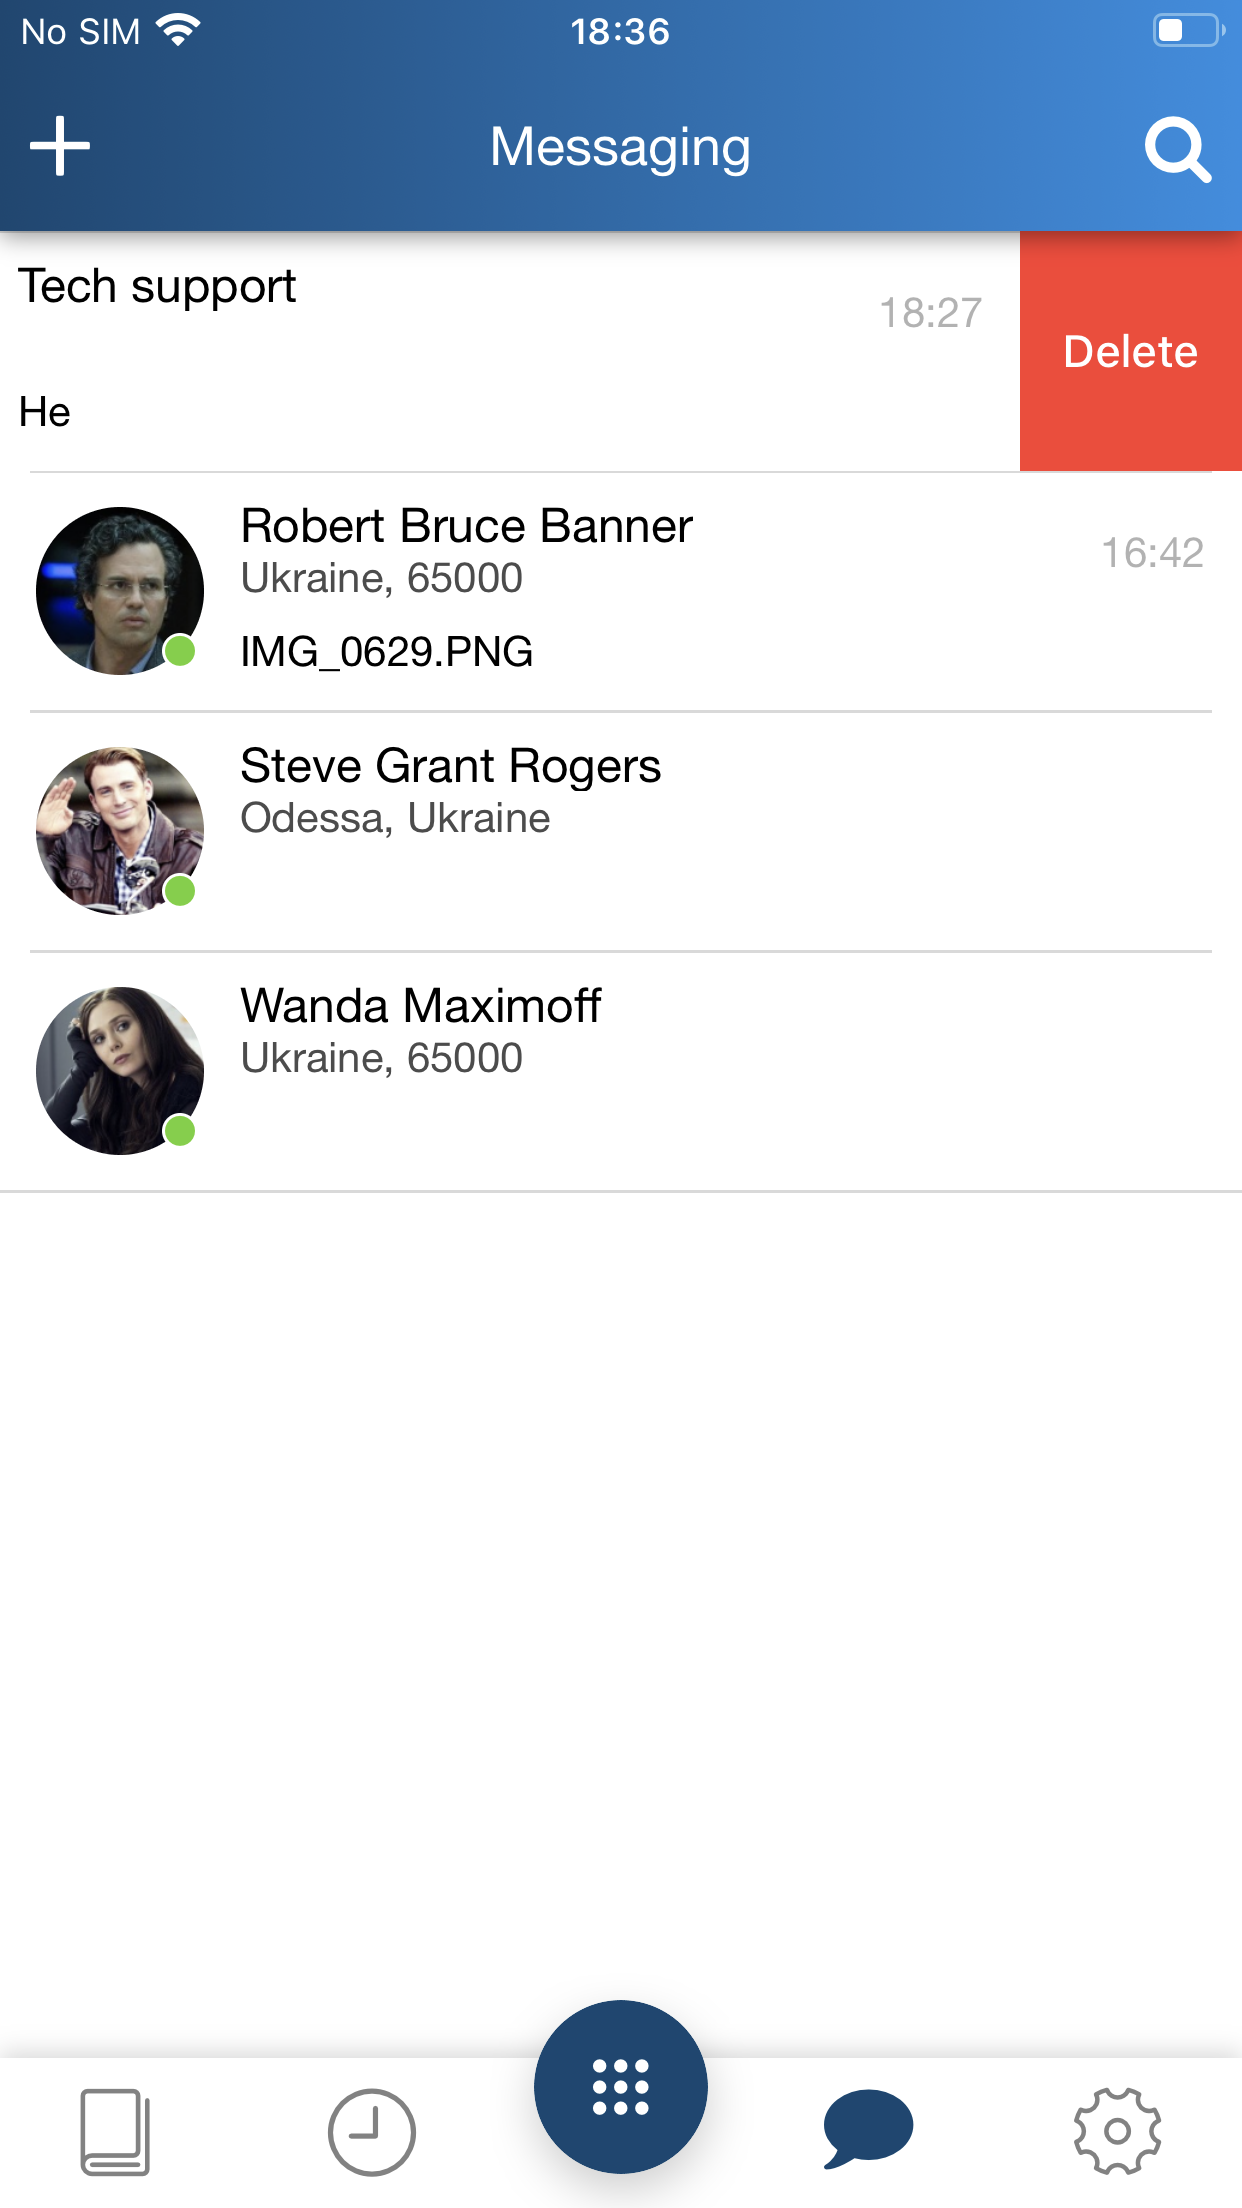
Note: To delete a chat session with a user, swipe it left.
Chat may be unavailable if it is globally disabled on the PBX with custom config parameter COLLABORATION_CHAT_ALLOW=false. Documentation: Custom config parameters List
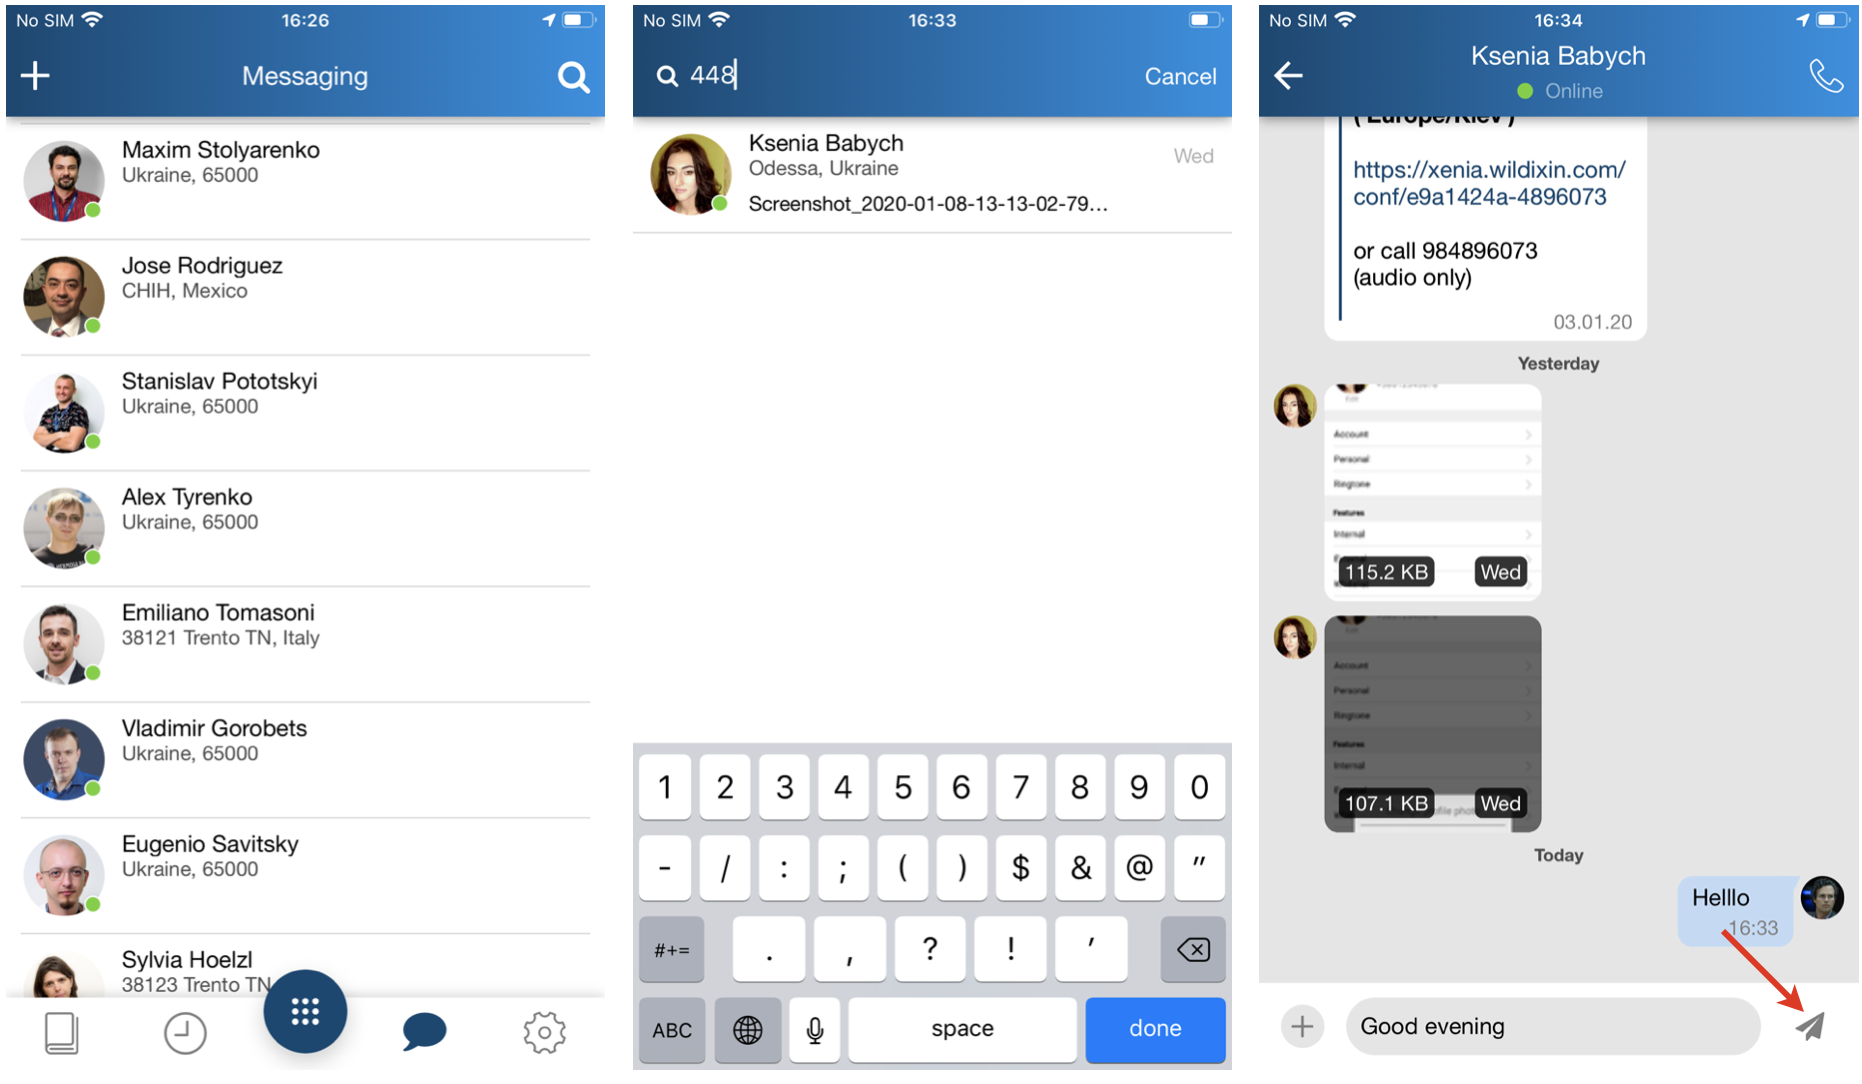
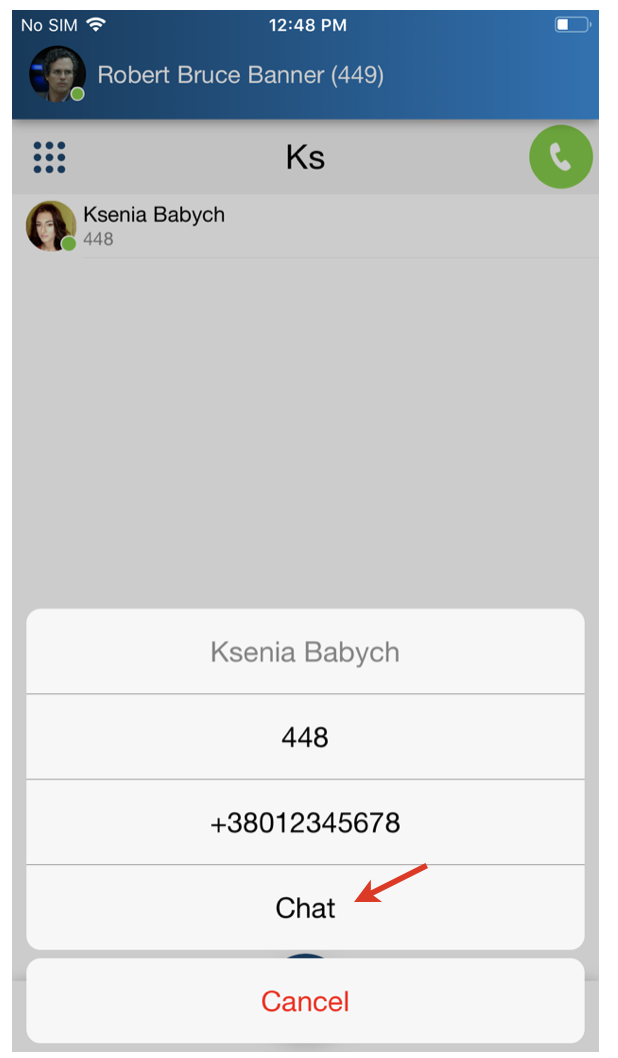
Start a chat session from live search results
Start entering user’s name or number / extension in the Search field to find a user
Tap on a user you wish to chat. Select Chat from the list
Start a chat session from History
You can also start a chat session with a user from History tab.
- Go to History
- Select a user you would like to chat with and tap the double Arrowhead icon to view user contact details
- Tap Chat
Note: If you delete a chat session with a user, you can restore it from History via Chat option.
Send a File / an Image / a Post-It/ Call me back
Send a file / an image:
- Start a chat with a user
- Tap +
- Select the source:
- Camera
Photo & Video Library
Downloads
Send files
Note: Attaching files is supported starting from app v. 8.9.55929.
- Select files/ images or take a photo using the camera to be sent (you can send up to 10 files/ images)
- Tap Send button
- Confirm by tapping Send
Note: The maximum file size to be sent is 100Mb.
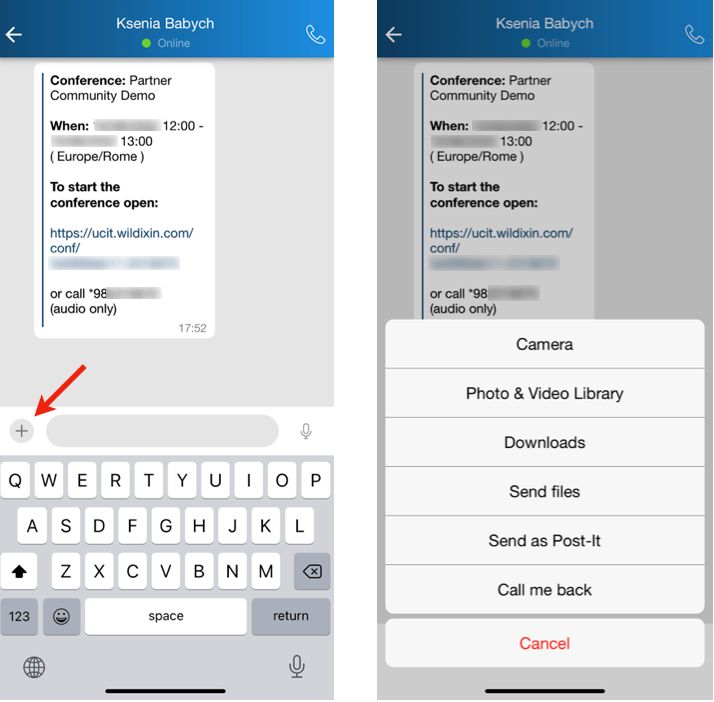
Send a Post-It
- Start a chat with a user
- Write your message
- Tap +
- Select the option Send as Post-It
Note: Post-it functionality may be unavailable if it is globally disabled on the PBX with custom config parameter COLLABORATION_CHAT_ALLOW=false. Documentation: Custom config parameters List
Send Call me back
- Start a chat with a user
- Tap +
- Select the option Call me back
Send a voice recording
Start a chat with a user
- Press and hold Microphone icon to record a message
- After you finish, release to send
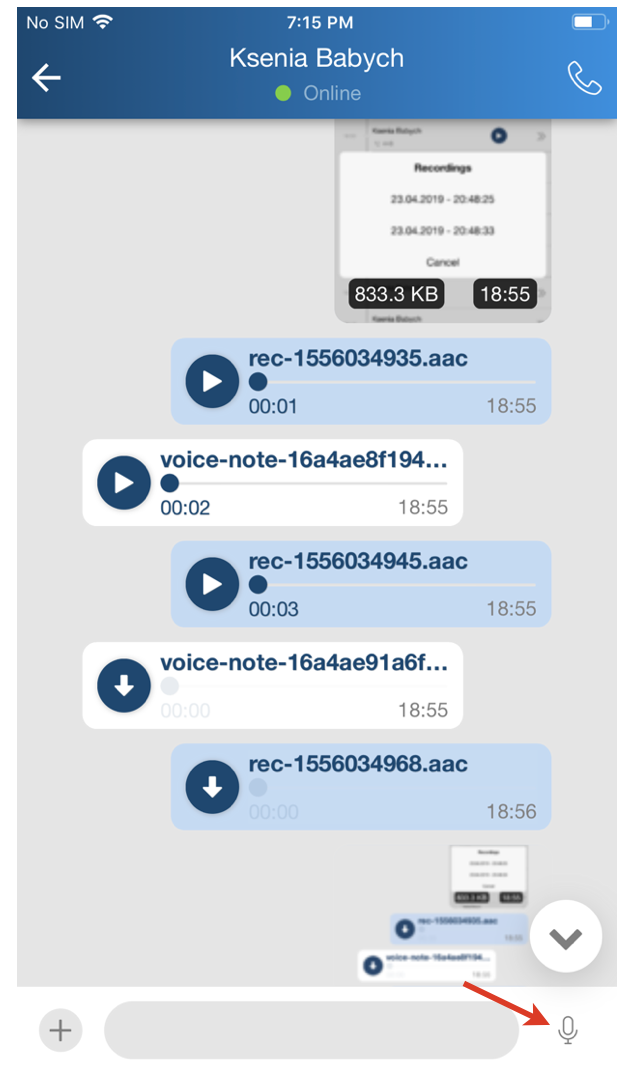
Note: To cancel voice recording without sending, slide left.
Send two-way SMS
Note: The option is available only to CLASSOUND users in US, Canada and UK (for UK, the relevant United Kingdom (2-way SMS) CLASSOUND DID is required). For more details, check documentation How to send and receive SMS/ MMS via CLASSOUND.
Requirements
- Min. supported versions:
- WMS: 5.03.20210826.1
- iOS mobile app: 8.1.45805
To send two-way SMS:
Start entering a number in the Search field
Tap on the number and select the 2 way SMS option from the list:
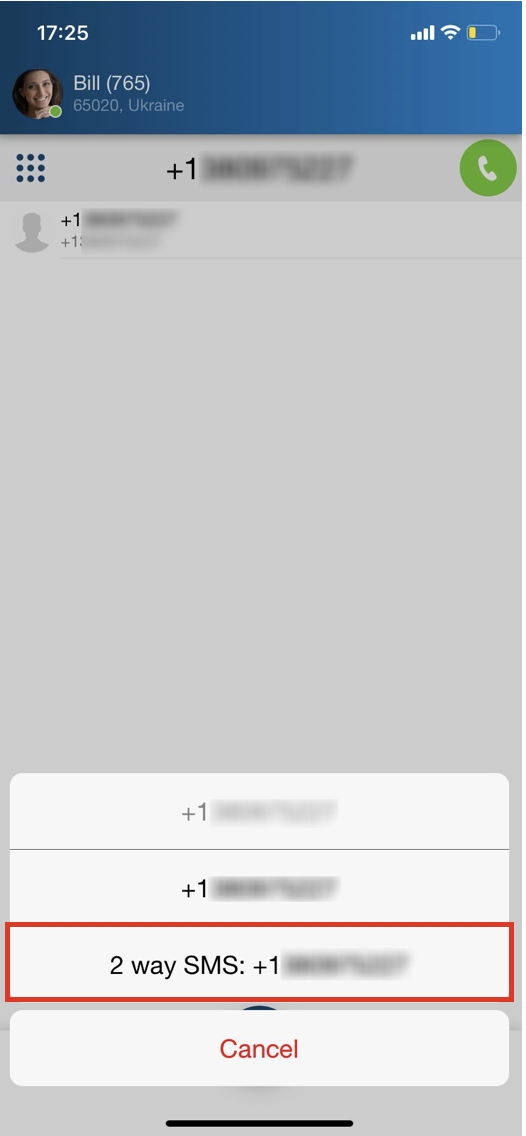
Chat is automatically created and when the customer replies, the incoming SMS is sent to the chat.
Participate in Wizyconf videoconference
Important: for access to video conferencing service on iOS devices, use Safari/ Google Chrome browser or install Wizyconf iOS App.
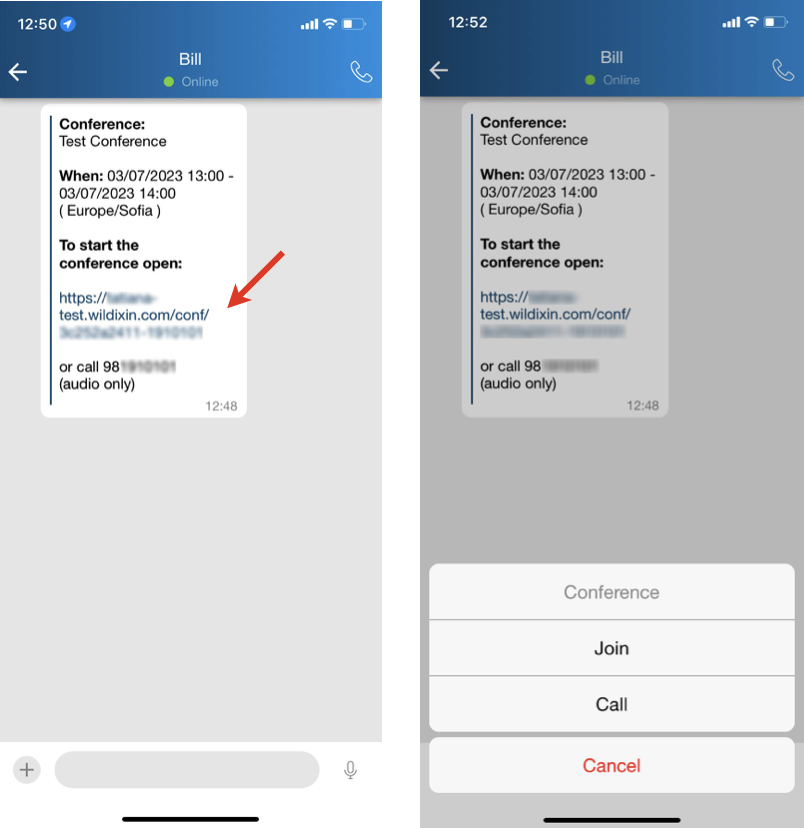
- Open a chat session with a user who sent an invitation
- Tap on the invitation - the message includes title of the conference, time, and link to open the conference
- Select Join to access the conference via Wizyconf iOS App or Call to access the conference in audio-only mode. Follow Wizyconf Videoconference User Guide for details
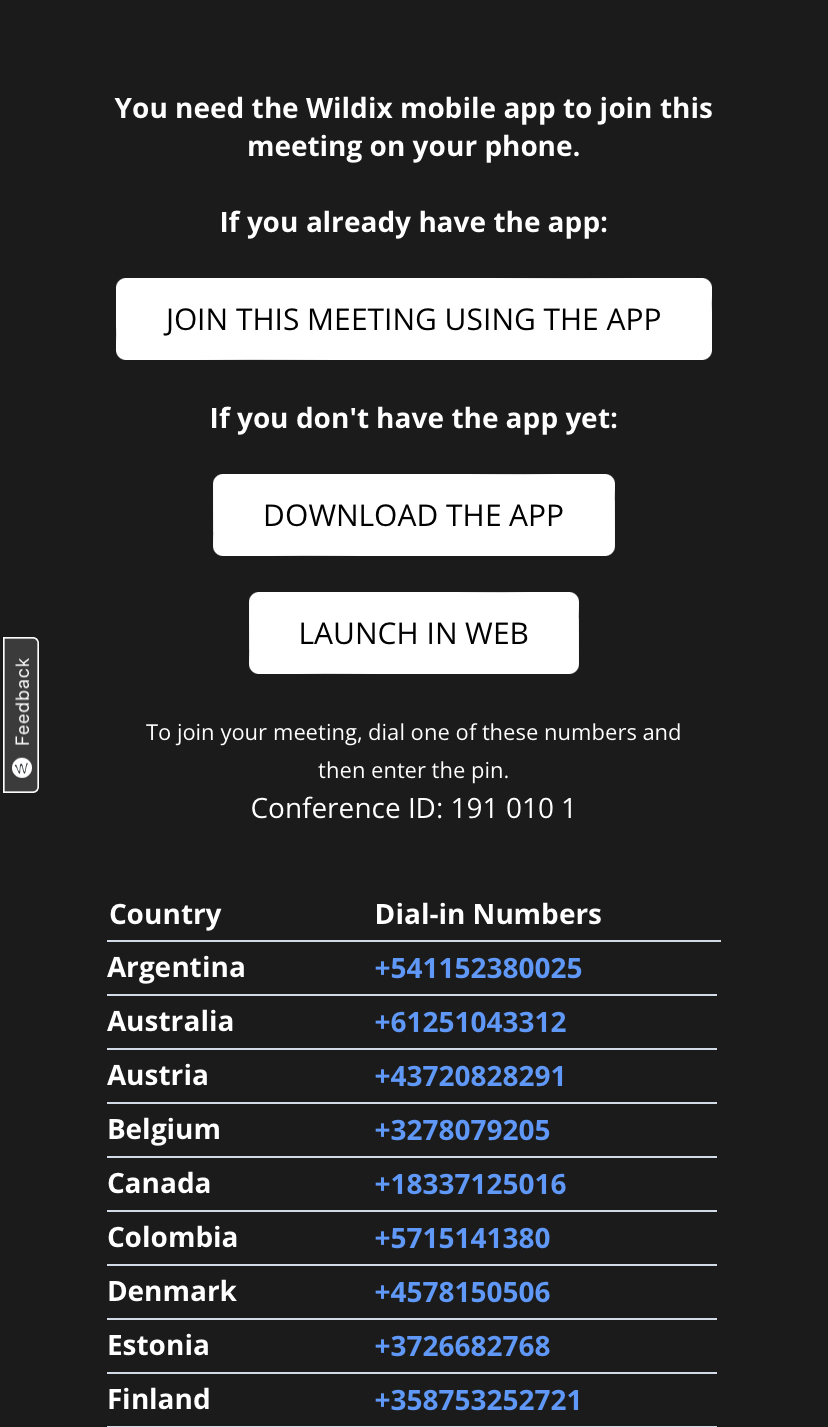
Tap Join this meeting using the app to enter the conference:
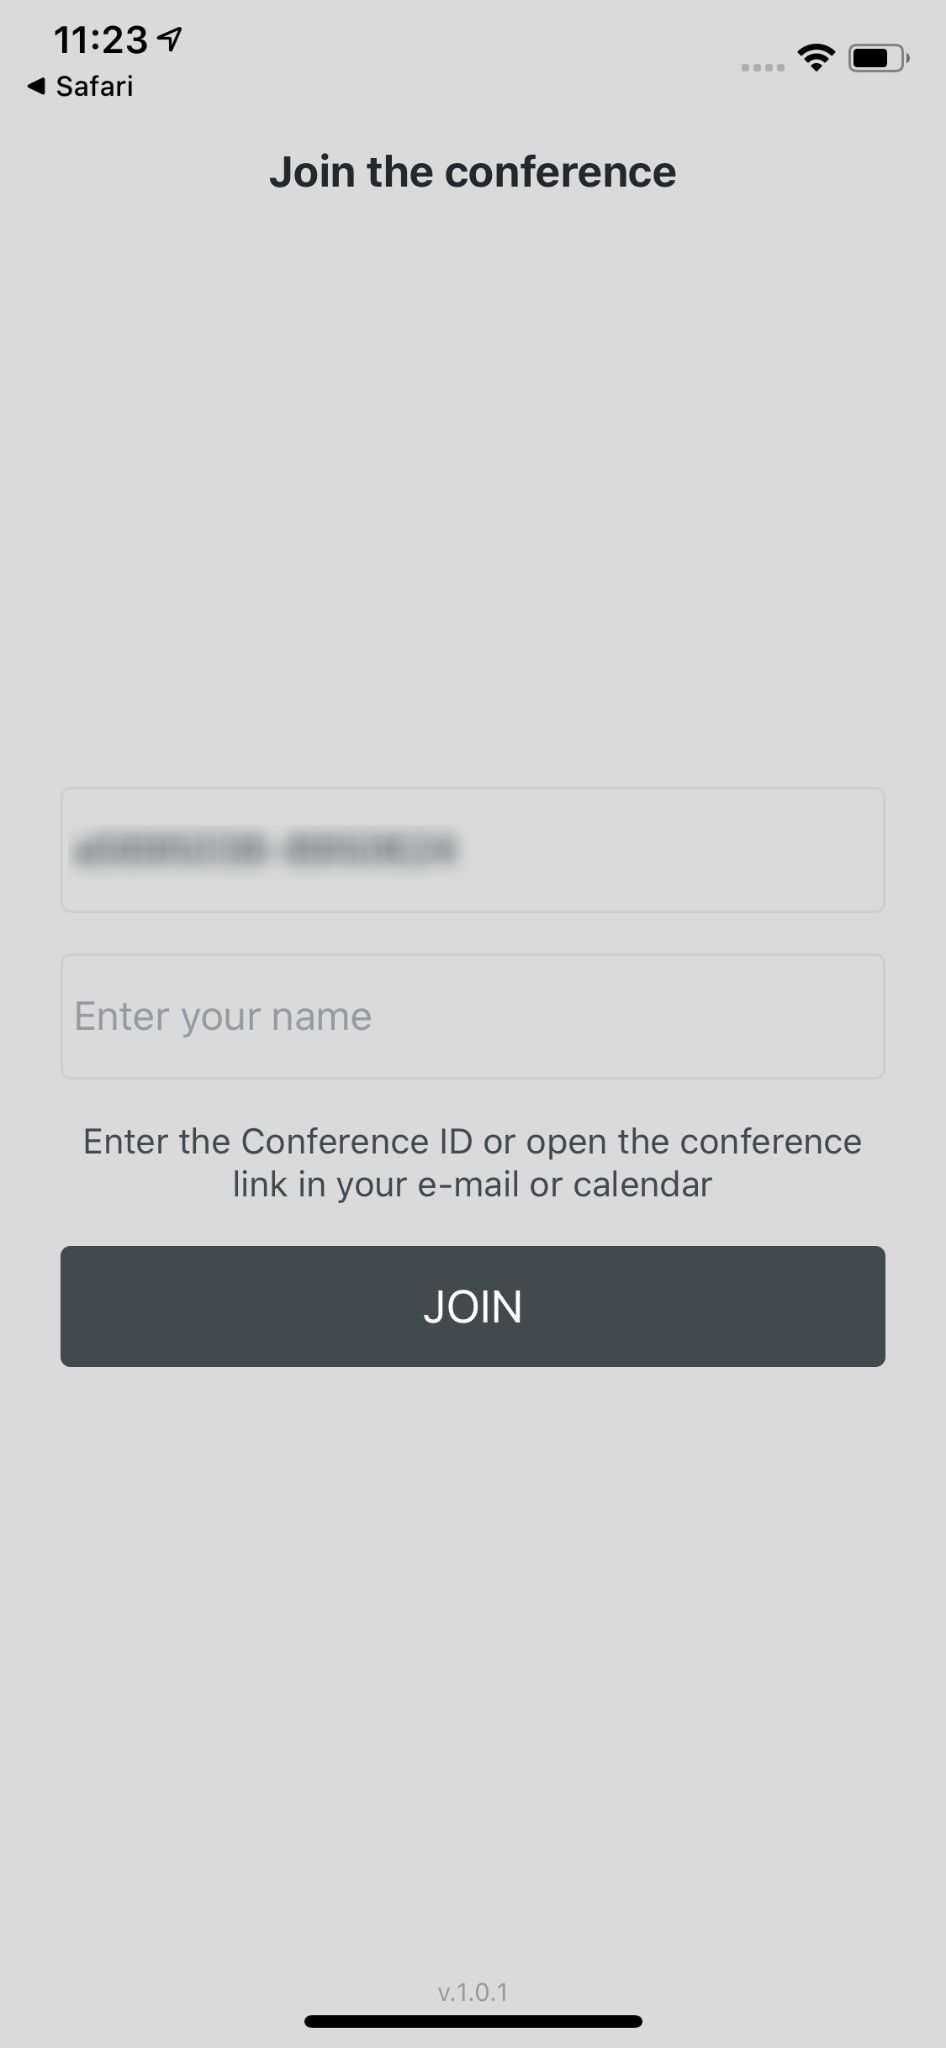
Upon the first access via the App, you need to enter your name, the conference ID is already present:
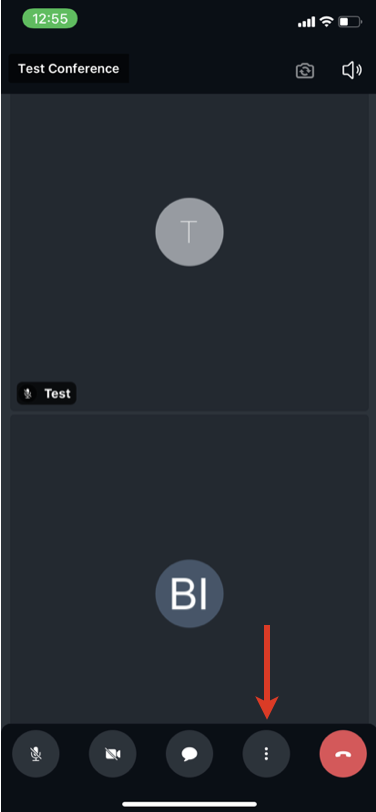
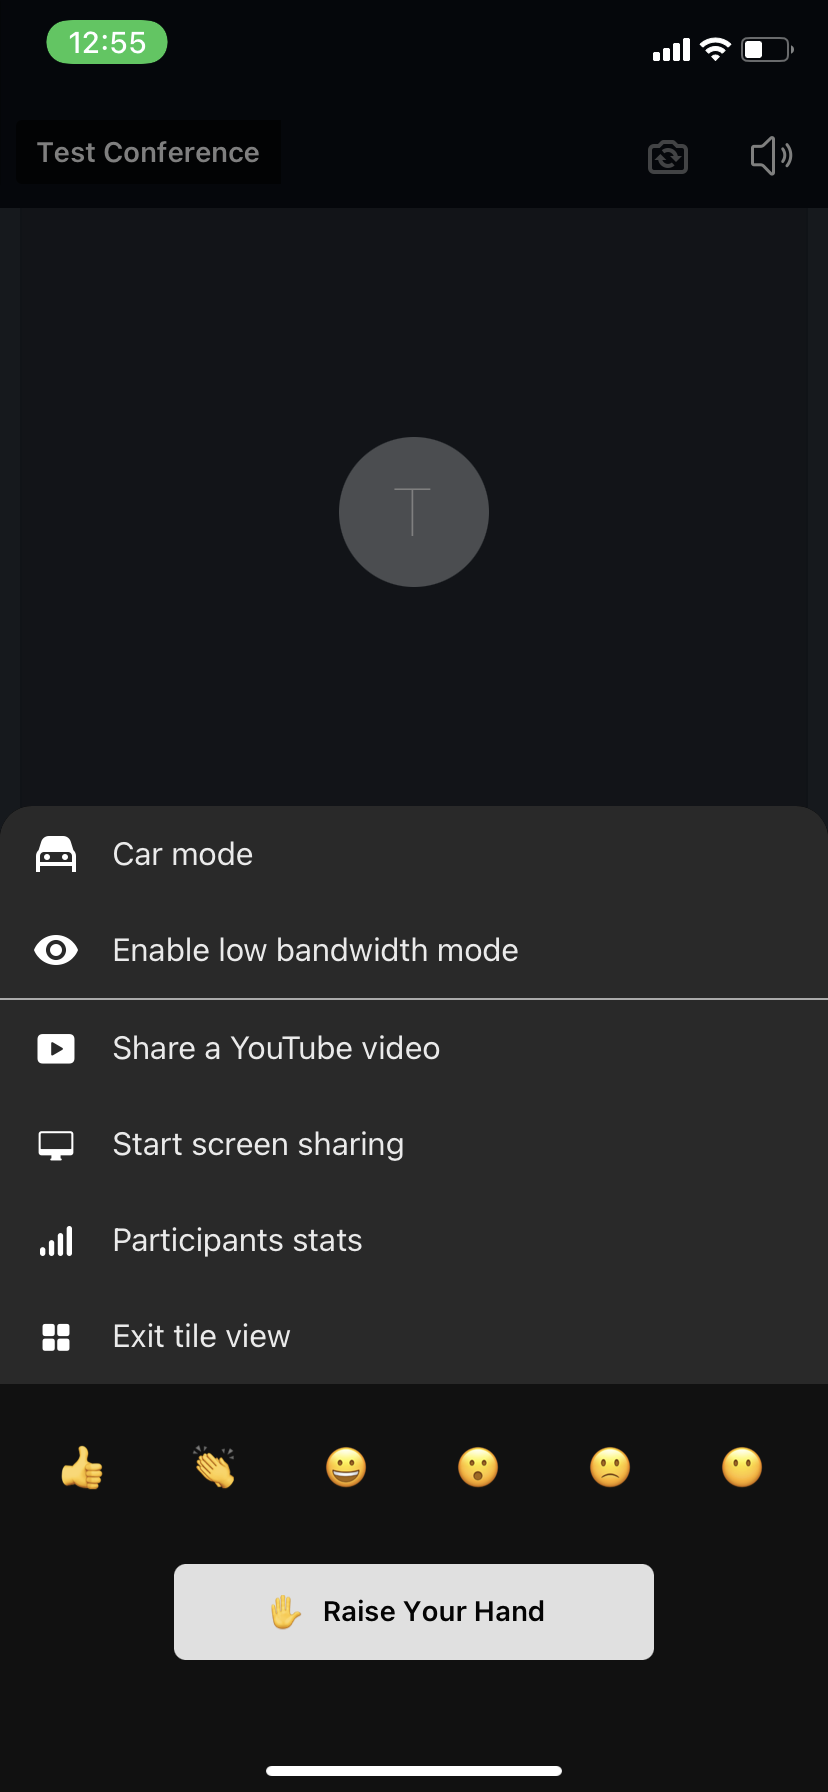
When you are inside the conference, you can adjust different settings by tapping on Three dots icon: enable low bandwidth mode, enter tile view, raise your hand and send a reaction:
Current limitations:
- DND status "in conference" is removed after the conference is finished, but is not removed automatically after closing tab with conference
- It is impossible to create a conference from iOS app; it is possible to participate in the conference if you were invited (you receive an invitation via chat)
- It is impossible to join a conference with a different user using iOS Safari browser after re-login in the app (user anyway joins the conference as the previous user)
Multiuser group chat
Available starting from iOS app version 7.8.35572.
Multiuser cloud-stored group chats with possibility to add up to 500 participants and send pictures/ files.
Limitations:
- not available for PBXs with LifeTime licenses
- no more than 100 group chats can be received from the server
- if user opens a push notification from a group chat after being removed by an owner, one-to-one chat with user who sent message is opened
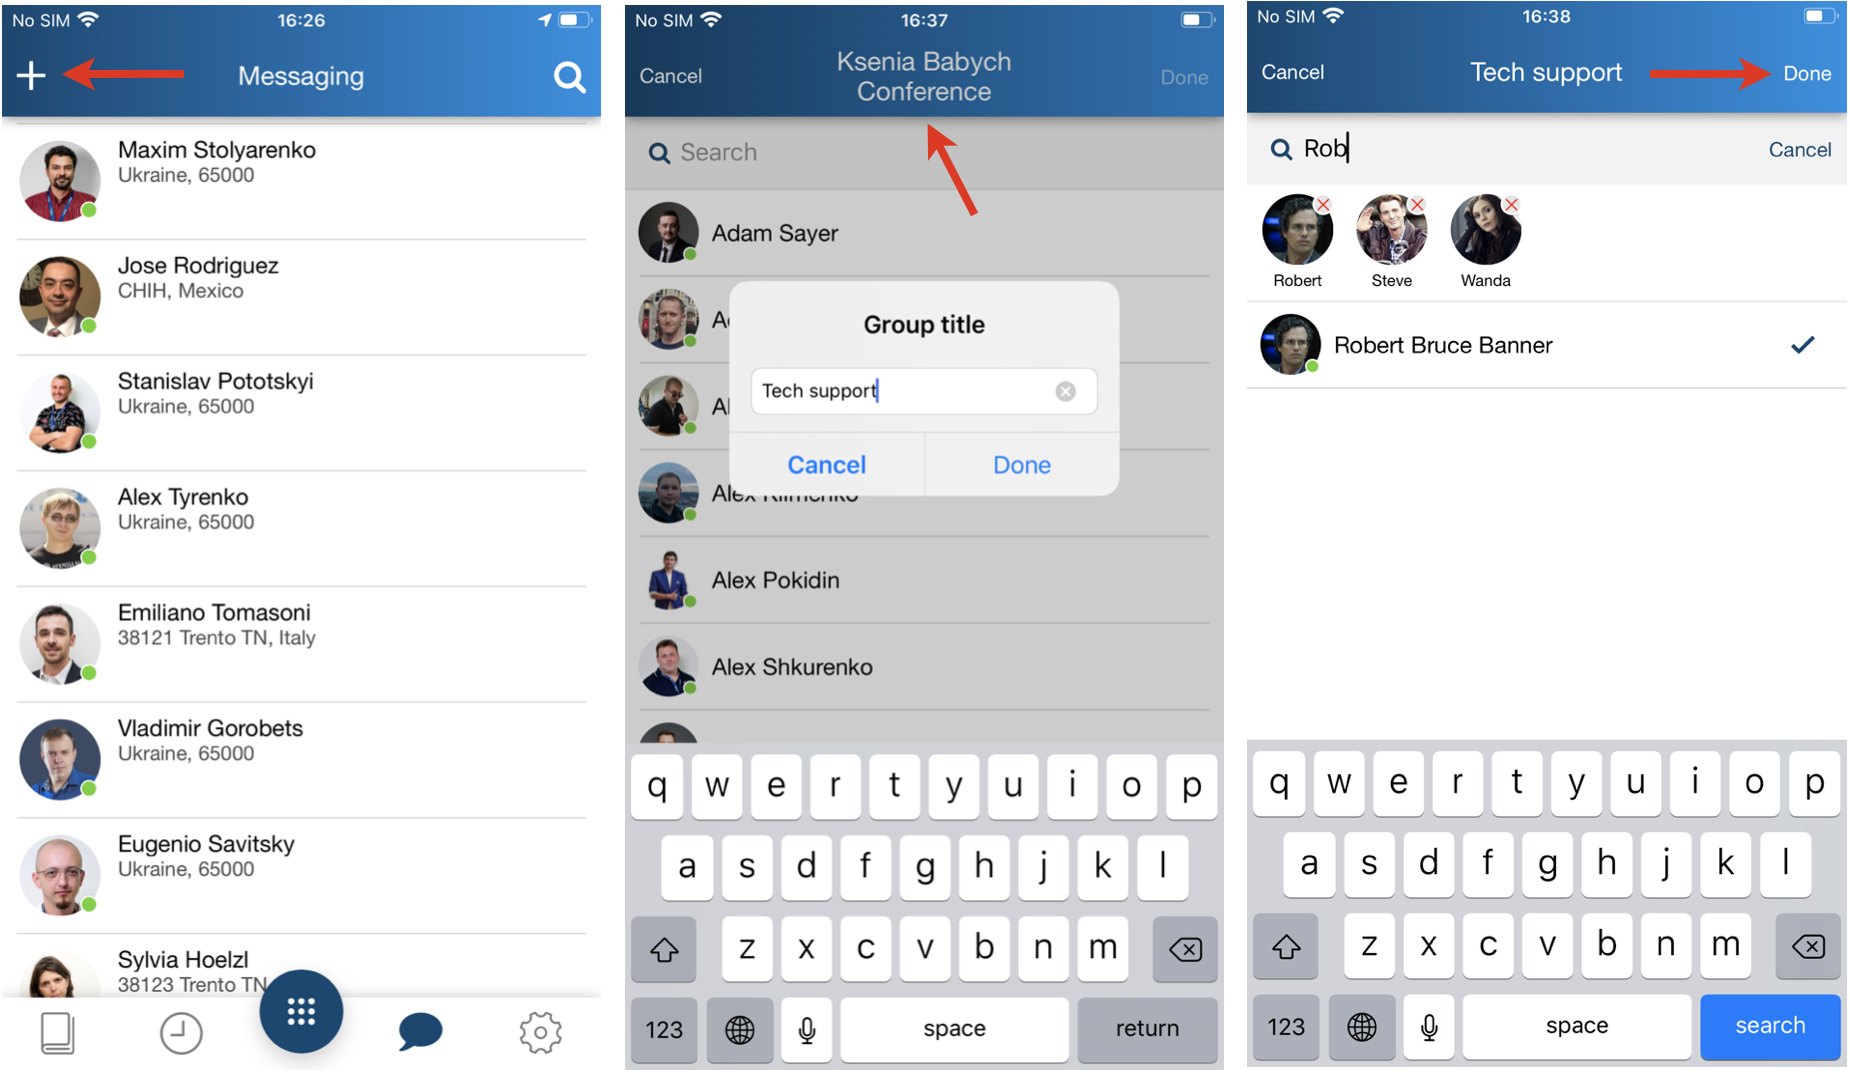
Create a group chat
- Tap +
Edit the group title (optional)
Add participants
Tap Done to finish
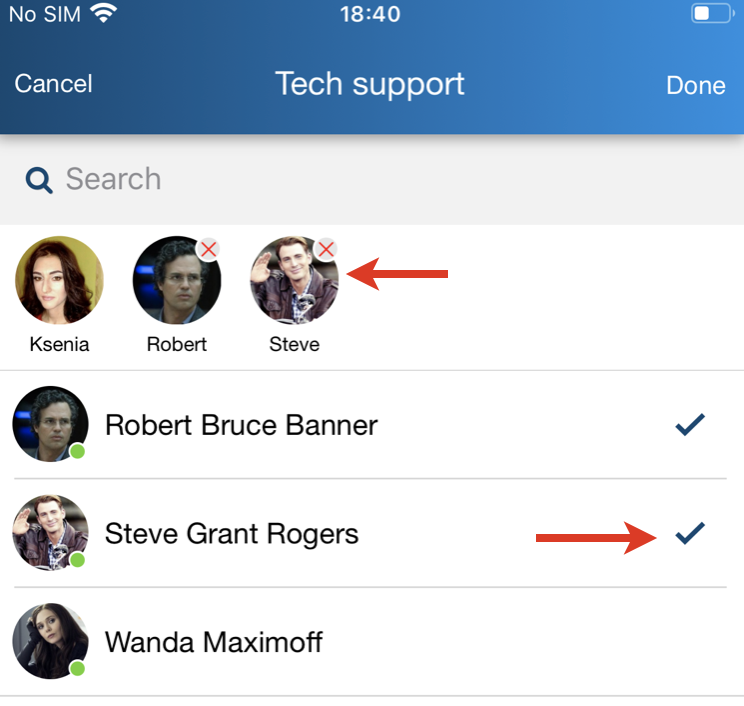
Add / remove participants
Note: You cannot remove yourself and a group chat manager.
Open the group chat management section by tapping on its title.
To add a participant: start typing a participant's name/ extension number in the search field, tick to add
To remove a participant: untick a participant or tap on a participant with indicated x icon
Tap Done to save changes
Leave/ close the group chat:
Only the group chat manager can close the chat. Other participants can leave it and can join back only after the manager adds them again.
Swipe the group chat left and tap Delete
History
Note: Call history and missed calls notifications are synced over the PBX among all the devices registered to your account (except for W-AIR handsets).
Tap History to access the log of calls. Incoming, outgoing and missed calls (highlighted in red) are displayed in All tab. To view only missed calls, tap Missed tab.
Tap and hold a call to be able to delete, archive or copy a phone number to clipboard.
Tap the double Arrowhead icon to view user contact details and a call log.
Note: in case the call log is empty, make sure that:
backend for CDR is enabled in WMS Settings -> PBX -> CDR
ACL group of your user does not have restriction “Cannot use” -> “History”
Note: calls via Collaboration application are also displayed in the device’s call history (Phone -> Recents).
Voicemails
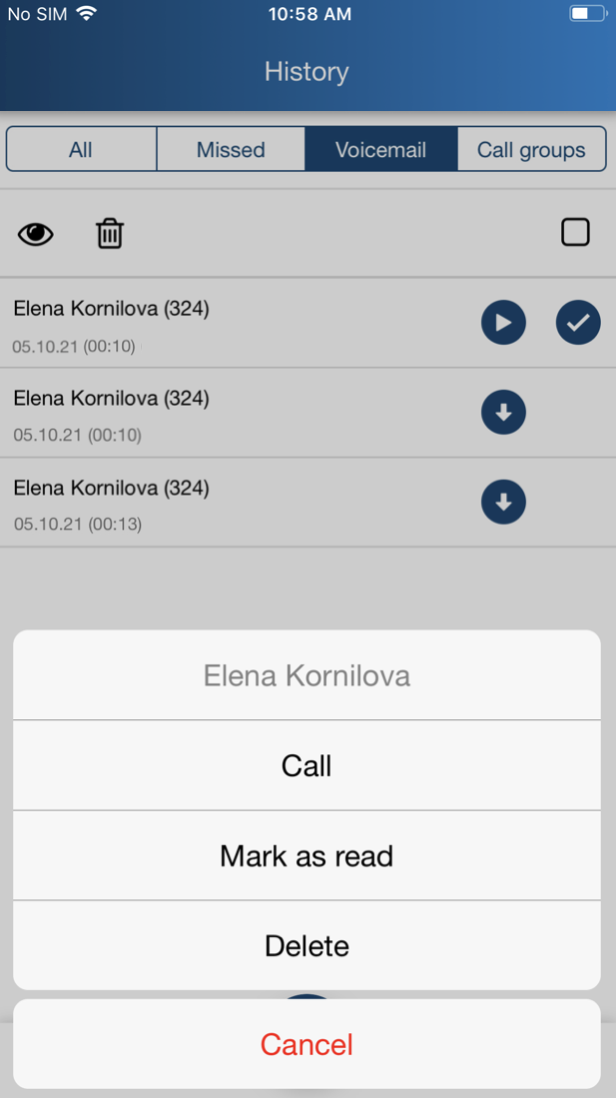
Tap Voicemail tab to access your Voicemails.
- To download a voicemail message, tap Arrow icon
- To play it back, tap Play button
- To pause a playback, tap Pause button
- Other options: tap on a voicemail message to display the drop-down list: Call a user who left a message, Mark as read or Delete it
Multi-edit of Voicemails:
- Select one or multiple Voicemails
- Click Mark as read or Delete icon
Call recordings
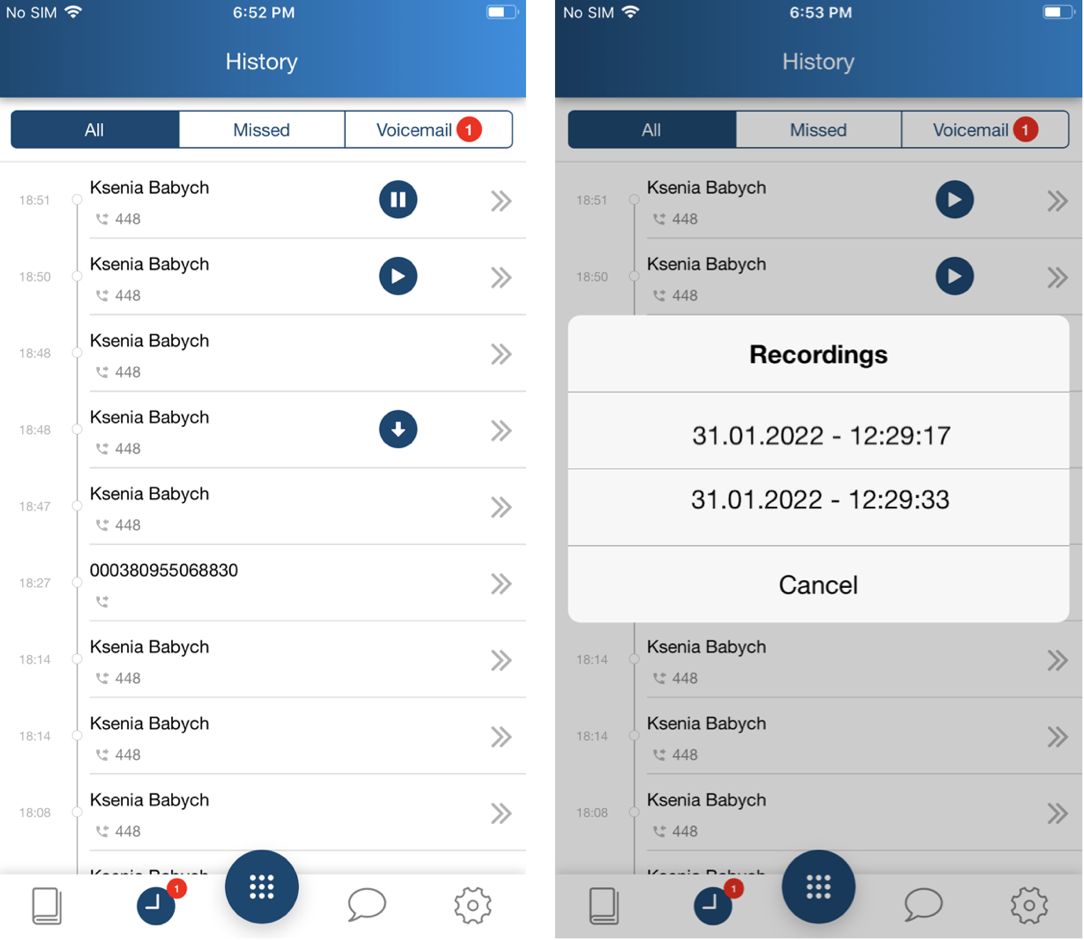
Call recordings are displayed and can be played back from History.
- To download a call recording, tap Arrow icon
- To play back a downloaded recording, tap Play button
- To pause a playback, tap Pause button
In case there are several recordings of one call, they are displayed as a list.
Call groups
The Call groups tab provides support for Call Group notifications manager feature.
Note: Starting from Beta version 8.7.55904, the Call groups tab is displayed only in case Call group notification manager is set up.
Documentation: How to set up the Call Group notifications manager feature.
It displays all missed events in Call groups which you are monitoring. Via this tab, you can call a user back, mark the event as read, or delete it.
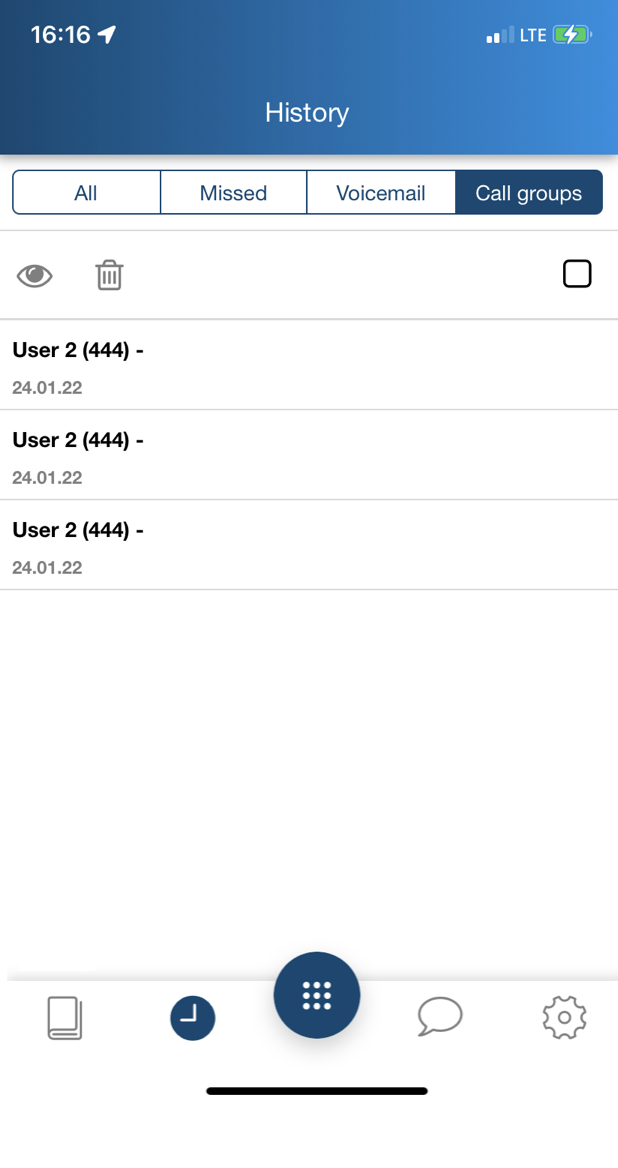
Note: Starting from Beta v. 8.7.55914, it is possible to listen to missed Call group voicemails on the Call groups tab.
Settings
- Account: login window
- Personal: contact details
E-mail
mobile number
Contact center: The feature lets you dynamically log into Call groups
Note: The support starts from iOS app version 8.6.55887 and WMS version 5.04.20211108.3.
Sign-On: turn it on and select Call groups in the Groups section, to dynamically log into them
Unavailable on away / dnd: the option auto-pauses you in all Call groups when your status changes to Away/ DND
- Groups: see the list of all Call groups, both the CGs you’ve been statically added to (the toggle is greyed, the status cannot be changed on this page, only via WMS), and the CGs you can choose to dynamically log into.
For more information, see the documentation: Call distribution in Call groups - Admin Guide - Contact center
- Features by call class (Internal, External, Blacklist, Whitelist)
Activate class: available for External / Blacklist / Whitelist (activates the class)
Call reject: if enabled, you do not receive incoming calls
Busy call forward: check the box and enter the number or VOICEMAIL, to enable call forwarding when busy on the phone
Unavailable call forward: check the box and enter the number or VOICEMAIL, to enable call forwarding in case of no answer
Force call forward: check the box and enter the number or VOICEMAIL, to enable the forwarding of all the incoming calls
Call waiting: enable to be able to receive more than one call at a time
Mobility with timeout: if enabled, you receive incoming calls to your mobile number after the specified timeout; mobile number must be configured in Collaboration Mobile app Settings -> Personal
- Advanced:
Debug: if enabled, you can collect logs in case of crashes/ issues with the application. Detailed information can be found in Collecting logs from iOS apps chapter of Debugging of Mobile Apps Guide
Send (appears only after enabling Debug option): allows sending an email report with the collected logs to Wildix support
Dark Theme: when the toggle is on, enables dark mode for Collaboration app on your phone. Note: after turning the toggle on/off, you are requested to restart the app to switch between dark/light mode.
- Call-Through PBX: provides possibility to make calls via GSM network of the PBX from Collaboration app (see the Call-Through PBX setup section for more details)
Use PBX LAN Address (enabled by default): the application connects to one of IP candidates: IP/domain and port 443 if a user did not specify a port on login page or IP/domain:port if user specifies a port on login page
Disable SIP mode: the feature is disabled by default. If enabled, call via Direct call is set as default mode for call generation. In this mode application de-registers from the PBX; missed call counter, new voicemail counter and status of Trunk, Timetable, Switch, 3 state switch, Call group Feature Keys stop working; chat and call control/ call generation via remote device continue to work
Limitation: If the option remains active for more than 30 days, PUSH subscription is removed for this extension. As a result, user is be able to receive chats. To reactive PUSH subscription, switch off and then switch on again Disable SIP mode.
Firewall bypass (beta): the feature is disabled by default. The app uses TURN server located on turn.wildix.com (used TCP port 443). If enabled in On mode, the app switches audio stream to PBX via external TURN server right away after call was started. If enabled in Auto mode, the app switches audio stream in case it is missing for 5 seconds after call was started
Limitations:
firewall bypass works only on Сloud PBXs and on PBXs with 1-to-1 NAT
application supports only 1 call in case feature is enabled
switching to external TURN server during conversation in case audio stream was lost (in Auto mode)
Use WebRTC (available starting from WMS 5.0): the feature is disabled by default. If enabled, the connection between calls is established via WebRTC
Requirements:
- WMS version 5.01.20200327.3 or higher
- iOS version 10.0 or higher
Limitations in WebRTC mode:
- conference calls are not supported yet
- G.729 codec is not supported
- Ring on Apple Watch: if enabled, you receive incoming call notification on Apple Watch (Apple watch extension)
Chat image quality: select one of the image resolutions (High/ Standard/ Low) to compress or improve quality of pictures/ photos before sending
Save chat images to gallery (enabled by default): allows saving images from chat sessions on the phone by tapping on it
Convert heic to jpeg (enabled by default): allows converting of .heic images into jpeg
- Give Feedback: provide customer feedback
- About: Info about App version and developer
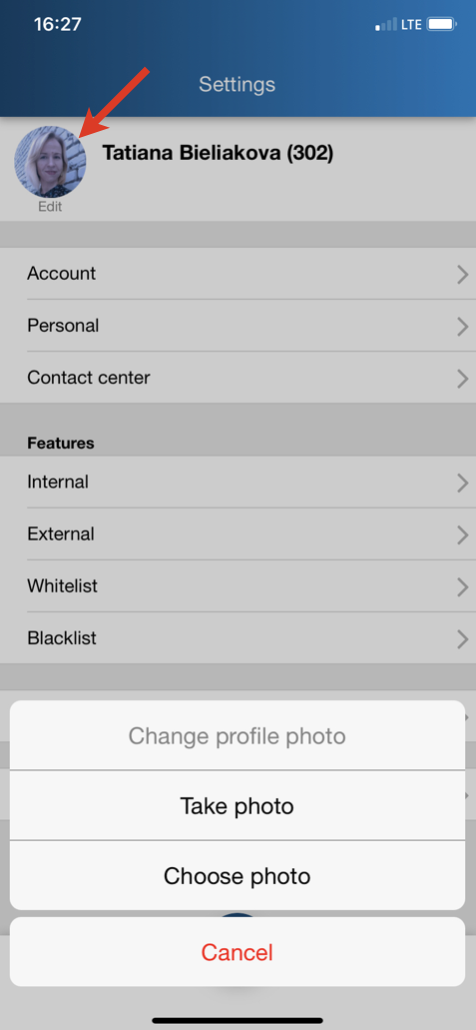
Change user picture
- Tap user picture to change the current profile photo
- Take a new one or choose the already existing photo
Log out
- Tap Settings -> Account
- Tap the Log out icon:
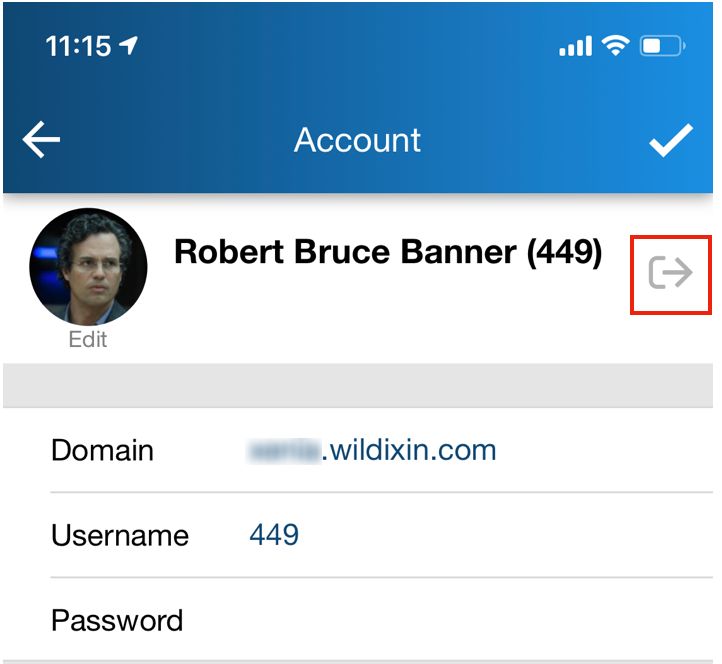
Note: after you log out, you will no longer receive calls and messages.
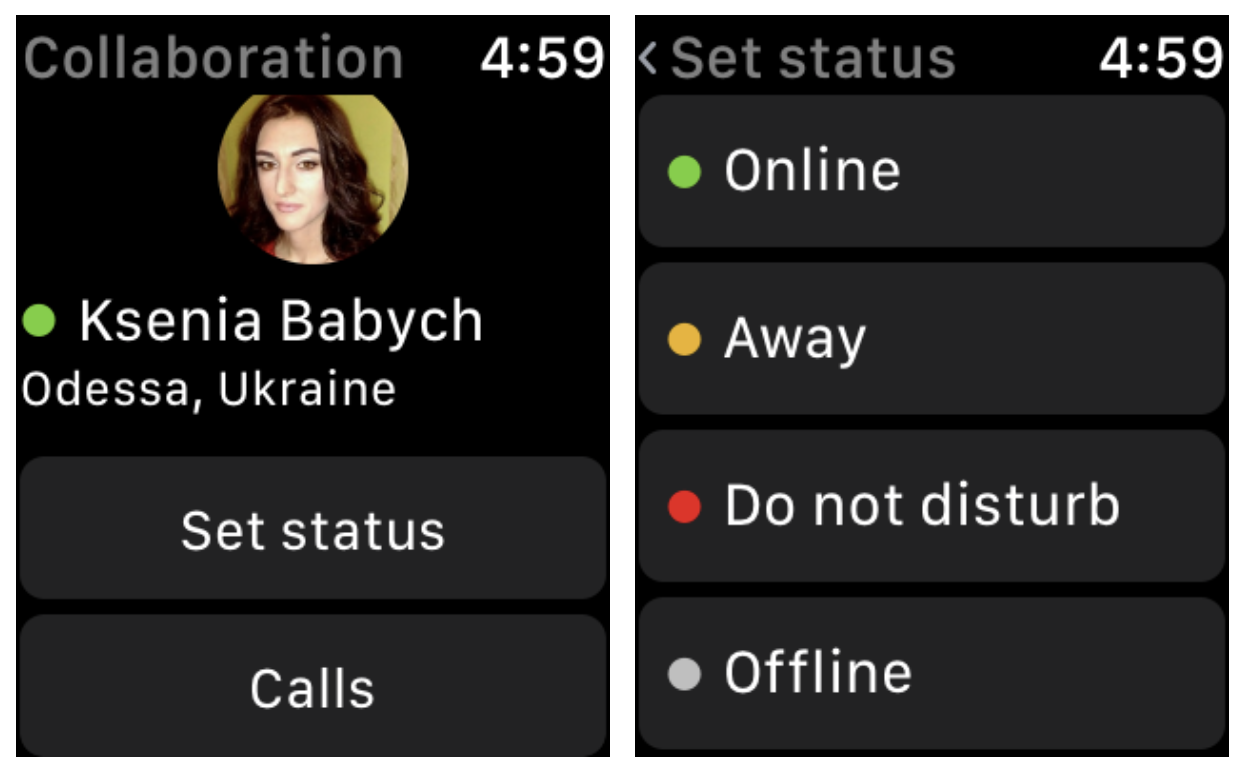
Appendix 1. Apple watch extension
Apple Watch extension is available starting from iOS app version 7.2.35312.
Upon the first launch, open the iOS app to sync it with Apple watch.
Notes:
- To display incoming call notification on Apple Watch, enable "Ring on Apple Watch" in Advanced settings
- To sync user status and active call information, it's necessary to open both Apple watch and iOS apps
- Sync delay between Apple watch and iPhone may reach up to five seconds
- In some cases Apple watch app may stop receiving data (status, user pic) from iOS app; to fix this issue, it is necessary to reboot Apple watch
Apple Watch extension allows you:
To see/ set status from watch (see full status, e.g. "away XXX until yy.zz.mmmm"/ set only away, dnd, online, offline)
To view all active calls:
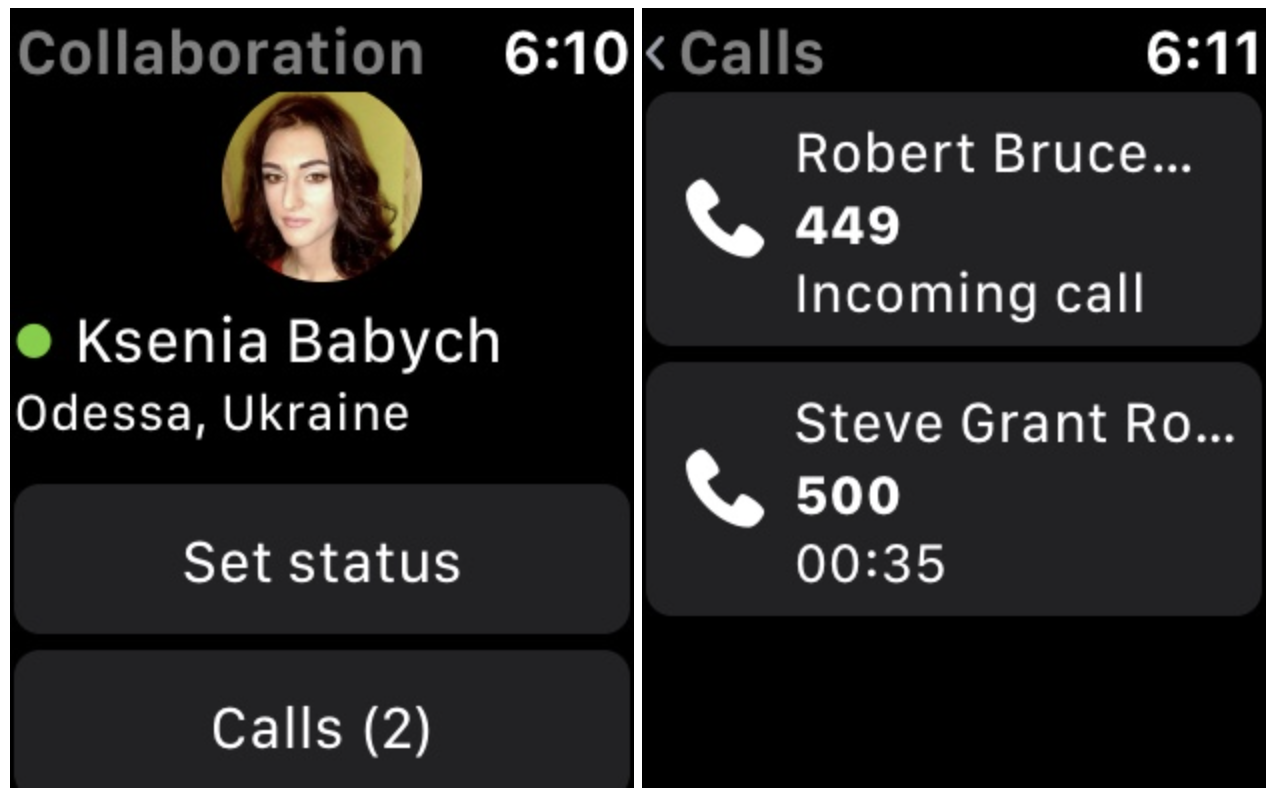
To control all active calls: answer/ hang up/ put on hold:
