Phones Accessories Quick Start Guide
In this Quick Start Guide you can find information on how to connect WHS headsets (WHS-MONO, WHS-DUO, WHS-BT), Mono/ DuoLED, DuoLED Bluetooth, WelcomeConsole-EXT – keypad extension module for WelcomeConsole/ WP490 2015/ WP490G, WiFi Dongle, WPEHS – Wireless Headset Adapter for WelcomeConsole/ WP490 2015/ WP490/ WP480G.
Useful links:
- Wildix Phones Accessories Datasheets: Phones Accessories Datasheet
- Wildix Phones Documentation (User Guides, Datasheets, End User Brochures): Desk phones documentation
- W-AIR Phones Documentation (User Guides, Datasheets, End User Brochures): W-AIR Documentation
- Collaboration and Mobile Apps Documentation
Updated: March 2024
Permalink: https://wildix.atlassian.net/wiki/x/Fx-OAQ
WHS – Wildix Headsets
- WHS-MONO (one ear)
- WHS-DUO (two ears)
- WHS-BT (bluetooth, one ear)
Third party headsets integrated with Wildix phones: Wildix Compatible Headsets - Jabra, Plantronics, EPOS Sennheiser, JPL, Axtel, Orosound.
WHS-MONO / WHS-DUO
Packing list:
- 1 x headset WHS-MONO/ WHS-DUO
- 1 x RJ9 cable
- 1 x 3.5 mm cable
- 1 pair x foam ear pads
Compatibility
- WP4X0 2015/ WP4X0G/ Start pre 2024/ WorkForce pre 2024/ WelcomeConsole pre 2024
- WP600A/ ACG/ Vision/ SuperVision
- WP old series
- W-AIR Basic (EOL)/ W-AIR 100 (EOL)/ W-AIR LifeSaver/ W-AIR Med/ W-AIR Office
- Compatible with iPhone and Android phones
- Compatible with Apple Mac and Windows PC
Connection
- Use RJ9 cable for WP4X0/ WP4X0G/ Start/ Workforce/ WelcomeConsole and WP old series
- Use 3,5 mm cable for WP600A/ACG, Vision/ SuperVision, W-AIR Basic / W-AIR 100 (EOL)/ W-AIR LifeSaver/ W-AIR Med/ W-AIR Office, iPhone and Android phones, Apple Mac and Windows PC
WHS-BT
Packing list
- 1 x monaural Bluetooth headset
- 1 x USB charging cable
Compatibility
- WP600A/ WP600ACG, Vision/ SuperVision, WorkForce pre 2024 and WelcomeConsole pre 2024(USB dongle is required, e.g Jabra Link 360/ 370)
- W-AIR LifeSaver/ W-AIR Med/ W-AIR Office
- Compatible with iPhone, Android phones, Apple Mac and many Windows PC models
Features
- Bluetooth version: V4.0
- Noise canceling
- Wideband Audio
- Monaural (One Ear)
- Flex, 360°
- Talk time: 12 hours
- Standby Time: 200 hours
- Working range: up to 20 meters
- Rechargeable time 3 hours
- Ergonomic design and adjustable headband for maximum comfort
- Light weight
- Answer / hangup / volume control on WP600AXX/ Vision/ SuperVision/ WorkForce/ W-AIR LifeSaver (ex W-AIR 150)/ W-AIR Med/ W-AIR Office/ iOS app
- it works on Android app, only if “Native call support beta” feature is enabled; it works only on “pure” Android devices from Google
- it works on WorkForce and WelcomeConsole only with USB dongle from Jabra / Plantronics / Sennheiser (e.g. Jabra Link 360/ 370)
- it works on Collaboration on Mac OS / Windows only with USB dongle from Jabra / Plantronics / Sennheiser (e.g. Jabra Link 360/ 370)
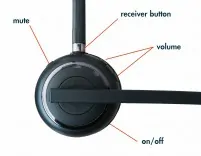
Quick Start Guide
Description of buttons:
Charging
Use the USB cable provided to charge the headset:
- When charging, the red LED is on
- When approaching the full battery level, the red LED goes down and the green LED turns on
- When charging is complete, the LED goes down
Turn on
Proceed as follows:
- Move the switch to the position 1
- The blue and green LEDs flash several times
Turn off
- Move the switch to the position 0
Connection to WP600A/ACG, Vision, SuperVision
Make sure the headset is switched on, then proceed as follows:
Press and hold the receiver button
 , until the blue LED starts flashing
- Go to the Wildix WP phone’s Settings menu -> Wireless & Networks -> Bluetooth and move the switch to the position ON
- Select WHS-BT from the list of AVAILABLE DEVICES
When connected, the headset’s blue and green LEDs turn on for several seconds and a voice prompt says "Connected".
Connection to W-AIR LifeSaver/ W-AIR Med/ W-AIR Office
Make sure the headset is switched on:
- Press and hold the receiver button
 , until the blue LED starts flashing
 - Go to the Wildix W-AIR LifeSaver/ W-AIR Med/ W-AIR Office handset’s Settings menu -> Bluetooth and select Enable Bluetooth
- Select Search for devices
- Select Wildix WHS-BT headset (the chipset number is shown) from the list of available bluetooth devices and select Pair
- Enter the PIN: 0000
When connected, the headset’s blue and green LEDs turn on for several seconds and a voice prompt says "Connected".
Connection to WorkForce/ WelcomeConsole
- Connect a USB dongle (e.g. Jabra Link 360/370) to your PC
- Install and run dedicated software for the USB dongle (e.g. Jabra Direct)
- Make sure the headset is switched on, press and hold the receiver button
- Follow instructions of the desktop software for pairing the USB dongle and the WHS-BT headset
- When paired, connect the USB dongle to WorkForce/ WelcomeConsole
Answer / End a call
Proceed as follows:
- To answer or to end a call, press the receiver button on the headset
- The blue and green LEDs flash twice
- During the conversation the LED is off
MonoLED, DuoLED
Note: It is required to install WIService (Collaboration -> Settings -> Extensions) to use the headset. Consult Collaboration Guide for details.
Packing list
1 x MonoLED/ DuoLED headset
1 x table stand
1 x portable case
1 x spare ear pads
1 x USB Type-A adapter
Compatibility:
- WorkForce 5
- ForcePro 5
- WelcomeConsole 5
- WorkForce pre 2024 (full LEDs support starts from firmware v. 65.145.2.7)
- WelcomeConsole pre 2024 (full LEDs support starts from firmware v. 68.145.2.28)
- Vision, SuperVision
- Apple Mac, Windows PC
Features
- USB Type-C plug
- USB adapter included
- Answer/ Hangup/ Mute/ Volume control buttons
- Status LEDs: online, away, DND, on call, ringing, call held, missed call
- Table stand included
It is possible to enable sidetone feature on Windows, consult this Article for details.
Quick Start Guide
Headset Overview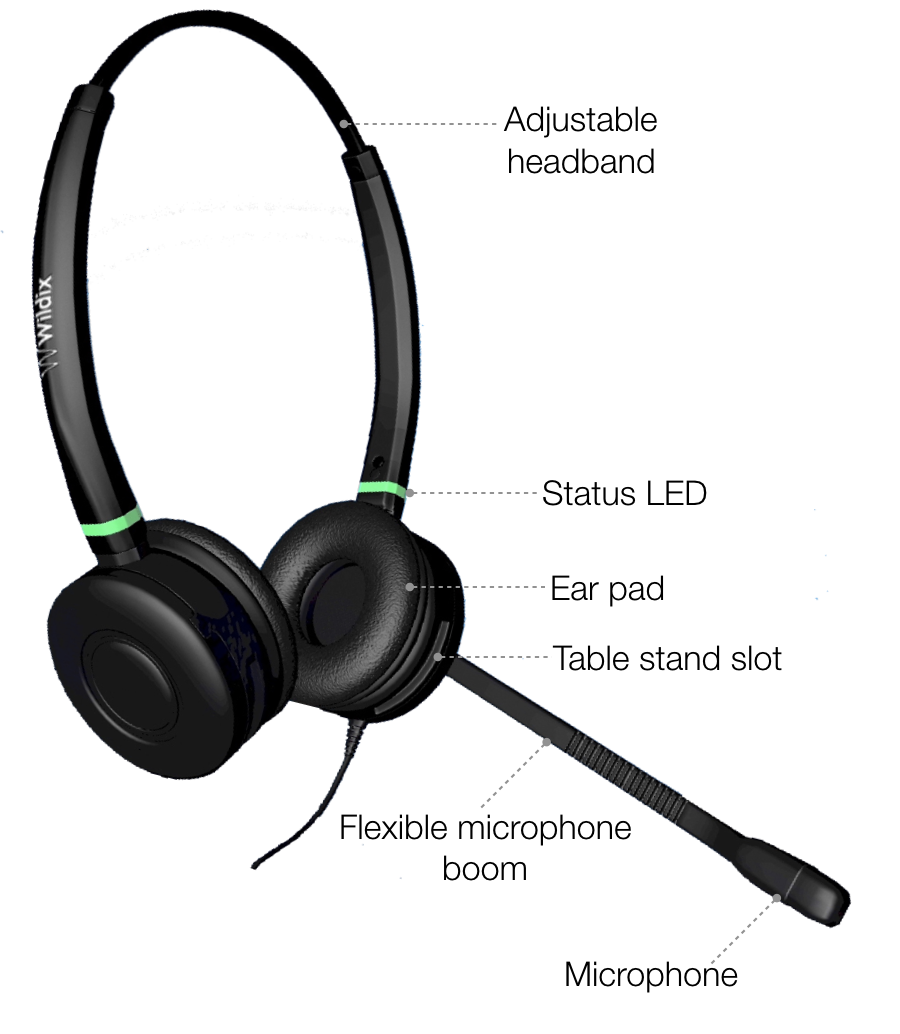
USB Connector Overview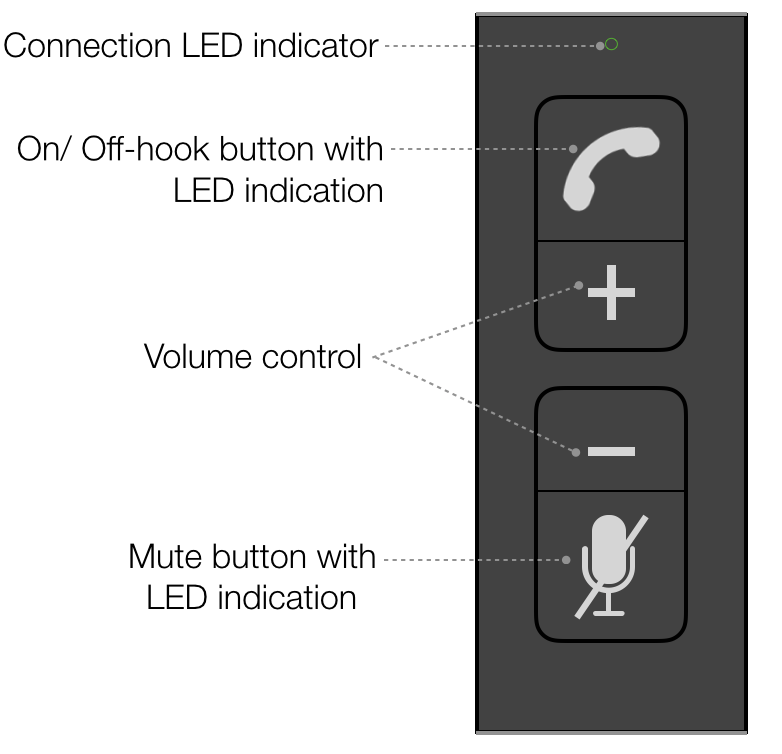 Connection
- Connect the Headset to the USB port on your phone using the USB type-A adapter
- Connect the Headset to the USB port on your PC or laptop using the USB Type-C plug
- Set “Wildix Mono/DuoLED” as audio device in Collaboration -> Settings -> Web phone

LED Indicators
Headset:
| Status | LED indication | Color |
|---|---|---|
Available | Steady on | Green |
Away | Orange | |
DND | Violet | |
Incoming call | Fast short blinks | Red |
Outgoing call/ In call | Long blinks | |
Hold | Two fast blinks, repeated | Status color + red |
Missed call | Long blinks followed by fast short blink |
USB Connector LED indication:
- Connection LED indicator: steady green when connected
- On/ Off-hook LED indication:
- Incoming call - fast red blinking
- Outgoing call/ In call - steady red
- Mute LED indication: steady red when muted
Answer/ end a call
- Press Off-hook button to answer/ end a call.
Adjust volume during a call/ ringer volume
Press Volume+/ Volume- Control during a call to adjust the volume/ from idle to adjust the ringer volume.
Note: it is possible to increase the volume level by +10 dB by upgrading the Headset firmware. Consult this Guide for details.
Mute the microphone during a call
- Press Mute button during a call to mute/ unmute the microphone.
Hold/ resume a call
Press and hold the On/ Off-hook button for several seconds during a call.
Enable/ disable DND status
- In idle state, press and hold the On/ Off-hook button for several seconds to enable/ disable DND (Do not disturb) status.
After disabling DND, the previous status of the user is set.
MonoLED-BT/ DuoLED-BT
IMPORTANT NOTE ABOUT CHARGING!
Place the Headset on charge as shown in the following picture to avoid damaging the unit:
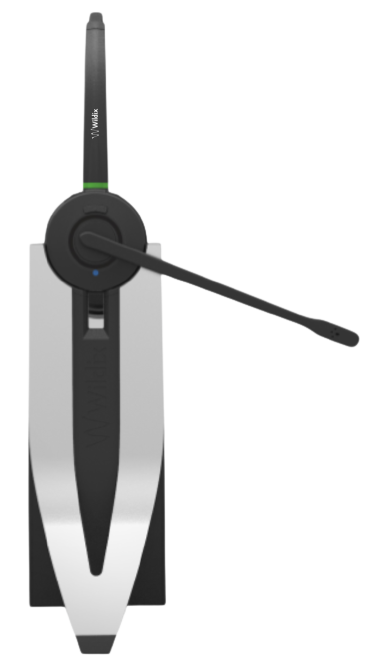
- Place the Headset with the mic boom on the front side so it matches the Wildix logo
- Be sure to insert the Base Station charging pins directly into the Headset charging notches so they match completely
Warning! Placing the Headset in the other direction can lead to severe damage if the USB port output is higher than 1500 mA.
Notes:
- It is required to install WIService to use the MonoLED-BT/ DuoLED-BT. Consult Collaboration Guide for details
- MonoLED-BT headset is available only as HWaaS
- In one of the first versions of the Headset delivered to customers, there are certain issues that can be fixed by upgrading, consult the Procedure if you encounter any within the list
Packing list
- 1 x MonoLED-BT/ DuoLED-BT Headset
- 1 x Base Station
- 1 x USB Type-C to Type-C cable
- 1 x USB Type-A to Type-C adapter
- 1 x portable case
Compatibility
The Headset supports dual (multipoint) wireless connection, which means it can be connected to two devices simultaneously:
- Via Base Station. Such connection provides full support of LED user and call statuses and compatible with:
- Apple Mac, Windows PC
- WorkForce 5
- ForcePro 5
- WelcomeConsole 5
- WorkForce pre 2024
WelcomeConsole pre 2024
Vision/ SuperVision (starting from v.3.07.51)
Limitation on Vision/ SuperVision: To change volume on MonoLED-BT/ DuoLED-BT, use volume buttons on Vision/ SuperVision.
- Via Bluetooth module embedded in the Headset itself.
- Vision, SuperVision
- W-AIR LifeSaver
- W-AIR Med
- W-AIR Office
Android, iOS apps
Limitation: Connection via embedded Bluetooth module doesn't provide:
- LED user statuses support, only call statuses
- Call control (it works only if connected via Base Station)
Features
- Status LEDs: online, away, DND/conference, on call, ringing, call hold, missed call
- Answer/ Hangup/ Mute/ Volume control buttons
- Wideband audio frequency
- Ultra noise canceling mic
- Up to 30m wireless range
- Talking time up to 15 hours
- High-performance 6th generation CVC technology
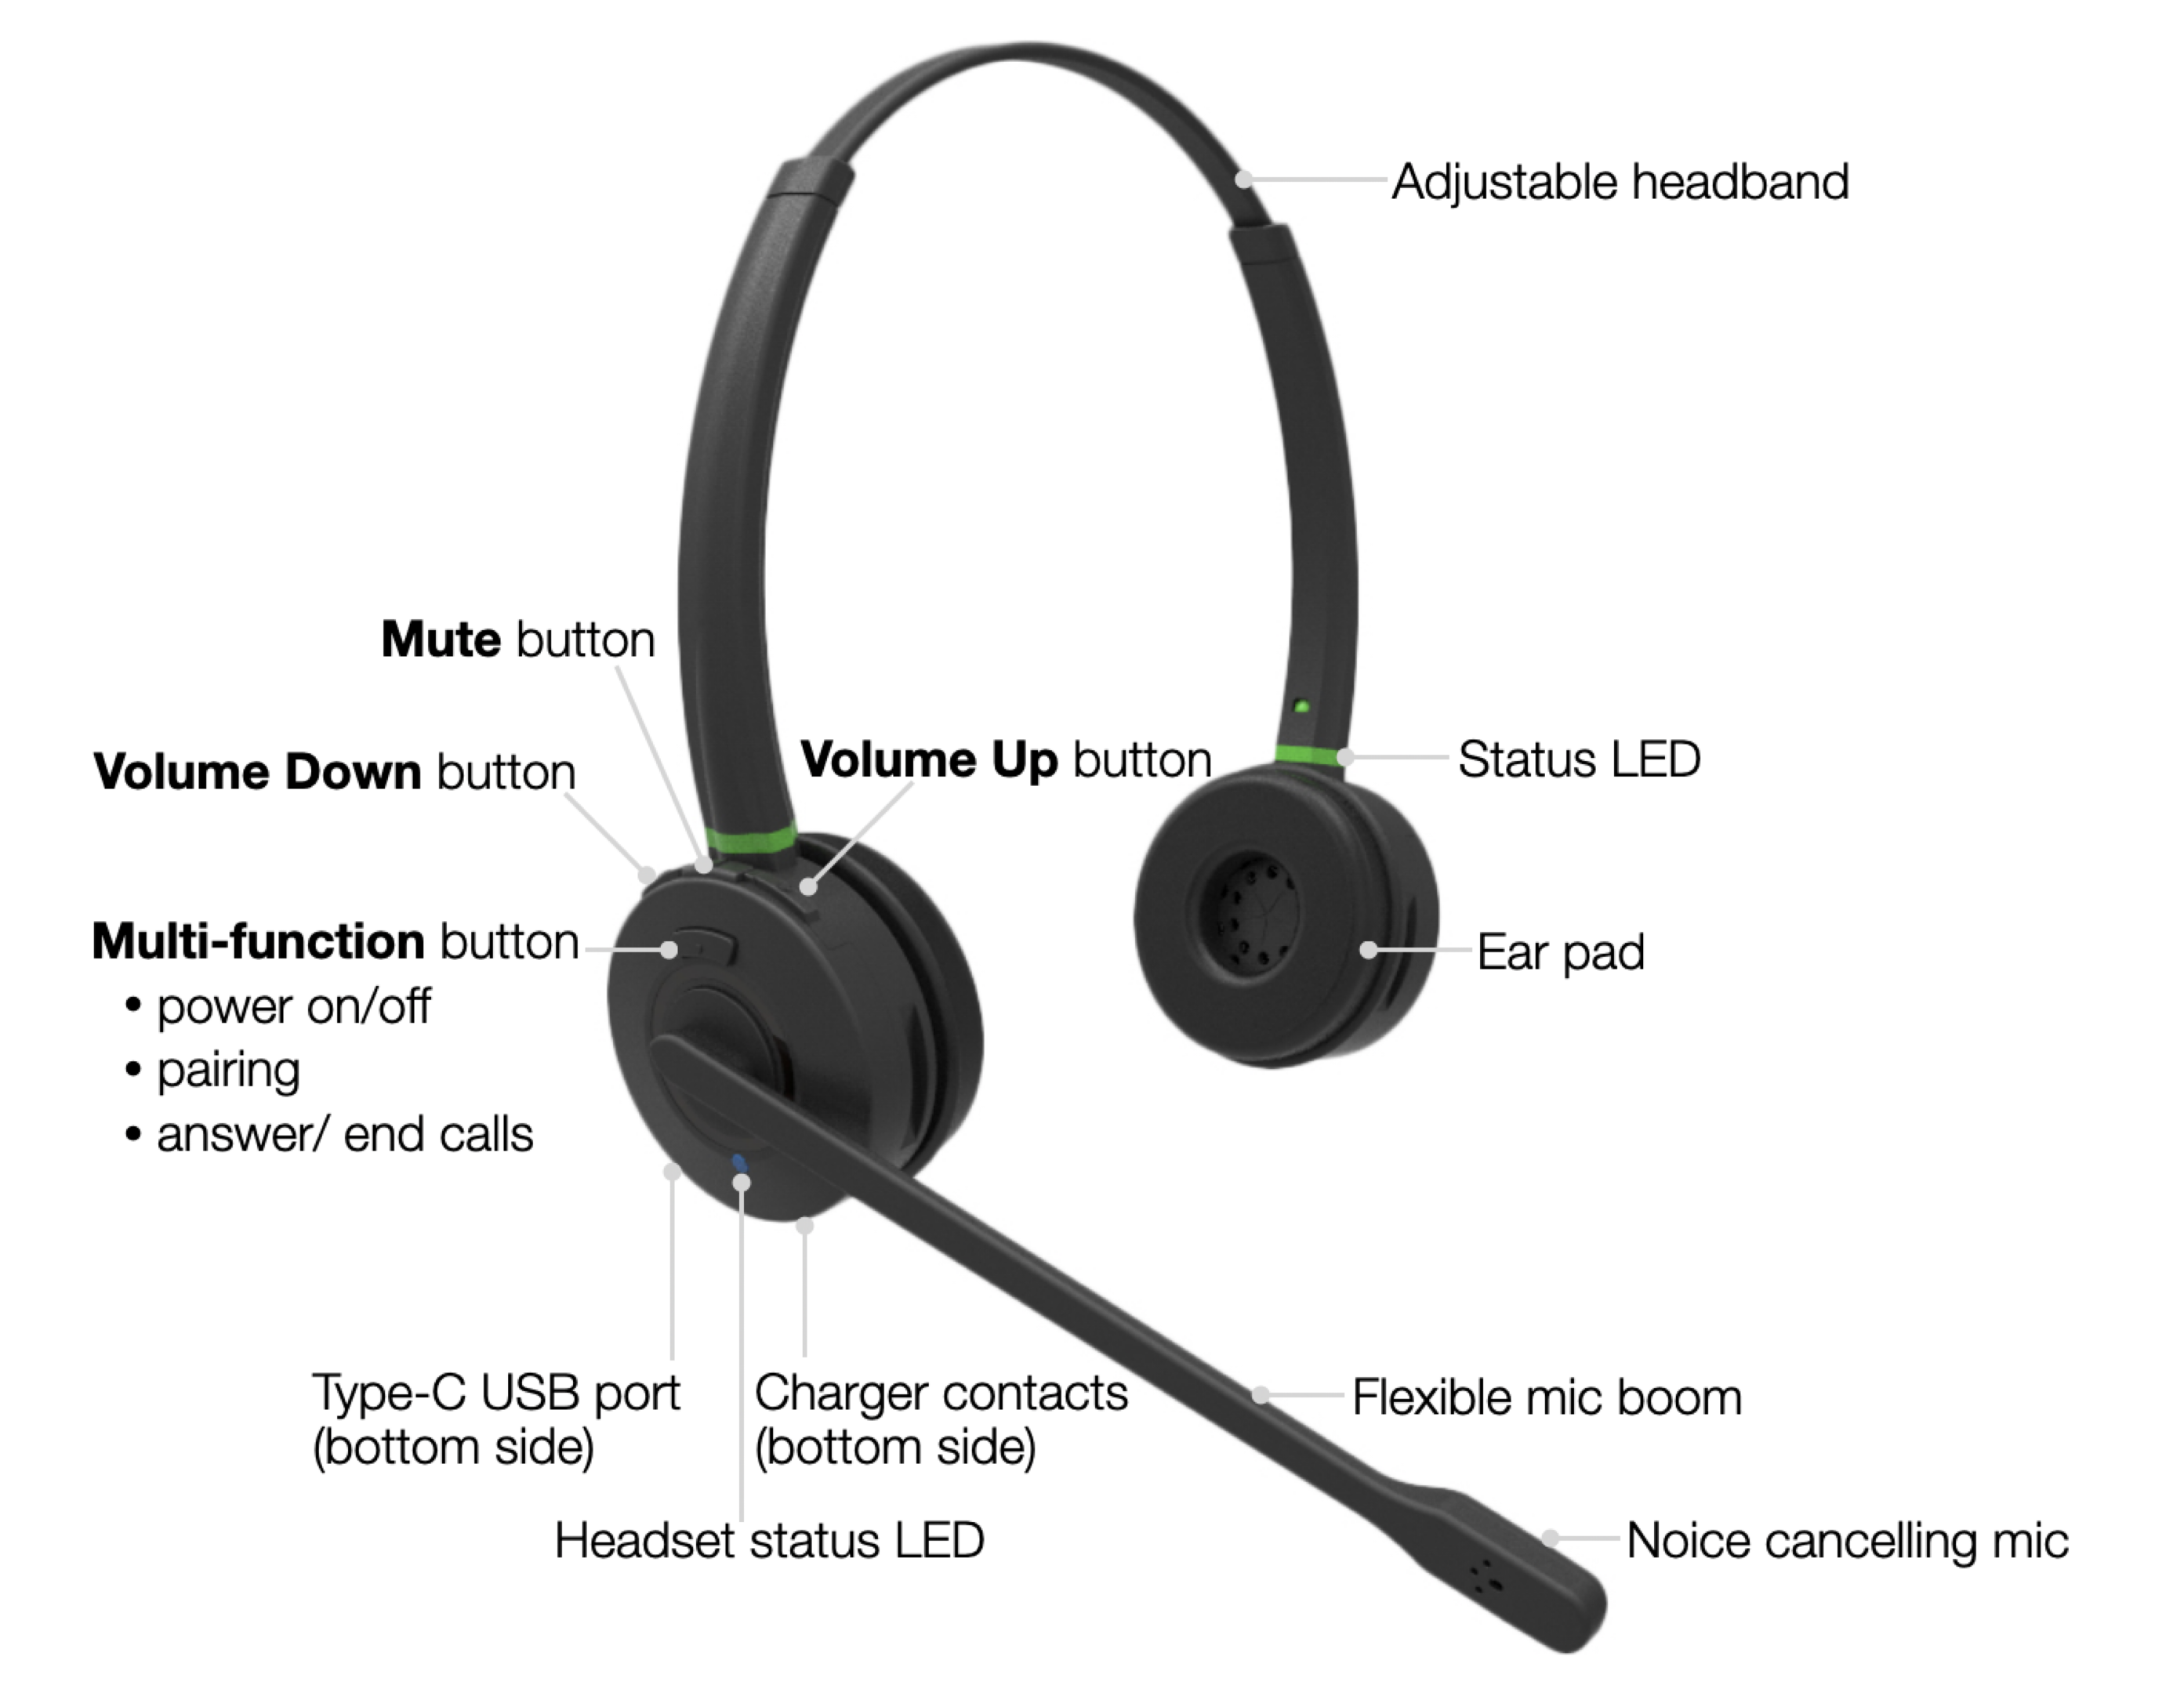
Quick Start Guide
Headset Overview
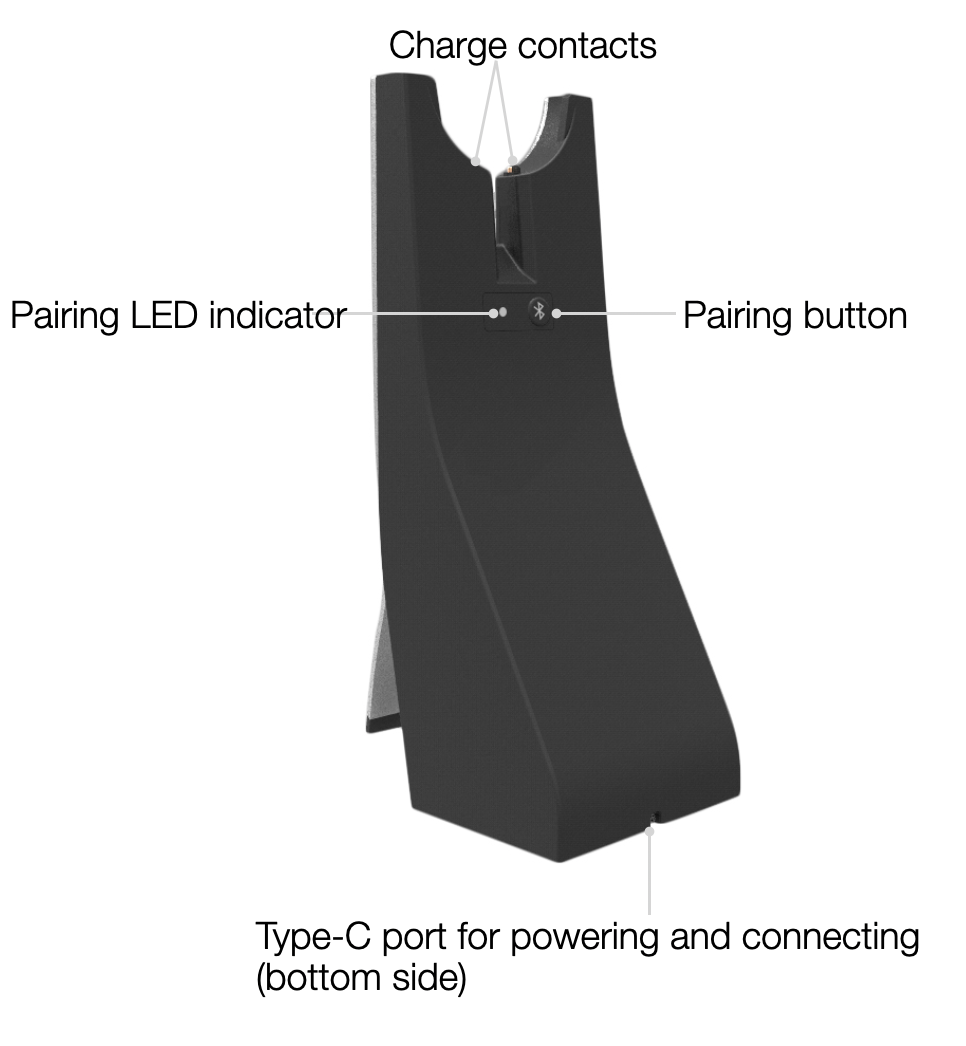
Base Station Overview
LED Indicators
Status LED
User/ call status | LED indication | Color |
Available | Steady on | Green |
Away | Yellow | |
DND/ in conference | Violet | |
Outgoing call/ In call | Red | |
Hold | Two fast blinks, repeated | Status color + red |
Missed call | Long blinks followed by fast short blink | Status color + red |
Incoming call | Fast short blinks | Red |
Headset status LED
| Headset status | LED indication | Color |
|---|---|---|
| Power on | One blink | Blue |
| Power off | Red | |
| Pairing mode | Fast short blinks | Blue |
| Pairing successfully | Long blinks | Blue |
| Answer a call | ||
| Charging | Steady on | Red |
| Fully Charged | Blue |
Base Station pairing LED
- Successful connection - long blue blinks
- Pairing - fast blue and red blinks
Power On/ Power Off
- Press Multi-function button for 3 seconds to turn the Headset on/ off
Charging
- Connect USB cable to the Base Station
- Plug the cable into a device USB port (use Type-A adapter if needed)
- Place MonoLED-BT/ DuoLED-BT into the Base Station
- When charging, the Headset status LED turns red
- When charged, the Headset status LED turns blue
Battery charging time
- Less than 60 minutes to charge 20%
- Less than 90 minutes to charge 50%
- Fully charged in less than 3,5 hours
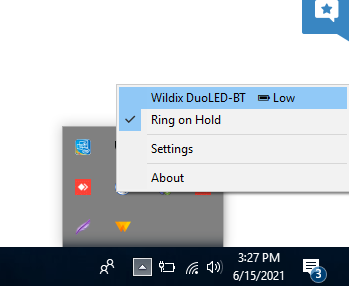
To check the battery level:
- On Windows, you can check the battery level using WIService tray. Go to Quick Launch Toolbar -> right-click on Wildix Integration Service icon and check the level of battery (Low, Medium, High):
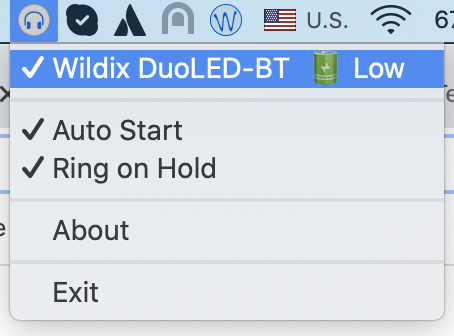
- On macOS, Go to Menu Bar -> click on WIService icon check the level of battery (Low, Medium, High):
Connection
Via the Base Station:
- Connect USB cable to the Base Station
- Plug the cable into a device USB port (use Type-A to Type-C adapter if needed)
- Turn the Headset on
- The Headset Status LED starts blinking and the voice prompt announces “Your Headset is connected”
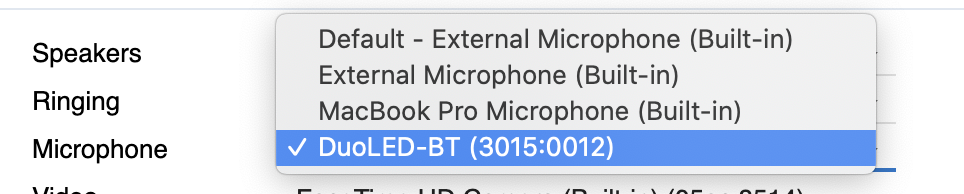
- For Collaboration, set “Wildix MonoLED-BT”/ “Wildix DuoLED-BT” as audio device in Collaboration -> Settings -> Web phone
The Headset and the Base Station are paired by default. If you accidentally unpair them, proceed with the following steps to pair them back:
- Press and hold Pairing button on the Base Station for 3 seconds, the Pairing LED indicator starts blinking with fast blue and red blinks
- Make sure the Headset is powered off. Press and hold the Multi-function button for 3 seconds until you hear “Power on”. Keep pressing for 3 seconds more until you hear “Pairing”
- The Headset Status LED starts blinking and the voice prompt announces “Your Headset is connected”
Via Bluetooth embedded in the Headset:
- Unplug the Base Station and turn the Headset off
- Activate Bluetooth on a device you want to connect the Headset to
- Press and hold the Multi-function button for 3 seconds until you hear “Power on”. Keep pressing for 3 seconds more until you hear “Pairing”
Search for MonoLED-BT/ DuoLED-BT in Bluetooth devices list on your device and select it for pairing, for example, on Android device:
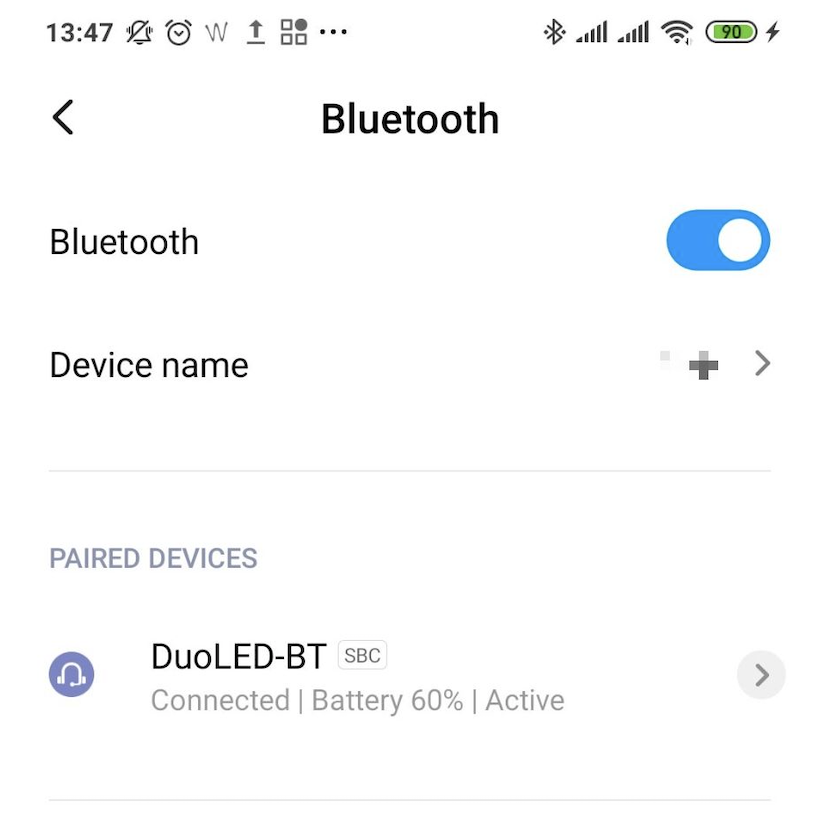
- The Headset Status LED starts blinking and the voice prompt announces “Your Headset is connected”
Answer/ End a call
- Press Multi-function button to answer/ end a call
Mute/ unmute a mic
- Press Mute button to mute/ unmute a mic
Put on pause/ resume a call
- Press Multi-function button for 2 seconds during a call to put a call on hold / resume
Adjust volume during a call/ ringer volume
- Press Volume Up to increase the volume
- Press Volume Down to decrease the volume
Reset the Headset
- Press and hold Mute button and then connect the Headset either to the charging cable or the Base Station
- Keep Mute button pressed for two seconds after connecting the cable
- These steps will lead to a reset of the Headset
WelcomeConsole-EXT – Extension module
Packing list
- 1 x Extension module
- 1 x RJ12 cable
Compatibility
- WP490 2015/ WP490G/ WelcomeConsole pre 2024
Features
- WP490EXT 2017: 40 Programmable BLF keys, 4.3” 272*480 COLOR Display
- WP490EXT pre 2017: 20 Programmable BLF keys; 4.3” 272*480 Graphical LCD with Backlight
- Powered by Wildix phone
- Up to 3 Modules Daisy-chain
Port description
- 2 RJ12 ports for data in and out
- AC Power Adapter jack: Input: AC 100-240V; Output: DC 5V/1A
Quick Installation Guide
Connection
Connect the EXT IN port of the extension module to the EXT port of the Wildix phone using RJ12 cable.
To connect another WelcomeConsole-EXT in chain, connect the EXT OUT port of the first extension module to the EXT IN port of the second extension module.
You can connect up to 3 extension modules in chain. In case you connect three modules, it’s necessary to connect the power adapter to the 3rd extension module (available on demand, code: PS-5V2A; also compatible with older version, code: PS-WP4X0G). Also in case you connect two modules + 1 WPEHS, it’s necessary to connect the power adapter to the 2nd extension module.
Note: The backlight settings of WelcomeConsole-EXT extension module are synced with WP490G 2016-2017, WelcomeConsole.
Configuration
Configure the BLF keys via Wildix Collaboration Settings -> Function keys.
After having configured 20 Function keys (BLF), proceed as follows:
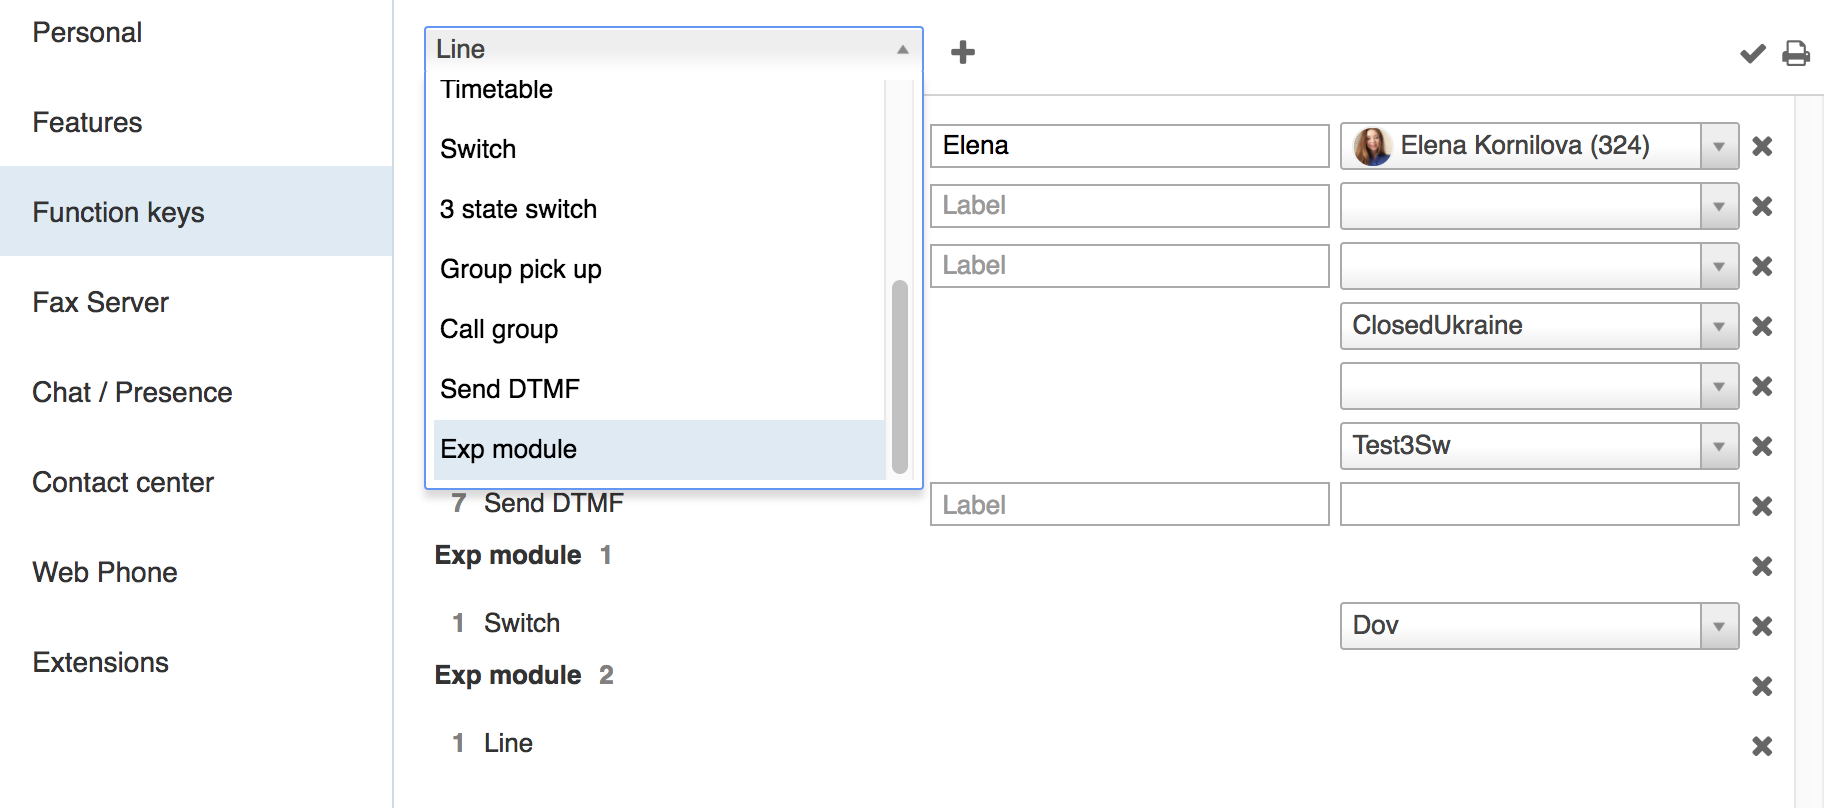
Click Exp module to add one or several extension modules (Add several Exp modules in case you have more than one extension modules connected in chain):
- Add Feature Keys to be monitored via the expansion module and move them under the desired section (under Exp module 1 / Exp module 2 / Exp module 3…)
- Click Save
WiFi Dongle
Notes:
- Min. required WorkForce firmware version 65.145.4.12
- Available only as a HWaaS item
Packing list
1 x WorkForce WiFi Dongle
- 1 x Type-C adapter
Compatibility:
- WorkForce
- WorkForce 5 (2024)
- WelcomeConsole 5 (2024)
Features
- IEEE802.11b/g/n/a/ac Wireless standard
- WPA-PSK/WPA2-PSK; WPA/WPA2 Encryption
- 2.4GHz and 5GHz Dual band frequencies
- Wireless speed up to 600 Mbps
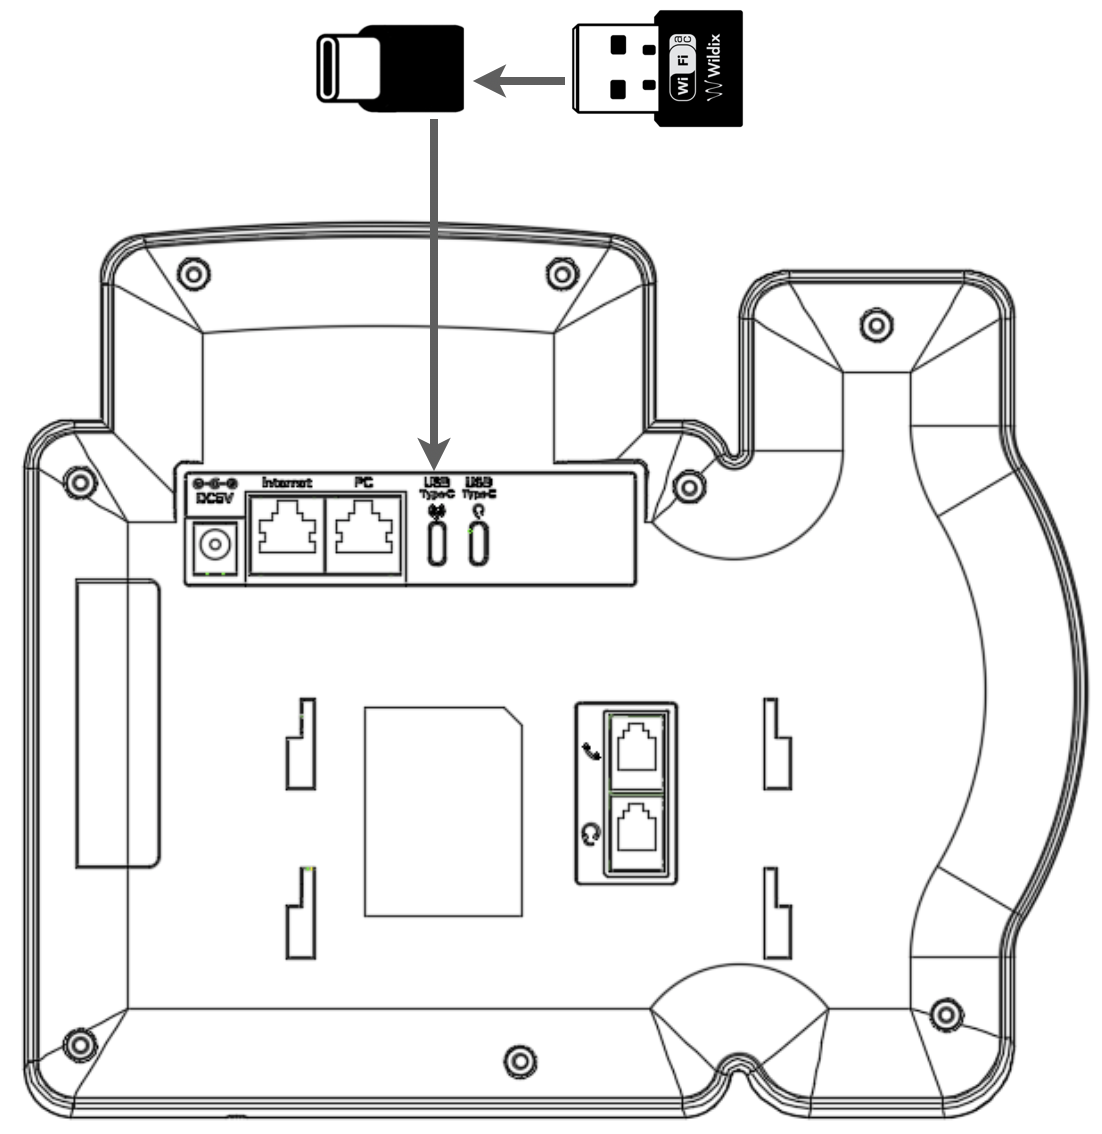
Quick Start Guide
WiFi Dongle Connection
- Connect WorkForce WiFi Dongle to Type-C adapter
Plug the Dongle into WorkForce USB Type-C port
Notes:
- Check that ACL rule “Can use” - “Advanced phone settings menu” is set in WMS -> Users -> Groups for users who need access to the feature
- WorkForce with a connected dongle requires at least 5V 2A power source
- Wi-Fi Bridge mode is not supported
Network connection
To connect WorkForce to a Wi-Fi network:
- Press Menu soft key on WorkForce
- Go to Network menu and select WLAN option
- Enable Wi-Fi connection: use Navigation keys or press Switch soft key to change Wi-Fi connection status from Disable to Enable; press Save soft key
- Searching for Wi-Fi Networks is in progress. After it is completed, there is a list of all available networks
- Select a Wi-Fi network from the list and press Connect soft key
- Enter password and press Save soft key
- WorkForce is now connected to the Wi-Fi network; the LED indicator blinks with fast short blue flashes during data transfer
WPEHS – Wireless Headset Adapter
Packing list
- 1 x EHS Adapter
- 1 x RJ45 cable
- 1 x RJ12 cable
- 1 x RJ9 spiral cord
Compatibility
- Compatible with WP480G/ WP490 2015/ WP490G/ WelcomeConsole
- Compatible with Jabra, Poly (formerly Plantronics) and Sennheiser wireless headsets
Compatible models:
- Jabra: PRO 9450, GN 9350e, GN 9330e, GN 9125
- Poly (formerly Plantronics): Savi 700 Series (710, 720, 730, 740, 745), CS500 Series (510, 520, 530, 540), Voyager Legend CS
- Sennheiser: DW Office (running firmware version 96 or later), SD Office
Features
- Answer and hangup calls remotely
- Powered by Wildix phone
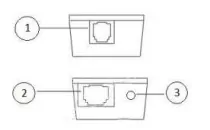
Port description
- 1 x RJ12 port (port 1 on the picture) to connect to Wildix phone
- 1 x RJ45 port (port 2 on the picture) to connect to Jabra headsets
1 x 3.5 mm Jack (port 3 on the picture) to connect to Poly (formerly Plantronics) headsets
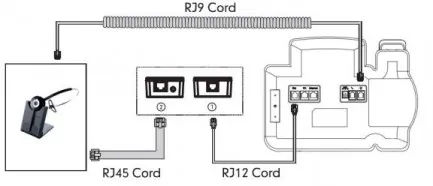
Connection
Note: In case you connect two extension modules + 1 WPEHS, it’s necessary to connect the power adapter to the 2nd extension module.
Jabra (GN Netcom):
Poly (formerly Plantronics):

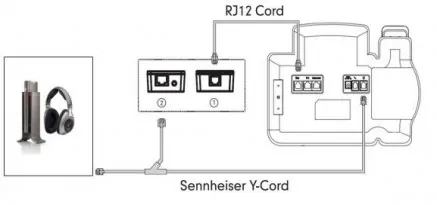
Sennheiser:
Firmware Upgrade (WelcomeConsole-EXT and WPEHS)
WelcomeConsole-EXT
Firmware update is included into provisioning and there is no need to do it manually.
WPEHS
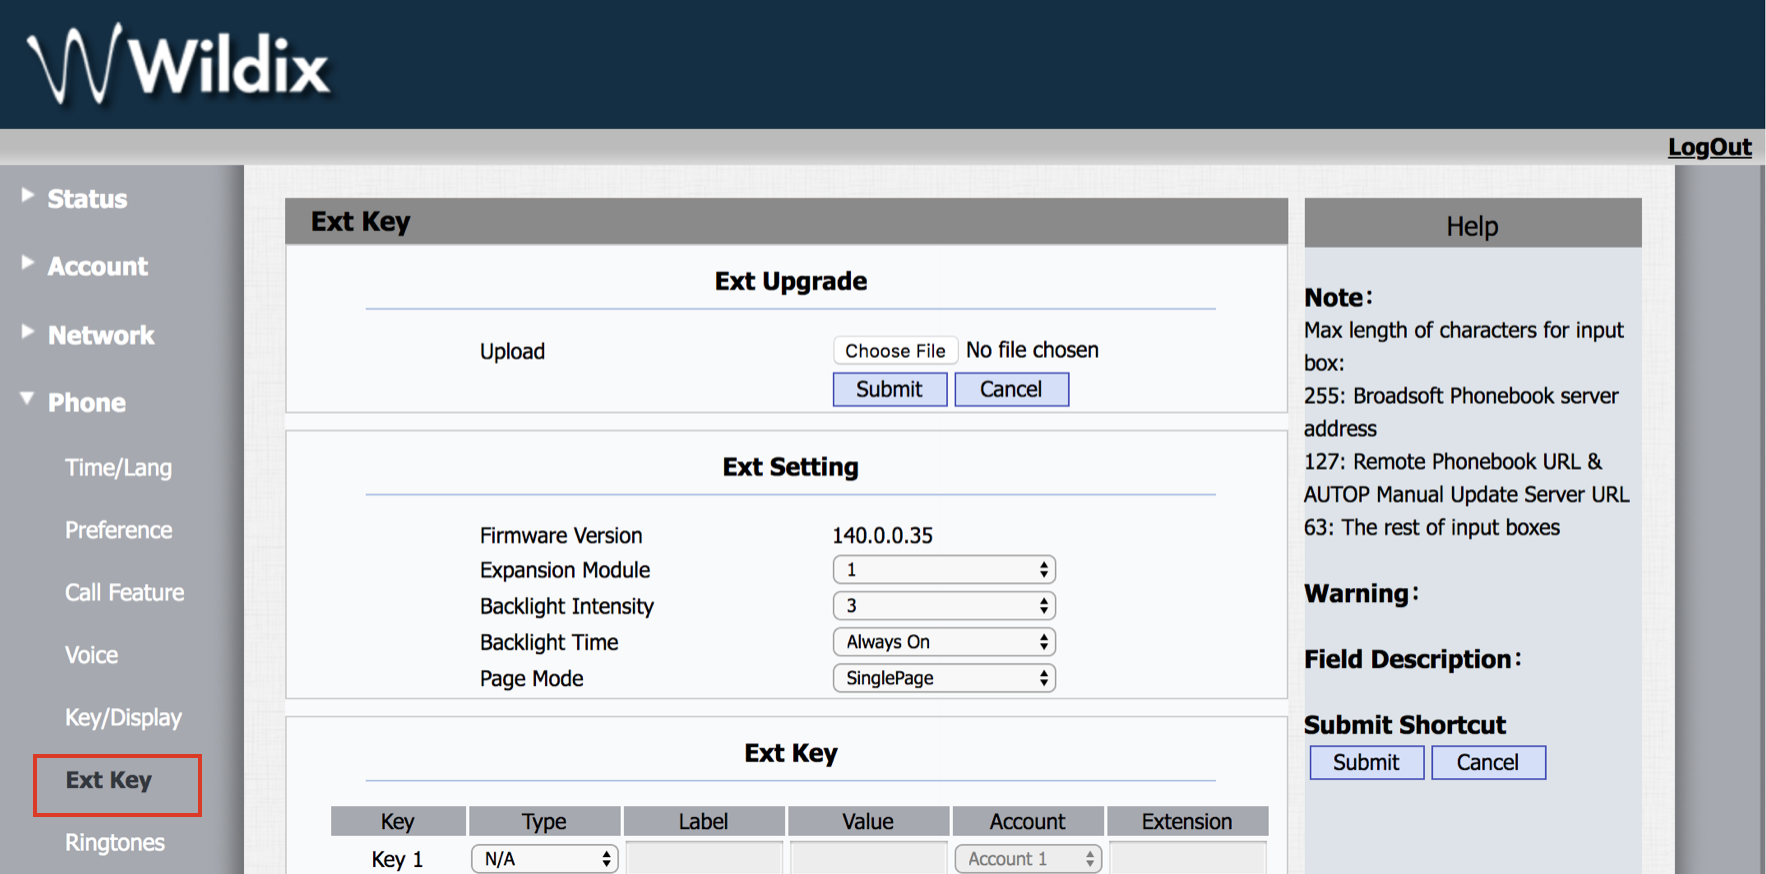
WPEHS firmware upgrade is performed via WP web interface.
Proceed as follows:
- Download the firmware file from the corresponding folder: https://drive.google.com/open?id=0B4EVs-56WfKZOV9NMmlVdmJiQlk (file with *.rom extension)
- Access the WP web interface
- Go to the menu Phone -> Ext Key -> Ext Upgrade -> choose the firmware file
- Click Submit
- Click Ok to confirm
After the upgrade is completed, the version is indicated in Firmware Version field: