How to configure Caller ID
This document explains how to set Caller ID (caller name and/ or caller number)
Created: February 2023
Permalink: https://wildix.atlassian.net/wiki/x/0QPOAQ
Caller ID allows the person being called to see the number and/or the name of the person calling them, when they have the correct equipment to receive the Caller ID information. Also, it is important to keep in mind that ultimately it is the carrier who is in control of the Caller ID name and number, see Carrier considerations.
Outgoing Caller ID
Outgoing Caller ID refers to the name and/or number that is sent to the carrier on each outgoing call, there are several ways to control both name and number in Wildix.
Caller ID can be set in multiple places and each of these places have a precedence in terms of which is used. In short, one setting can be overridden by another setting. The order of precedence is:
- Trunk
- Dialplan
- User (Office/Full Name)
So, if there is a Caller ID setting on the trunk level it will be used regardless of what is set at the other levels. Similarly, if there is a setting at the user level (office/full name parameters), it can be overridden by a setting at the Dialplan or trunk levels.
So, be sure that you don’t override the user setting somewhere else in the configuration unless you do in fact intend to do this. An example use case may be as follows:
For calls coming from a user John Doe (201), we may want to “normally” send Caller ID of John Doe 6145550201. However, if John dials 911, we want to override this Caller ID and send a different Caller ID (e.g. ABC Corp 6145551200). This is a typical use case so that the Caller ID number is set to a number that is registered with 911 to the correct location. And, it’s a typical use case of when you would override Caller ID information in one setting with the Caller ID from another setting as part of the overall design.
Method 1 - Basic Caller ID configuration (User)
The easiest way to configure both Caller ID name and number is setting “Full Name” and “Office Number” in the user configuration:
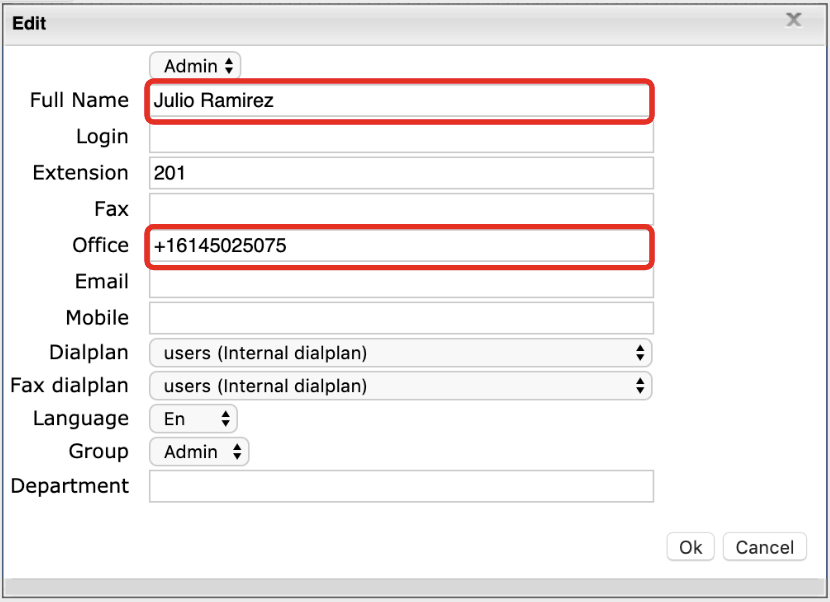
In this Case the Caller ID name “Julio Ramirez” and Caller ID number “+16145025075” will be sent to the trunk, this is a “per user configuration” and can be overridden by the trunk configuration or Dialplan configuration. Please see Method 2 Caller ID at trunk level, Method 4 - Caller ID at trunk level - Advanced, and Method 3 - Configure the Caller ID in the Dialplan.
It is possible to substitute the real user's number with false identity, both for internal and external calls. For this purpose it is possible to create in WMS virtual users to be used by employees as identity numbers. Read more about Identities feature: Identities Feature.
Method 2 - Caller ID at trunk level
Caller ID (number only) can be set at a trunk level, this is done in Trunk Settings in “From user” field:
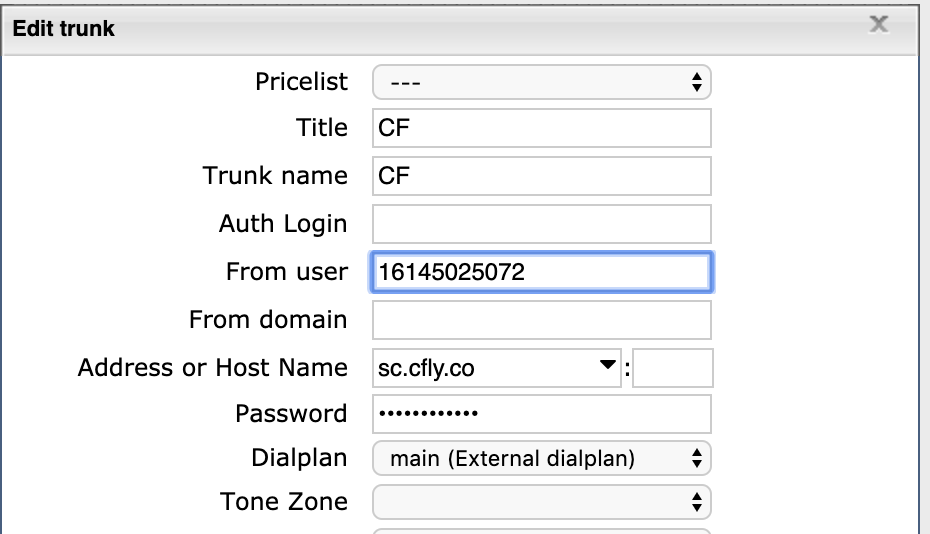
Doing it this way will override any user-level Caller ID number and even any Dialplan configuration related to Caller ID, Method 3 - Configure the Caller ID in the Dialplan, this can be useful if you are interested in only using one number regardless of who made the calls or if you only have 1 DID assigned by your carrier and want to guarantee you use the correct one no matter what the user configuration is.
Method 3 - Configure the Caller ID in the Dialplan
Go to Dialplan Rules; edit the outgoing Dialplan associated to the users, most probably “users” Dialplan, and use the Set “Caller number on trunk” application with the desired Caller ID number.

You may also modify the Caller ID name in the Dialplan using the Set “Caller name” application:

The last configuration can be useful if you want to avoid sending “Personal names” over the trunk, all of the calls that hit this Dialplan will use the specified Name when calling over the trunk. In this example, J Ramirez.
Both Set “Caller number on trunk” and “Caller name” applications can be used right after each other if desired.
Remember that this setting overrides the user settings but is overridden by trunk settings (From user).
Also, keep in mind that once the call is sent over the trunk it is the carrier who is in control of Caller ID name and number, please see Carrier considerations.
Method 4 - Caller ID at trunk level - Advanced
There may be the case in which the carriers request specific configurations for handling Caller ID. One of the most recurrent (if not the only) is when the trunk needs to be related to a specific “User” (completely different than your DIDs). In this case the carrier probably will expect the specific user name in the “from” field (where the Caller ID usually goes). In such cases the carrier needs to specify where the Caller ID should be set, it can be one of the following fields:
- P-Asserted-Identity
- P-Preferred-Identity
- Remote-Party-ID
In any case the chosen field needs to be set in Trunk configuration under Advanced settings in the option “CID Header”:
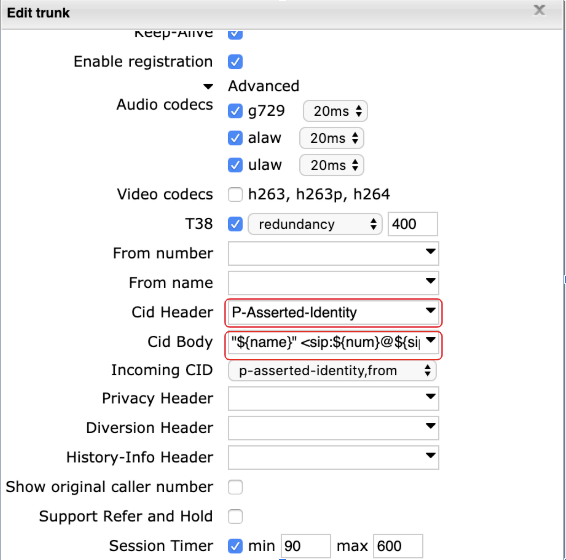
As you can see in the previous image, besides specifying which field to use to send Caller ID (P-Asserted-Identity in this example), you also need to specify the “Cid Body”. This is the value that will be sent in the the field chosen on “Cid Header”. Most of the time the suggested value for “Cid Body” will work as is and as it shown above. If for some reason you need to modify this value, here is an explanation of the default value:
"${name}" <sip:${num}@${sipdomain}>
- ${name}: variable that will contain either the calling user full name Method 1 - Basic Caller ID configuration (User), or the value set in “Caller name” application if used, Method 3 - Configure the Caller ID in the Dialplan.
- ${num}: variable that will contain either the calling user office number, Method 1 - Basic Caller ID configuration (User), or the value set in “Caller number on trunk” if used, see Method 3 - Configure the Caller ID in the Dialplan.
- ${sipdomain}: variable that will contain the carrier’s sip domain or IP address configured on the trunk.
You can replace any of these variables, only if strictly needed. Just remember to preserve the whole structure. Examples:
"NAME HERE" <sip:1234567890@domain.com>
"ANOTHER NAME HERE" <sip:0987654321@20.30.40.50>
Or some combination of hard coded values and variable values such as:
"${name}" <sip:0987654321@20.30.40.50>
Incoming Caller ID
The feature Worldwide Phonebook is enabled on CLASSOUND-enabled PBXs in the USA and Canada.
How it works: if the caller is not present in the company phonebooks, a lookup in external online resources is performed. More details on Worldwide Phonebook: Wildix Business Intelligence - Artificial Intelligence services
It is possible to disable Worldwide Phonebook via Global Dialplan Variable EXTCONTACTLOOKUP (=yes/ no). More details: Custom Global Dialplan Variables List.
In case the caller is found in the PBX phonebooks, Caller ID is displayed with “Company” field ("Organization" field in the Phonebook) for calls from trunks on Wildix devices.
Additionally it's possible to customize the way Caller ID name is displayed using "Set" Dialplan application. More details in Dialplan applications - Admin Guide (Dialplan application "Set").
Incoming Caller ID, name and number received on each incoming call, can also be manipulated if needed. Please keep in mind that incoming Caller ID name and number also depend on the carrier, please see Carrier considerations.
To manipulate incoming Caller ID you will be doing it in the Dialplan using Set applications as shown on Method 3 - Configure the Caller ID in the Dialplan.
In your incoming Dialplan (main by default), you can use Set “Caller name” to manipulate the incoming Caller ID name:

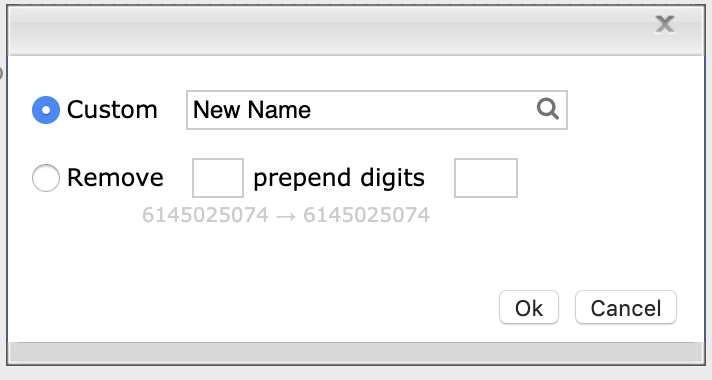
In the Dialplan example above, the Caller ID name will always be “New name” regardless of what the carrier sent. A variable is also available to manipulate so instead of completely overriding the Caller ID name you can for instance prefix/suffix it:
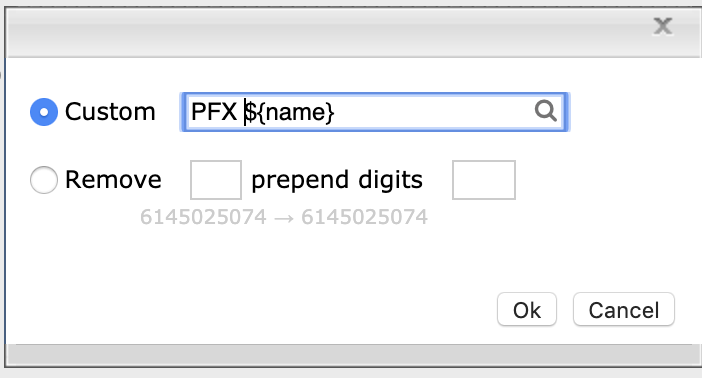
In the previous example the prefix “PFX” will be prefixed onto whatever name (variable ${name}) the carrier sends for the call. Example: if the carrier sends John Doe, the Caller ID name that will show up will be “PFX John Doe”.
Caller ID number can also be manipulated (if needed), for instance, if you don't want your users (receiving inbound calls) to know the real number a call comes from you can easily achieve it using the Set “Caller number” application:

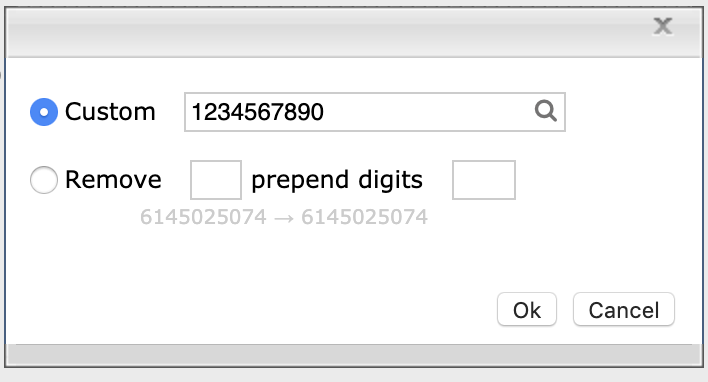
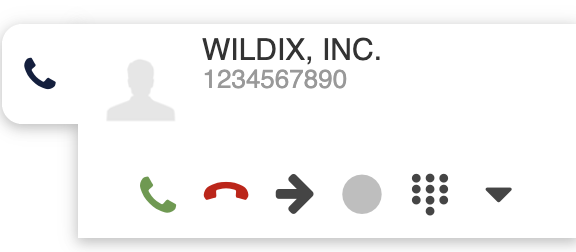
In this case the user(s) receiving the call will always see 1234567890 as the calling number regardless of what the carrier sends.
Both Set “Caller name” and “Caller number” can be used right after each other if needed.
Knowing the right variables you can further manipulate the Caller ID name/number, for instance. Sometimes besides knowing the source number of the call (incoming Caller ID number) your users also need to know what number was dialed to reach your Wildix system (your DID). Here is an easy way to achieve this:
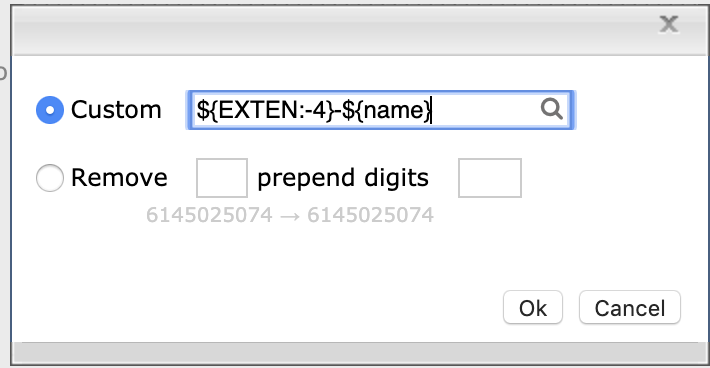
Set “Caller name”: ${EXTEN:-4}-${name}:
- ${EXTEN:-4}: Variable ${EXTEN} contains the value of the current Dialplan number, in this case the DID you are configuring (6145025074), with the syntax “:-4” at the end we use only the last 4 digits
- - : only a separator that will be shown to the user receiving the call
- ${name}: the original Caller ID name the carrier sends us on each call
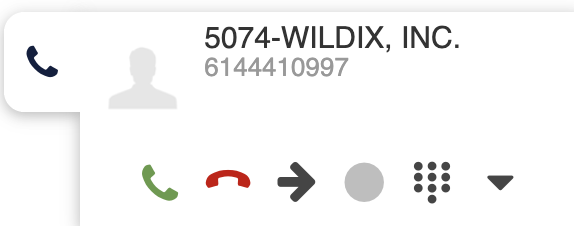
With this, the user receiving the call will know both the name (if available), the number calling (6144410997) and the dialed DID last 4 digits (5074 in this example):
Carrier considerations
Both the Caller ID number and name depend on the carrier. If there is a name and a number available for the call coming into the system your carrier should send that info within the call itself. As for the outgoing calls, Wildix is flexible enough to let you set both number and name in the Caller ID, even in a per call/user basis. However, once the call is sent it is up to your carrier to honor the information sent within the call. For instance, some carriers could set a default Caller ID number for all of your calls, no matter what you send to them. Whether you have X amount of DIDs or only one, your carrier could override the name you are sending so at the end (called party phone) it will be your company name instead of your users name. Please keep this in mind. Check the Caller ID name/number that you are sending to the carrier and if it is different than what the end user sees, check with the carrier!
Verifying Caller ID name and number “sent to” and “received from” the carrier
If you are familiar with pcap files and Wireshark, the easiest way to verify the information sent and received in each call is generating a trace (Settings -> Tools and utilities -> Generate a trace). Then make or receive some calls and analyze them on Wireshark.
This should be standard practice to ensure that you are sending the carrier what you want to be sending to the carrier for Caller ID name/number and that you are sending it in the SIP header that the carrier wants it.
Another option of validating the content of the SIP invite and the Caller ID name/number is to use sngrep to see the information in real time on your screen. Below is a description of how to utilize this tool to do it.
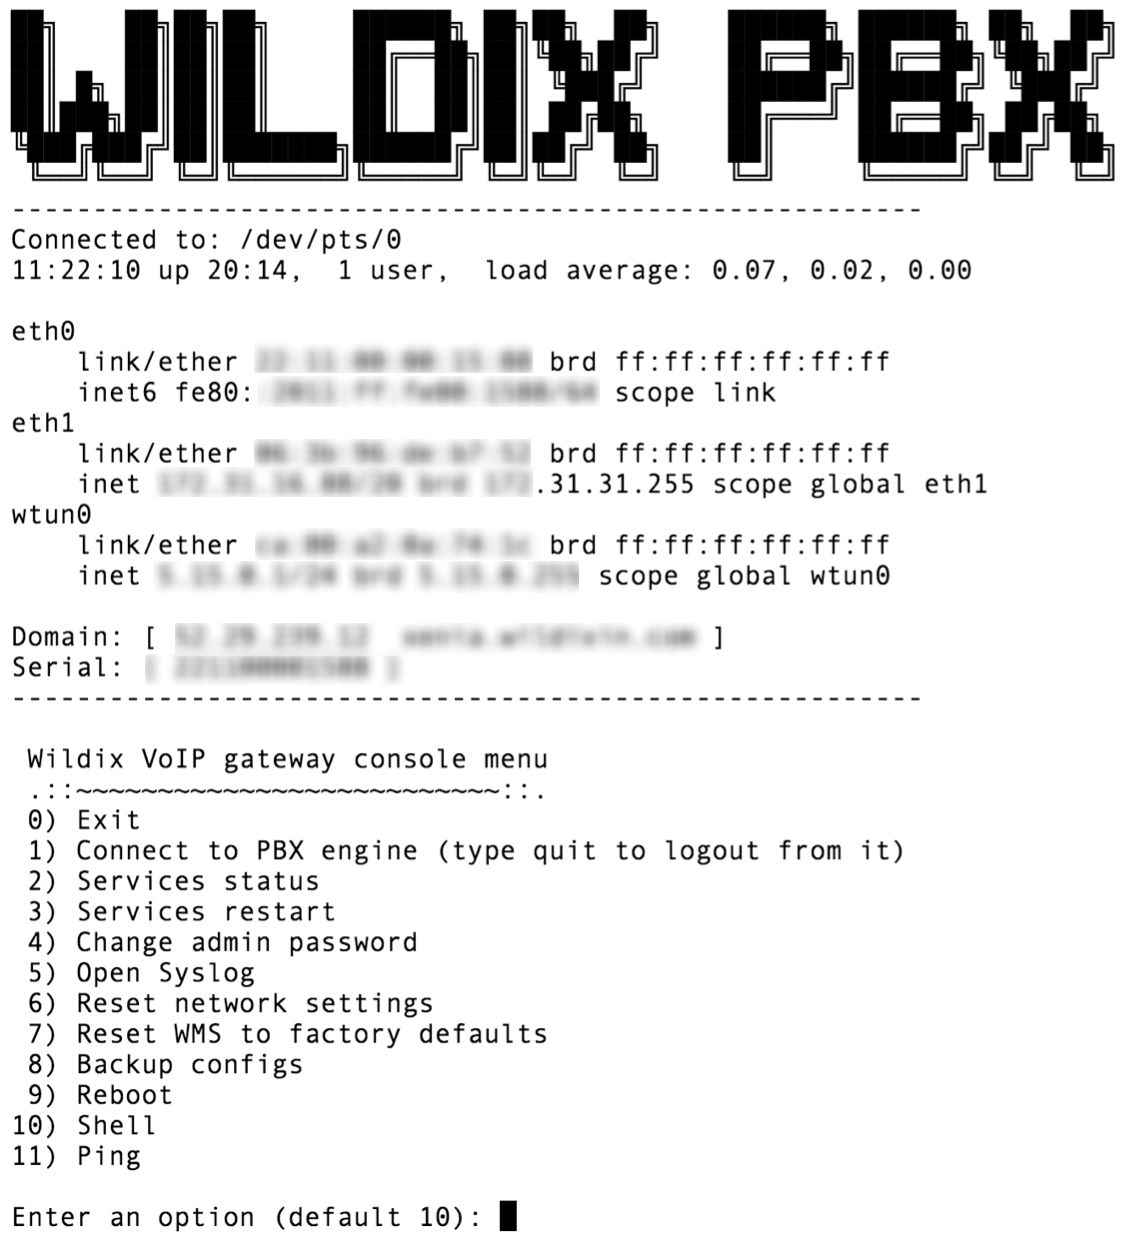
Go to https://YOURSYSTEMNAME.wildixin.com/terminal/ (you need to be already logged as admin or some other user with the right permissions) or use the terminal menu on your system (in the far right corner of your system’s menu):

In the new window select 10)Shell or just hit backspace (option 11 is the default):
Once in the shell you need to become root by executing “su” and entering the password:

As root execute “sngrep -c”, the -c is important to see only INVITEs, which is what we are interested in for this case.

Once sngrep is running make an outbound call (one that you are interested in confirming Caller ID sent):

You probably will see two INVITES for each outbound call, with your keyboard arrows highlight the second one and hit backspace, that will take you to the call details:
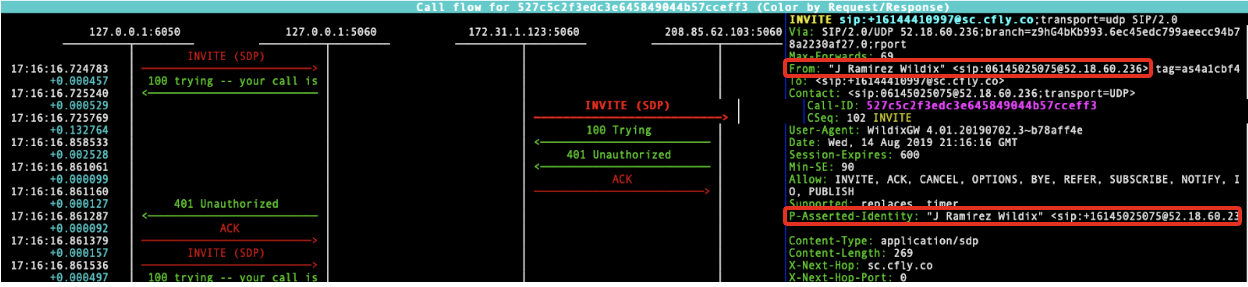
In the call details there will be (most probably) two flows, with your keyboard arrows select the INVITE going to your carrier’s IP (the flow on the right). Once highlighted, you should see the INVITE details on the right side of the screen. In the previous image, the Caller ID in the “FROM” fields should match the Caller ID name and number set in the User “Full name” and “Office number”. See Method 1 - Basic Caller ID configuration (User), or the Caller ID name and number set in the Dialplan, see Method 3 - Configure the Caller ID in the Dialplan, or the Caller ID name and number set on the trunk, see Method 2 Caller ID at trunk level. Finally, if Caller ID was set to any of the special fields, Method 4 - Caller ID at trunk level - Advanced, you should see that special field on the INVITE (as shown in the previous picture).
Requesting Support from your carrier
If you are having problems with your Caller ID, whether incoming or outgoing, and you confirmed that Wildix is sending the right information or receiving wrong information, you should contact your carrier. If possible start a trace from the web interface, make some tests, stop and download the trace. Even if you are not familiar with pcap files and Wireshark the file should be helpful to the carrier and provide evidence to your carrier. The carrier should then be able to provide you with some additional information about why they are not sending the Caller ID name/number forward.