Dubber Installation Guide
This guide explains how to install Dubber, a unified call recording and voice AI system, which can be integrated with Wildix.
Created: January 2022
Permalink: https://wildix.atlassian.net/wiki/x/ih7OAQ
Introduction
Dubber on Wildix allows SMBs and businesses to capture, record, and analyze 100% of calls within the organization, allowing them to maintain high standards, boost sales effectiveness, and unlock other possibilities of voice data.
Find more info on this page: https://www.wildix.com/dubber/
Requirements
- WMS version: 5.03 or higher
- UC-Essential license or higher
- Dubber account
Installation
Follow the below steps to configure Dubber integration:
Step 1. Upload scripts
Download the following scripts on your device:
Upload the scripts to /home/admin/ directory of the PBX using FileZilla, WinSCP, SCP, or another SFTP client.
Note: To be able to access file system via SFTP client, you need to enable SSH access in WMP.
Documentation: Enable SSH port on Cloud PBXs (optional)
Step 2. Create directory
Go to WMS -> open Terminal -> select the option 11 (Shell), login as super admin user and execute the following command:
bash /home/admin/dubber_deploy.sh
It creates /mnt/backups/dubber directory and populates it with scripts required for the configuration to function.
Step 3. Enter your Dubber account data
Input the following values (obtained in Dubber admin portal UI), into /mnt/backups/dubber/wildix_upload.php file:
- client_id
- client_secret
- username
- password
- environment
You can either use one of the text editors installed on the PBX (nano-tiny, vim), or edit the file before uploading it to the /home/admin/ directory (Step 1 of this guide).
Example:
$client_id = 't6zykpjghdyufngwiyu95pk9';
$client_secret = 'AkztHb6PTk';
$username = 'G-S3216574788';
$password = 'zGfpYirpohmezRmeqKrjJ';
$environment = "uk1";
Step 4. Configure Dialplan
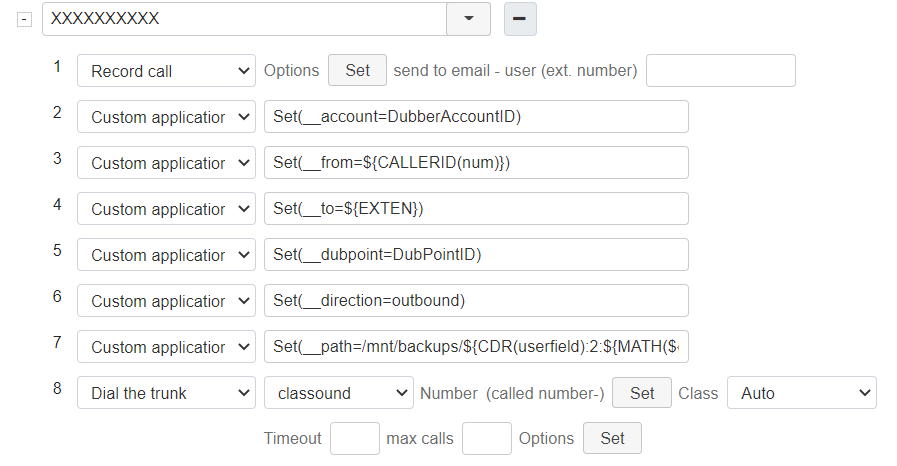
I. In the outbound / inbound Dialplan (depending on the users' needs), add the following Dialplan applications to populate the variables later used in the scripts:
- Record call application. Recording must be started before other custom apps. Otherwise, some of the variables will be empty.
Custom applications with the following values: Set(__account=DubberAccountID)
Note: DubberAccountID variable should be replaced with the customer’s Dubber account obtained on the Dubber website.
- Set(__from=${CALLERID(num)})
- Set(__to=${EXTEN})
Set(__dubpoint=DubPointID)
Note: DubPointID variable should be replaced with the customer’s DubPoint IDs, obtained on Dubber website.
Set(__direction=outbound)
Note: Direction value should be changed based on the setup, but ultimately it is just metadata for the visuals.
Set(__path=/mnt/backups/${CDR(userfield):2:${MATH(${LEN(${link2})}-10,i)}}0.mp3)
Note: make sure that “Quality of calls recordings” is set to mp3 in Dialplan -> General settings, otherwise change “.mp3” to “.wav” in the 7th application.

Then, you need to route the call:- In the below example, Dial the trunk application is used.
II. Next, add a hangup Dialplan entry “h” and Custom application with the following value:
- System(/mnt/backups/dubber/save_call.sh ${account} ${from} ${to} ${dubpoint} ${direction} ${path})

This executes the script after the end of the call.
Step 5. Process recording files and upload them to Dubber cloud
Add a cronjob to process recording files and upload them to Dubber cloud.
Execute the following command:
crontab -e
Add the following line in the file editor:
* * * * * /mnt/backups/dubber/process_files.sh > /dev/null 2>&1
- Save by pressing Ctrl+X.
Cronjob in the provided example is executed at the beginning of every minute, you can use crontab calculator to set it to a different value: https://crontab.guru/